Configuring AutoZone
Before you can begin using AutoZone, you need to configure R.O. Writer to interface with the AutoZone catalog.
This topic includes the following configuration steps:
Step 2 - Configure AutoZone as an R.O. Writer Supplier
- Step 2a - Create the AutoZone Supplier
- Step 2b - Configure the AutoZone Interface
- To Add an AutoZone Interface to an Existing Supplier
Step 3 - Add AutoZone to the Quick Launch and Smart eCat
Step 4 - Configure AutoZone as a Smart eCat Supplier
- Step 4a - Create the Coverage
- Step 4b - Download the Coverage File
- Step 4c - Add AutoZone to the Smart Buy List
Step 1 - Check Your License
The integration with AutoZone is a licensed feature. When you check your license details, you should see “AutoZone” in the Licensed Options section. If this feature is not included in the Licensed Options section, you may need to refresh your license.
If you would like to add this feature, please contact the R.O. Writer Sales team to update your license.
Step 2 - Configure AutoZone as an R.O. Writer Supplier
You need to create a supplier for AutoZone in R.O. Writer Configuration and then add an interface to that supplier.
Step 2a - Create the AutoZone Supplier
You need to create a supplier record for AutoZone in R.O. Writer Configuration.
NOTE: If you already have an AutoZone supplier, you do not need to create a new one. In fact, it may be better for your reporting and accounting if you add the new interface to your existing AutoZone supplier. However, only you can make that determination.
Complete these steps:
- Open R.O. Writer Configuration
 .
. - Click Configuration menu > Parts > Suppliers. The Suppliers window opens.
- Click the Add button at the bottom of the window (to the right of the Save button).
- Click inside the Supplier Code field and type in the three-character code you want to use for AutoZone (for example, "AZO").
- You can also enter a two-character code (for example, "AZ").
-
Click inside the Supplier field and type in the name you want to use for AutoZone.(This is the name that appears in most dropdown lists.)
- Click the Add button at the very bottom of the window. This saves the supplier and clears the fields.
You need to save the Supplier Code and Supplier name first and then enter the rest of the supplier details. - Select the AutoZone supplier in the Supplier dropdown list.
-
Complete the supplier information.
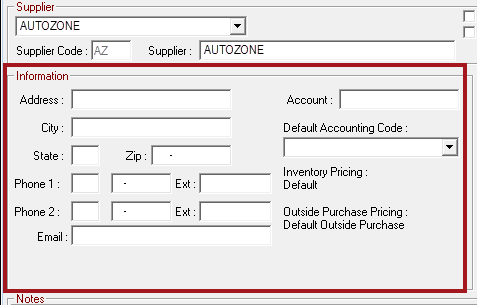
- Click the Save button to save all the supplier settings.
- Click Close to exit.
Step 2b - Configure the AutoZone Interface
The interface enables Smart eCat and Smart eOrder to connect to the AutoZone online catalog when searching for parts.
R.O. Writer cannot provide you with your account information; you must obtain your account information directly from the supplier.
Complete these steps:
- On the Supplier window, select the AutoZone supplier in the Supplier dropdown list.
-
In the
- The Suppliers window opens displaying AutoZone as the Supplier Name.
- In the Supplier Interface dropdown list, select AutoZone.
- The Connection Information for AutoZone appears in the bottom half of the window.
- Enter the Interface Name.
- Enter the interface information.

- Type in the PIN for your AutoZone account.
- This number is used to log you into the AutoZone catalog.
- You must obtain this information from AutoZone. R.O. Writer cannot provide your account information.
- This number is used to log you into the AutoZone catalog.
- Enter the Shop Email and Shop Phone Number for your account.
- If you enter your shop email and phone number here, this information is sent to AutoZone with each order.
- As a result, AutoZone can contact your shop directly about specific orders if there is an issue or error.
- Check the Primary box to make this interface the primary interface for AutoZone.
- Smart eCat always searches the primary interface for the supplier.
- Check Post Order to Accounts Payable (Optional).
- Click Save. The main Suppliers window appears with the AutoZone interface in the
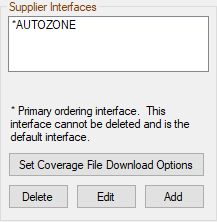
- Click the Set Coverage File Download Options button to determine how coverage files download. Automatic is recommended.
- Click Save to save the AutoZone supplier with the new interface.
To Add an AutoZone Interface to an Existing Supplier
If you already have an AutoZone supplier with a configured interface that uses IAP or AConneX, for example, and you do not want to create a new supplier for the new connection, you can open the existing AutoZone supplier and add another interface.
If you add a new interface to an existing AutoZone supplier that already has an IAP or AConneX interface, you must check the Primary box to use the new connection. If you add the new interface but do not mark it primary, Smart eCat will look for and retrieve parts from the old IAP or AConneX interface. This could cause confusion because of discrepancies between the two connection types.
Step 3 - Add AutoZone to the Quick Launch and Smart eCat
After the AutoZone supplier has been configured with an interface, you need to make the AutoZone catalog available from R.O. Writer main. In the General Options setting, you add AutoZone to the Quick Launch and Smart eCat.
You need to repeat the following steps on each workstation that accesses the AutoZone catalog.
Complete these steps:
- Open R.O. Writer Configuration .
- Click File menu > General Options.
- If the
-
In the Catalogs section, check the AutoZone box.
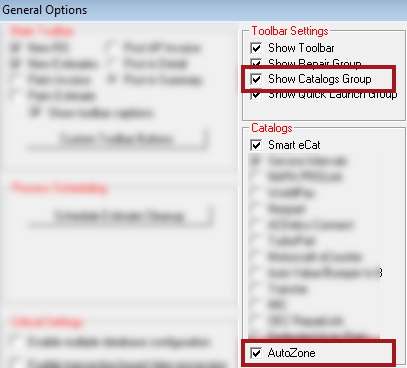
- Click OK. The General Options window closes.
- If the R.O. Writer main module is open, close it and reopen.
- The AutoZone button appears in the:
- Quick Launch.
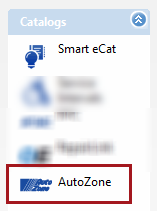
- Smart eCat toolbar.

- Quick Launch.
You are now ready to access and use the AutoZone catalog!
If you want AutoZone parts included in default Smart eCat searches, you need to configure the supplier coverage for AutoZone in Smart eCat Configuration.
Step 4 - Configure AutoZone as a Smart eCat Supplier
This step allows you to search the supplier's catalog in Smart eCat integrated searches.
Step 4a - Create the Coverage
After the supplier is created in R.O. Writer Configuration, you create the coverage for it in Smart eCat.
Complete these steps:
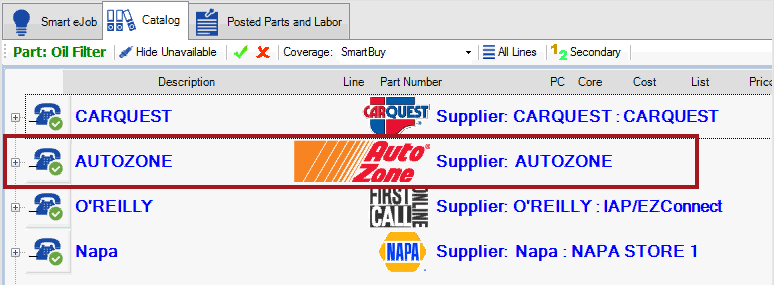
- Open Smart eCat by clicking the Smart eCat button in the Quick Launch. (You do not need to open a ticket first.)
- In the toolbar, click Configure
 . On the Catalog tab, the Smart eCat configuration tabs open to the Smart Buy tab.
 - Click the Coverage tab.
- Click the Add/Edit Coverages button
 .
. - Select Create a New Supplier and click Next.
- Type "AutoZone" in the Supplier field. This is the name of the supplier coverage.
- Click Finish. The Finish Supplier window opens.
- Click Perform Changes. The supplier coverage is created.
- Click Close. You are returned to the Coverage tab.
- Click Configure again to refresh.
- Click the Coverage tab. You will see the "AutoZone" supplier in the Suppliers Using Coverage list on the left side of the window.
To see AutoZone parts in searches, you need to download the coverage file from AutoZone.
Step 4b - Download the Coverage File
The coverage file is an .MCL file of part information from the supplier. You must download the coverage file to retrieve AutoZone parts in Smart eCat integrated searches.
Complete these steps:
- While Smart eCat is open, in the toolbar, click Update Coverages
 . The Suppliers Coverage Update table appears displaying the coverages configured in Smart eCat.
 - Select the AutoZone supplier coverage in the table.
- Click the Download and/or Update Coverage File for the Selected Coverage button
 .
. - Wait as the coverage file downloads to the AutoZone supplier coverage.
- When the download is complete, a prompt appears telling you the coverage was updated successfully.
- Click OK. The AutoZone coverage now contains the information from the AutoZone catalog.
You can now select AutoZone as a supplier in Smart eCat wherever the Supplier dropdown list appears. To add AutoZone to default Smart eCat searches, make sure the AutoZone supplier is included in the Smart Buy list.
Step 4c - Add AutoZone to the Smart Buy List
On the Options tab of Smart eCat Configuration, Smart Buy is the Default Coverage.
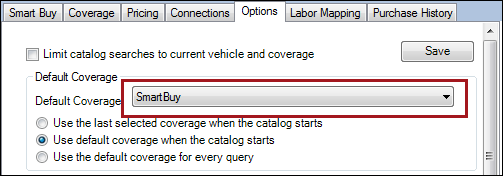
This means that the supplier coverages in the Smart Buy list are searched when a Smart eCat search is first performed. You can change the supplier coverage after the search.
Complete these steps:
- In the toolbar, click Configure . On the Catalog tab, the Smart eCat configuration tabs open to the Smart Buy tab.
- The AutoZone coverage should appear in the Included in Smart Buy column.
-
If not, use the left arrow to move the AutoZone coverage from the right column to the Smart Buy column.
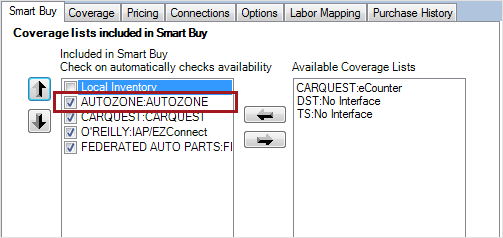
- Make sure the AutoZone coverage entry is checked.
AutoZone is now configured for integrated searches in Smart eCat.