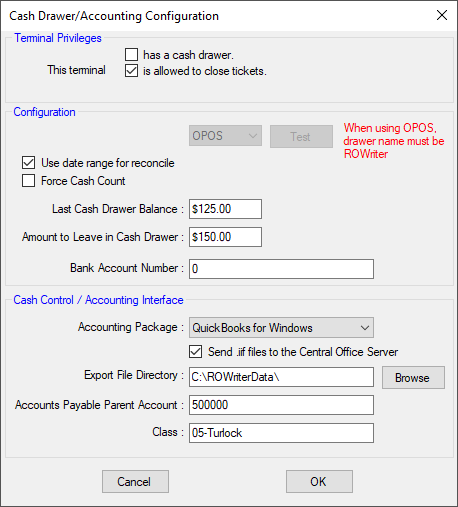
Cash Drawer/Accounting
If the Accounting Interface is being used, these options must be set up before using R.O. Writer.
NOTE: You can also open this window by clicking the Configuration toolbar button in the Accounting Interface module.
Terminal Privileges
The Terminal Privileges section determines the specific permissions of the current computer (terminal).
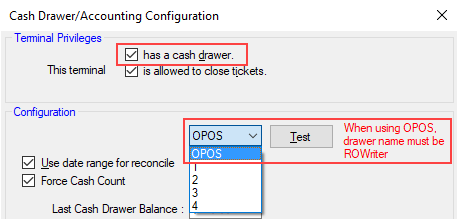
This Terminal Has a Cash Drawer
This setting is about whether or not the current machine is physically connected to a cash drawer; it is unchecked by default.
Check This Terminal Has a Cash Drawer only if the current computer (terminal) is physically connected to a cash drawer,
R.O. Writer supports the following cash drawer
- Non-OPOS cash drawers using an RJ11 plug with the BT-100U cash drawer trigger to connect the cash drawer to the computer.
- When using this setup, you must select the correct port number in the dropdown list under Configuration. Do not select OPOS!
- You do not need to run R.O. Writer as an administrator to use a cash drawer.
- MMF cash drawer, POS model number: MMF 226-125161872-04. This is an OPOS cash drawer.
- When using this cash drawer, you must
- Name the cash drawer "ROWriter".
Select OPOS in the dropdown list in the Configuration section.
- Run R.O. Writer as an administrator.
- For more information, please visit www.mmfcashdrawer.com.
- When using this cash drawer, you must
As always,
- Configure the cash drawer’s interface software as documented.
- In the Configuration section
- Select the correct comm port in the dropdown list
- Click the Test button when the computer is connected to the drawer. If R.O. Writer is connected to the cash drawer correctly, the drawer opens when the Test button is clicked.
This Terminal is Allowed to Close Tickets
Check This terminal is allowed to close tickets to allow the current machine to finalize repair orders.
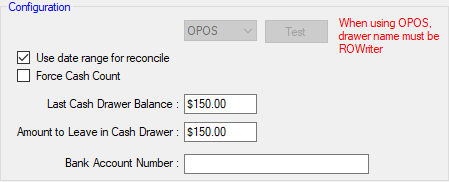
Configuration
This section describes the settings in the Configuration section.
Cash Drawer Comm Port
This dropdown list is active only if This Terminal Has a Cash Drawer is checked. The selection in this dropdown list tells R.O. Writer where to find the cash drawer.
- Select OPOS to use the MMF cash drawer, POS model number: MMF 226-125161872-04.
- Select the correct port number to use a non-OPOS cash drawer.
Test Button
The Test button opens the cash drawer if the correct port is chosen and R.O. Writer can communicate with the drawer.
Use Date Range for Reconcile
Check Use Date Range for Reconcile to allow entry of a date range when reconciling. Only check this box if you are careful never to use the same date range twice and do not skip days in between.
This is generally not recommended if you are exporting accounting information that will be imported into QuickBooks because 1) it cannot track what has already been posted, and 2) it is easy to duplicate information.
- When you use a date range in Reconcile, transactions do not get marked as posted and only the date of the transaction is used.
- When you don't use a date range in Reconcile, the Accounting Interface does not post by date.
Reconcile includes ALL transactions - regardless of date - that have not been posted to QuickBooks yet. When prompted to ask if the Reconcile report is correct and you answer Yes, the transactions included are marked as posted and cannot be posted again.
After transactions have been posted to QuickBooks, they are flagged as posted in R.O. Writer.
Force Cash Count
Check Force Cash Count to force the user to count and enter the correct currency amounts in each category on the Drawer Countdown tab in Reconcile rather than just enter the total amount.
NOTE: The Enter Individual Currency Amounts and Enter Total Cash in Drawer Amount settings do not appear on the Drawer Countdown tab.
Last Cash Drawer Balance
This is a cash drawer default.
The Last Cash Drawer Balance appears as the Beginning Cash Balance on the Drawer Countdown and Summary tabs of the daily Reconcile. The value cannot be edited in Reconcile, only here.
Amount to Leave in Drawer
This is a cash drawer default. This is the amount to leave in your cash drawer, which is the same as petty cash in QuickBooks.
The Amount to Leave in Drawer appears as the Amount to Leave in Drawer on the Summary tab of the daily Reconcile. The amount can be edited in Reconcile.
Bank Account Number
Enter the bank account number for the cash drawer.
Cash Control/Accounting Interface
The settings in this section are specifically for QuickBooks and therefore remain inactive until QuickBooks for Windows is selected as the Accounting Package.
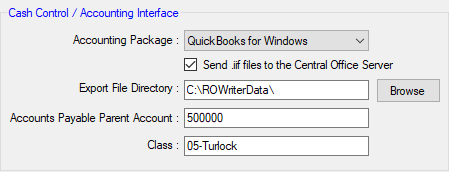
Accounting Package
The Accounting Package is the name of the accounting software you work with.
- Select QuickBooks for Windows if you use the Accounting Interface to export to QuickBooks.
- The rest of the settings in this section activate.
- Select No Accounting Interface If you use the Accounting Interface only for reporting or do not use the Accounting Interface at all.
- The settings in this section remain inactive.
Send .iif Files to the Central Office Server
This setting appears only if 1) you are licensed for Central Office, and 2) this is the Central Office store computer.
Check Send .iif Files... to send the .iif information to the database every time Reconcile is run. Then, the .iif information transmits to the Central Office server with every data transmission.
The .iif file can be exported in the Accounting Interface on the Central Office server computer.
Export File Directory
The Export File Directory is the folder where all .iff files created in the Accounting Interface are stored. This includes
- The accounts.iif file - The chart of accounts
- The ROW.iif and [LicenseNumber_DateTime].iif file - The files produced by the Reconcile process
Click the Browse button to navigate to the folder location. The folder can be
- C:\Program Files\Intuit\QuickBooks Pro
- Or the default directory in QuickBooks for importing files (assuming that QuickBooks is loaded on the computer you are importing from).
- A folder you create
- You can use a folder on the local computer such as C:\ROWriterData or a server mapped to the local computer such as R:\data\accounting.
NOTE: If you use Central Office, the .iif file is extracted from the database in the Accounting Interface on the Central Office server computer and saved to the Export File Directory location entered here.
Accounts Payable Parent Account
Enter the Accounts Payable Parent Account to be able to see your Accounts Payable total as well as the total for each supplier in QuickBooks. Individual supplier accounts will import as sub accounts under the Accounts Payable parent account.
In QuickBooks, you can click the collapse button to show only the Accounts Payable account total or click the expand button to see what is owed to each supplier.
If no Accounts Payable Parent Account is entered, Accounts Payable invoices import into QuickBooks as individual supplier accounts, which helps QuickBooks determine how much is owed to each supplier. However, this method can make it difficult to determine your total Accounts Payable liability.
NOTE: Do NOT use Inventory for the Accounts Payable Parent account. Inventory is an asset account, not a liability account like Accounts Payable. This would generate errors when importing into QuickBooks.
Class
In QuickBooks, classes give you a way to classify your transactions. The classes you create in QuickBooks appear in your class list. Some reports in QuickBooks can be selected by class.
The Class setting allows you to specify a class for R.O. Writer data imported into QuickBooks. This useful if you have a Central Office location where multiple stores import data into it. Each store can be set up to be a separate class, such as “Store1”.
To use classes in QuickBooks, complete these steps:
- Open QuickBooks.
- Click File menu > Preferences > Accounting Company Preferences.
- Check Use Class Tracking.
- Click Report for a quick report for a particular class.
NOTE: For regular reports, use the Filter button after selecting the report to select the class to print.