Configuring OEConnect RepairLink
Before you can begin using OEConnect (OEC) RepairLink, you need to configure R.O. Writer to interface with OEC. There are several steps to the configuration process:
Step 2 - Configure the OEC RepairLink Supplier
Step 3 - Add OEC to the Quick Launch
Step 4 - Log Into OEC RepairLink for the First Time
Step 1 - Check Your License
The integration with OEC RepairLink is a licensed feature.
When you check your license details, you should see OEC in your Licensed Options. If this feature is not included in the Licensed Options section, you may need to refresh your license.
If you would like to add this feature, please contact the R.O. Writer Sales team to update your license.
Step 2 - Configure the OEC RepairLink Supplier
You must create one OEC RepairLink supplier with an interface before you can place your first order with an OEC dealer.
Step 2a - Create the OEC RepairLink Supplier
You need to create one supplier for OEC in R.O. Writer Configuration.
Complete these steps:
- Open R.O. Writer Configuration
 .
. - Click Configuration menu > Parts > Suppliers. The Suppliers window opens.
- Click the Add button at the bottom of the window (to the right of the Save button).
- Click inside the Supplier Code field and type in the three-character code you want to use for OEC.
- Click inside the Supplier field and type in the name you want to use for OEC. This is the name that appears in most dropdown lists.
- Click the Add button at the very bottom of the window. This saves the supplier and clears the fields.
You need to save the Supplier Code and Supplier name first and then enter the rest of the supplier details. - Select the OEC supplier in the Supplier dropdown list.
-
Complete the supplier Information as necessary.

- Click the Save button to save all the supplier settings.
- Click Close to exit.
Step 2b - Configure the Supplier Interface
The interface connects you to the OEConnect RepairLink gateway where you can connect with OEC dealers.
R.O. Writer cannot provide you with your account information; you must obtain your account information directly from the supplier.
Complete these steps:
- On the Supplier window, select the OEC supplier in the Supplier dropdown list.
- In the Supplier Interface section, click the Add button.
- The Suppliers window opens displaying the interface settings.
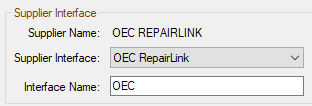
- Type in the Interface Name.
- Keep in mind that R.O. Writer assigns “OEC RepairLink” as the Interface Name when it creates suppliers for OEC dealers.
-
In the Supplier Interface dropdown list, select OEC RepairLink.
-
The OEC RepairLink Connection Information appears in the bottom half of the window.
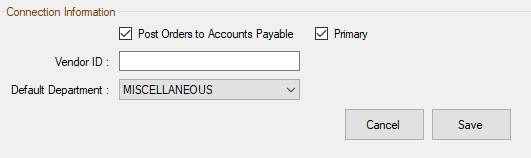
- Enter the Connection Information.
-
Check Post Order to Accounts Payable (Optional).
- When you check the order status and all invoices have a status of Complete, a Post to Accounts Payable window appears.
- Check Primary to make sure that this interface is the primary interface for OEC RepairLink.
- Enter the Vendor ID (Required).
-
Select the Default Department (Optional). This puts all parts posted to tickets in this department automatically.
-
Click Save.
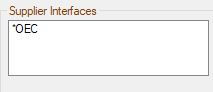
The Interface Name appears in the Supplier Interfaces section on the main Suppliers window.
- Click the Set Coverage File Download Options button to determine how coverage files download. Automatic is recommended.
- Click Save to save the OEC RepairLink supplier with the new interface.
OEC Suppliers
R.O. Writer creates suppliers for OEC dealers the first time you order from or post parts from those dealers to tickets. These are sometimes referred to as “OEC suppliers”; however, there can be only one OEC RepairLink supplier that connects to OEC RepairLink itself.
Step 3 - Add OEC to the Quick Launch
After the interface has been added to the OEC Supplier, the next step is to put the OE RepairLink button on the main window  .
.
NOTE: If you put OEC on the Catalogs section before there is an interface saved for the OEC supplier, an error appears when the OEC link is clicked because the link has nothing to connect to.
Complete these steps:
- Open R.O. Writer Configuration .
- Click File menu > General Options.
- Select Show Catalogs Group if it is not checked already.
-
In the Catalogs section, select OEC RepairLink.

- Click OK. The General Options window closes.
- Exit R.O. Writer.
- Open R.O. Writer.
-
The OE RepairLink button appears in the Catalogs toolbar
.
You are now ready to use OEC RepairLink!
Step 4 - Log Into OEC RepairLink for the First Time
Login credentials are not part of configuring the OEC supplier. As a result, you need to authorize each workstation in Smart eCat the first time you access OEC. After you log in successfully, the login credentials are saved. The next time you access OEC on that workstation, R.O. Writer automatically logs you into your account.
To Authorize the Workstation to Access OEC RepairLink
Complete these steps:
- On each workstation that uses OEC, open R.O. Writer main.
- Click OE RepairLink in the Catalogs section in the Quick Launch .
-
The Smart eCat window opens to the OEC login window.
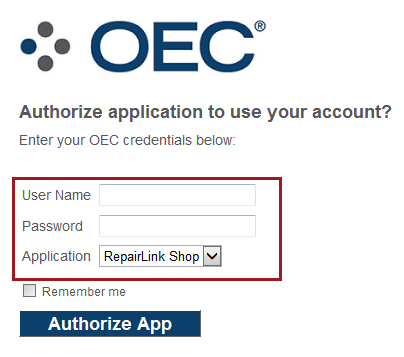
- Enter your User Name and Password. The Application is RepairLink Shop.
- Click the Authorize App button.
- The OEC RepairLink window appears on the Catalog tab of Smart eCat.
- The login credentials are saved and applied the next time you access OEC RepairLink.
You are now ready to use OEC RepairLink!