Printing Oil Stickers from Tickets
You can print oil stickers from tickets that include labor that is configured to print oil stickers.
There are two ways to print oil stickers from tickets:
- On-demand on the Other Information tab.
- Automatically when you print a work order or finalize the repair order.
NOTE: Oil stickers require a special printer that must be connected and configured on each workstation that prints oil stickers.
Printing Oil Stickers On Demand
Oil stickers can be printed from the Other Information tab at any time.
To Print an Oil Sticker
Complete these steps:
- Open the repair order.
- Click the Other Information tab > Print Sticker button.
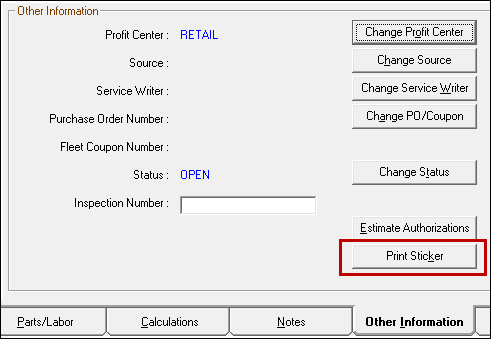
- The Print Oil Sticker prompt opens.
- Review the information on the prompt and edit it as needed.
- Click OK to print the sticker.
After the oil sticker is printed, the labor description is updated. Information in the labor description prints on the customer invoice.
Printing Oil Stickers Automatically
You can configure oil stickers to print automatically when processing a repair order. The oil sticker configuration window includes a Prompting setting you can use to customize when oil stickers print automatically.
The Prompting setting determines if R.O. Writer prints or prompts you to print an oil sticker from an open ticket if that ticket includes labor that is configured to print oil stickers.
|
New Oil Sticker Configuration |
|
|---|---|
|
|
|
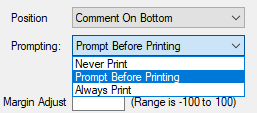
Prompt
When Prompt is selected, the Print Oil Sticker prompt appears when you print the work order or finalize the repair order.
The prompt appears only once.
- If you print a work order and print the sticker from the prompt, the prompt does not appear when you finalize.
- If you don't print a work order before you finalize, the prompt appears when you finalize.
- If you print a work order but cancel the sticker print, the prompt appears when you finalize.
Whenever the prompt appears, you can modify some of the oil sticker information before printing the sticker.
If you need to print the sticker again, you can click the Print Sticker button on the Other Information tab of the ticket.
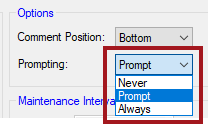
Always
When Always is selected, the oil sticker prints when you print the work order.
No prompt appears. You cannot review or edit the information on the sticker before printing. The sticker prints as configured.
The oil sticker prints only once; it does not print again when you finalize. If you do not print a work order, the sticker prints when you finalize.
If you need to print the sticker again, you can click the Print Sticker button on the Other Information tab of the ticket.
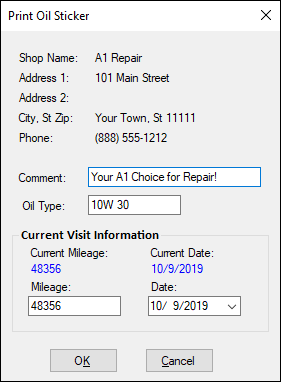
Print Oil Sticker Prompt
The Print Oil Sticker prompt appears
- When you click the Print Sticker button on the Other Information tab.
- If the Prompting setting in oil sticker configuration is set to Prompt and you print a work order or finalize a repair order that includes labor configured to print oil stickers.
The Print Oil Sticker prompt allows you to preview the oil sticker information and make changes before printing.
To Print an Oil Sticker From the Prompt
Complete these steps:
- When the Print Oil Sticker prompt appears, review the information on the prompt.
- Edit the information as needed.
- Click OK to print the sticker to the configured oil sticker printer.
After the oil sticker is printed, the labor description is updated. Information in the labor description prints on the customer invoice.
Oil Sticker Information on the Prompt
The information that appears on the Print Oil Sticker prompt is determined by your settings in oil sticker configuration.
Some information can be changed on the prompt and some information can be changed only in Configuration.
|
Item |
Description |
|---|---|
|
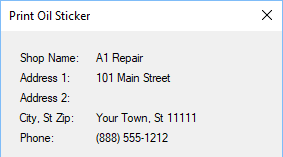
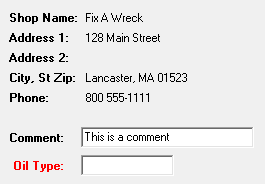
Shop Details |
This section displays the shop details saved in oil sticker configuration. You cannot edit this information on the prompt window.
|
|
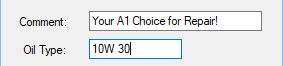
Comment |
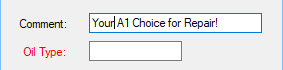
The Comment field displays the comment from oil sticker configuration. You can edit the comment before printing.
If you are printing a barcode on the oil sticker, the Comment field is empty and disabled on the prompt window. |
|
Oil Type
|
The Oil Type field shows the oil type from the labor operation or Smart Job. If no oil type was entered for the labor, the Oil Type field is red and the field is blank. You can type in the oil type.
|
|
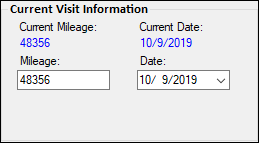
Current Visit Information
|
Current Visit Information appears if
This section displays the current visit information:
|
|
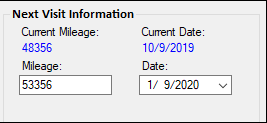
Next Visit Information |
Next Visit Information appears if
This section displays the current visit information and the recommended mileage and date for the next visit:
|
When the Oil Type is Blank
If the Oil Type is blank in the configured labor,
- When the Print Oil Sticker prompt appears, the Oil Type field is red and blank. You can type in a value at that time.
If the Oil Type remains blank when you print, the Oil Type line does not print on the sticker.
- When oil stickers print automatically, the Oil Type line will