Printing to a Physical Printer
Printing to a physical printer in your shop has never been easier.
As always, before you can print any document to a physical printer set up in your shop, you must do the following in Configuration for each client workstation:
- Set up the printer locations.
- Choose the form types for the ticket types you use (quotes, estimates, work orders, and repair orders).
When the configuration process is complete, you are ready to print to a physical printer.
NOTE: The Date to Print field has been removed from the process of printing to a physical printer. This means that the printed date is always the date you print the document.
To Print to a Physical Printer
Complete these steps:
- Click the print button on the R.O. Writer window.
- If you are printing a report, the data begins compiling.
-
The Output Selection window appears with the Printer tab showing.
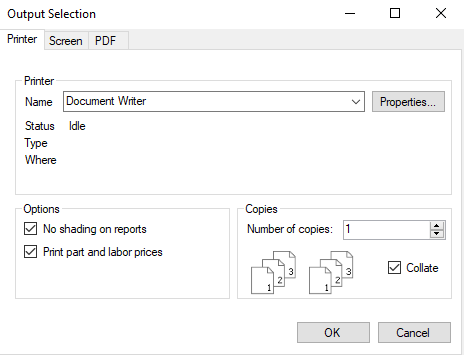
- In the Printer section, choose the physical printer in the Name dropdown list.
- The physical printer selected as the default for the type of document you are printing in the printer locations Configuration setting should be selected.
- The fields below the Name field display information about the selected printer:
- Status - The status (e.g., Idle, Printing, Out of Paper, etc.).
- Type - The kind of printer this is.
- Where - The port or IP address where the printer is located.
- Click the Properties button to see the window for the printer.
- If you are printing a report, decide if you want shading on the report:
- Check No Shading on Reports if you want no shading on the rows of the report.
- Uncheck No Shading on Reports if you want to shade every other row of the report.
- If you are printing an estimate, repair order, or customer invoice, decide if you want to print or suppress the prices for the individual parts and labor:
- Check Print Part and Labor Prices to print the prices.
- Uncheck Print Part and Labor Prices to suppress the prices.
This option applies only to reports and not any other type of document.
This option applies only to printed tickets and not to any other type of document.
- Review the Copies section: One is the default selection for Number of Copies.
- Change this number if you want to print more than one copy.
- Leave Collate checked to make sure each copy prints in the correct sequence; otherwise, you will need to collate the paper by hand manually.
- Click OK.