Processing Electronic Checks
Electronics checks allow you to process paper checks the same way you would a credit or debit card. After you enter the appropriate information from the check, the Merchant First Mile Middleware software contacts the bank and transfers the money.
E Check Payment Type
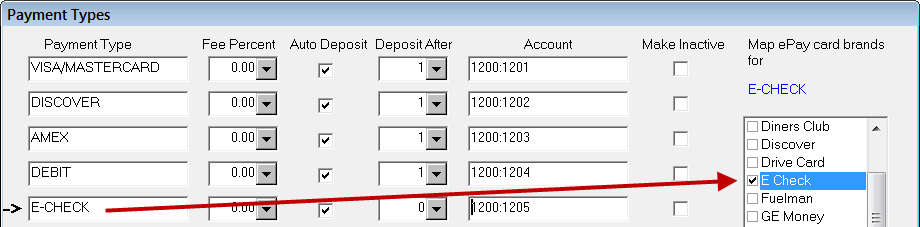
Make sure that the E Check universal payment type is mapped to an R.O. Writer payment type in the Configuration module (Configuration menu > Repair Order > Payment Types). You should give the R.O. Writer payment type a name that indicates that this is for an E Check.
Processing E Check Payments
Processing checks in a shop requires that the customer present a paper check. The check can be partially completed or blank. The check number is recorded during the transaction, so you should mark the paper check as “VOID” after the transaction and before handing it back to the customer.
Complete these steps:
- Start a repair order payment
- For an advanced payment, click the Calculations tab > Advanced Payment button.
- For finalize, click the Finalize button in the ticket toolbar.
-
On the Payment window, click the Check button and the Check Payment Details window opens.
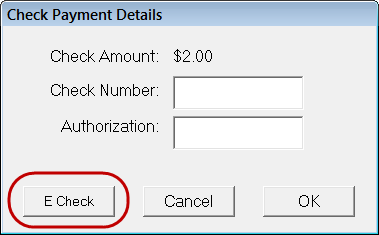
-
Click the E Check button. The Check Guarantee Sale window selected in First Mile Configuration opens with customer information already entered.
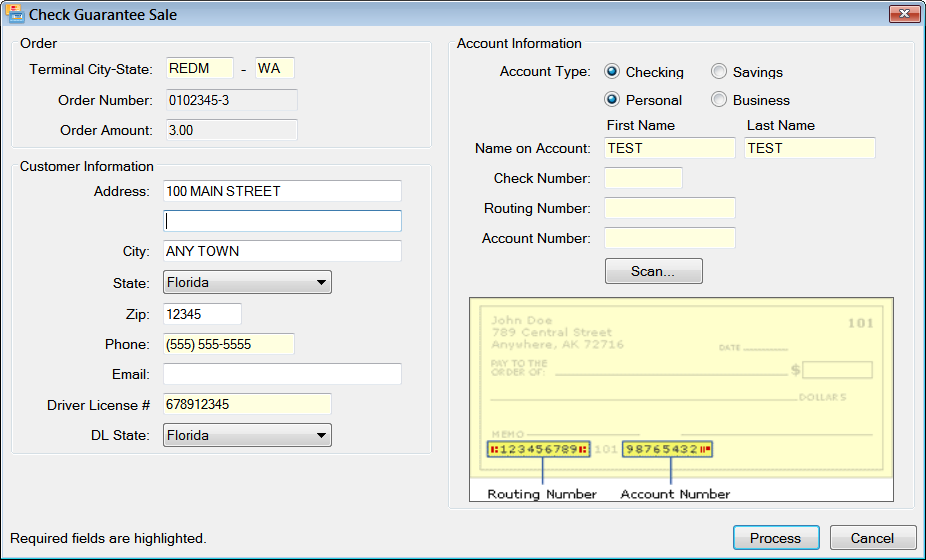
- Complete the required and desired fields; required fields are highlighted in yellow.
- The Check Guarantee Sale window requires you to use a check scanner (click the Scan button).
- The Paper Guarantee Sale window allows you to key in check information (click the Process button) or use a check scanner (click the Scan button).
- Click the Process button. The required fields are verified.
- If any required fields are incomplete, a prompt window appears and the missing information is highlighted.
- When all required fields are complete, Merchant Partners processes the check.
-
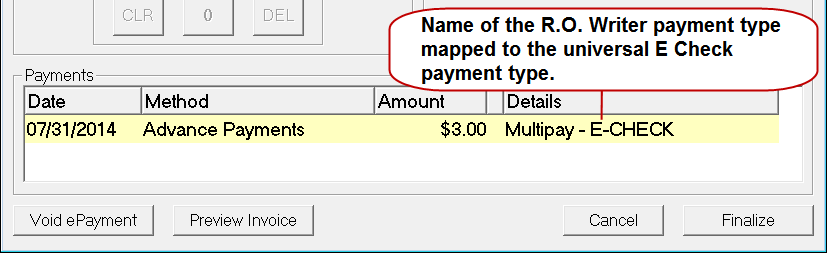
When the transaction is processed successfully, the payment appears in the Payments section of the R.O. Writer Finalize window.
Check Guarantee Sale Window
The most common electronic check processing window selected on the ACH Tab in First Mile Configuration is Check Guarantee. This is the window that opens when you choose to pay by electronic check.
Order Section
The Order section provides information about the repair order associated with the current transaction.
Terminal City-State
This information is populated with the Terminal City and State entered in First Mile Configuration. These fields can be edited so you can enter another terminal city and state if you need to.
This information is required for all point of purchase transactions.
Order Number
The Order Number is the repair order number. This field cannot be edited.
If more than one payment of any kind is made on a repair order, this number is appended with the sequential number of the payment.
For example, if 10000 is the repair order number:
- The Order Number for the First payment = 10000
- The Order Number for the Second payment = 10000-2
- The Order Number for the Third payment = 10000-3
Order Amount
By default, the Order Amount is the amount in the Balance Due field on the payment window at the time the Check button is clicked.
You cannot change this amount on this window. If you need to change the amount, click the Cancel button and enter a new amount in the Balance Due field. Then, click the Check and E Check buttons and the new amount will appear in this field.
Account Information Section
All fields in the Account Information section are required.
Account Type
The Account Type is the type of account the check is being drawn from. Ask the customer if this is a checking, savings, personal, or business account and select the appropriate option.
Name on Account
The Name on Account is the first and last name of the account holder.
These fields are automatically populated with the customer’s name from the repair order. However, you can type in a new name if someone other than the customer is paying.
Check Number
The check number is what makes this transaction unique. It appears in the upper right corner of the check.
Routing Number
A routing number is a nine-digit number in the lower-left corner of the check. Routing numbers identify the financial institution that holds the account.
When R.O. Writer launches the transaction, it searches for the routing number first. After it finds the appropriate institution, it searches for the account number.
For more information about routing numbers, click the following link: http://www.routingnumbers.org/.
Account Number
This is the number immediately to the right of the routing number in the lower-left corner of the check. This is the number of the account the money is to be transferred from.
Scan button
Click the Scan button to notify R.O. Writer that you are about to scan a paper check in the check reader machine. R.O. Writer searches for the device and then initiates the financial transaction.
NOTE: The Scan button appears on the Paper Guarantee Sale window only if a check reader machine is connected to the computer.
Customer Information Section
The Customer Information section displays the address of the customer. The information is pulled in from the repair order. You can adjust the address here if you need to.
Address, City, State, Zip, Phone, and Email
This information is automatically populated from the repair order. You can edit these fields if you need to.
Driver License #
If you need the customer’s driver license information, ask the customer for the number, and enter it here.
SSN
If you want or need the customer’s social security number, ask the customer for number, and enter it here.