Configuring Tire Quote
The Tire Quote window does not require much configuration; however, you must configure R.O. Writer so that Tire Quote searches retrieve the correct information.
Watch the video below to see how to configure Tire Quote.
The major steps are:
Step 1 - Add Tire Quote in the Quick Launch
Step 2 - Create the Tire Group
Step 3 - Configure the Tire Suppliers
Step 4 - Configure Tire Packages
- Tire Package Step 1 - Create Parts Kits
- Tire Package Step 2 - Create Labor Operations
- Tire Package Step 3 - Attach Parts Kits to Labor Operations
- Tire Package Step 4 - Select the Labor Operations in Tire Quote Options
Step 5 - Set Other Tire Quote Options
Step 6 - Configure Tire Parts in Local Inventory
Step 1 - Add Tire Quote in the Quick Launch
Check the Tire Quote box in the Configuration module: Configuration menu > File > General Options> Quick Launch section.
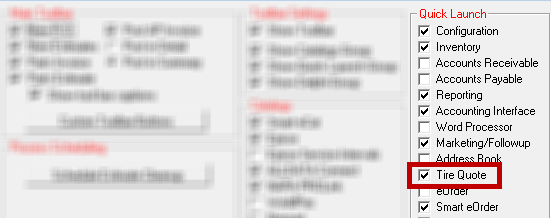
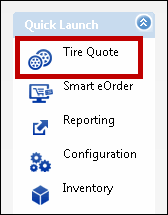
The next time you launch R.O. Writer, the Tire Quote button is visible in the Quick Launch.
Step 2 - Create the Tire Group
Tires must be in the tire group to be included in Tire Quote searches. The tire group is a Parts Department Group specifically for tires; it should include all parts departments for tires.
For more details, click the following link: Tire Group for Tire Parts.
Step 3 - Configure the Tire Suppliers
You need to create the supplier with working interfaces that access the supplier's catalog. R.O. Writer support interfaces for the following tire suppliers for Tire Quote:
Prerequisites
- The tire supplier must be included in your license.
- Each tire supplier interface is a license feature. When you check your license details, you should see these interfaces in your Licensed Options. If these integrations are not included in your Licensed Options, you may need to refresh your license.
- If you would like to add one or more of these interfaces, please contact the R.O. Writer Sales team to update your license.
- You mush obtain the interface connection information from the supplier.
- R.O. Writer cannot provide you with the connection information you need from your supplier.
To Use Supplier Pricing for Tire Suppliers
The connection information for tire suppliers includes a Use Supplier Pricing setting.
When Use Supplier Pricing is checked, the price in Tire Quote for the supplier matches the price you would see when logging into your account on the supplier's website. R.O. Writer's pricing matrix or other pricing settings are replaced by the supplier's pricing for your account.
Remember that the supplier’s price that appears in Tire Quote matches the supplier's price for your login credentials. This is not always the price a customer would see when accessing the supplier's website.
To Configure ATD with an Interface
R.O. Writer supports and integrates with ATDConnect 3.4.
ATDConnect operates in real-time, which enables you to check the most current inventory at any time. No information is added to your current inventory tables through this interface.
NOTE: ATDConnect replaces an older application named “American Tire Internet Update for R.O Writer” that was used to interface with ATD when no direct interface was available. If you are currently using this application, we highly recommend that you switch over to ATD Connect.
R.O. Writer cannot provide you with your account information; you must obtain your account information directly from the supplier.
Complete these steps:
- Open R.O. Writer Configuration
 .
. - Click the Configuration menu > Parts > Suppliers.
- On the Suppliers window, click the Add button at the very bottom of the window.
- Enter an alphanumeric Supplier Code. You can enter up to three characters. ("ATD" is recommended.)
- This is the code used to identify the supplier on the Tire Quote window.
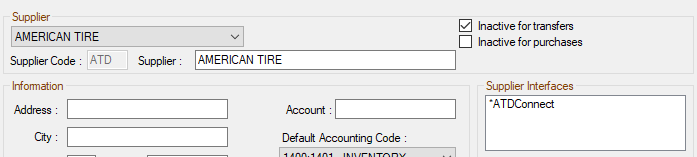
- Enter the name of the supplier in the Supplier field. ("American Tire" is recommended.)
- Complete the rest of the supplier information and click Save.
- Click the Add button in the Supplier Interfaces section.
- The interface window opens displaying "American Tire" as the Supplier Name at the top.
- In the Supplier Interface dropdown list, select ATD Connect. The Connection Information for ATD appears in the bottom half of the window.
- Type in the Interface Name. ("ATDConnect" is recommended.)
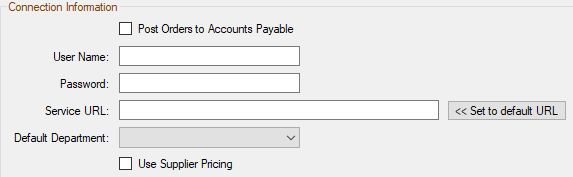
- Enter the connection information in the bottom half of the window.
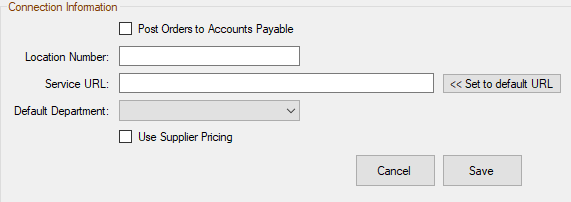
- Enter the interface information you obtained from ATD:
Location Number - The interface supports and integrates with ATDConnect 3.4, which uses only the Location ID to identify both your shop and your account.
- Service URL - Click the Set to Default button to enter the default URL for ATDConnect.
- Choose the Default Department. The parts department you select must be in the tire group.
- Creating a parts department specifically for the supplier is recommended; e.g., "TIRES-ATD".
- Creating a parts department specifically for the supplier is recommended; e.g., "TIRES-ATD".
- If you want to use your pricing from ATD, check the Use Supplier Pricing box.
- Click Save. The Supplier window appears with the Interface Name in the Supplier Interfaces section.
To Configure Carroll Tire with an Interface
R.O. Writer cannot provide you with your account information; you must obtain your account information directly from the supplier.
Complete these steps:
- Open R.O. Writer Configuration .
- Click the Configuration menu > Parts > Suppliers.
- On the Suppliers window, click the Add button at the very bottom of the window.
- Enter an alphanumeric Supplier Code. You can enter up to three characters.
- This is the code used to identify the supplier on the Tire Quote window. ("CO" is recommended.)
- Enter the name of the supplier in the Supplier field. ("Carroll Tire" is recommended.)
- Complete the rest of the supplier information and click Save.
- Click the Add button in the SupplierInterfaces section.
- The interface window opens displaying the "CARROLL TIRE" as the Supplier Name.
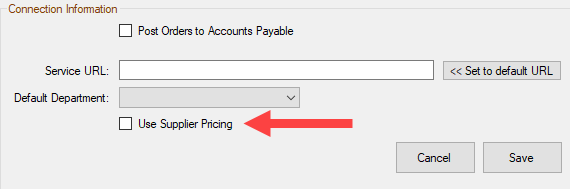
- In the Supplier Interface dropdown list, select Carroll Tire Online. The Connection Information for Carroll Tire appears in the bottom half of the window.
- Type in the Interface Name. ("Carroll Tire Online" is recommended.)
- Enter the connection information for the interface in the bottom half of the window.
- Enter the following information from Carroll Tire:
- User Name
- Password
- Service URL - Click the Set to Default button to enter the default URL for Carroll Tire.
- Choose the Default Department. The parts department you select must be in the tire group.
- Creating a parts department specifically for the supplier is recommended; e.g., "TIRES-CARROLL".
- If you want to use the supplier’s pricing, check the Use Supplier Pricing box.
- Click Save. The Supplier window appears with the Interface Name in the Supplier Interfaces section.
To Set the Order of the Supplier Links in Tire Quote
Each time you configure a new tire supplier, its supplier link appears below the search results in Tire Quote. To set the sequence of supplier links, open the Tire Supplier setting in Tire Quote.
Step 4 - Configure Tire Packages
You can configure up to four pricing packages for Tire Quote. Ideally, you would create a pricing package for the most common types of installations. For example, you could create the following packages:
- Basic Mount & Balance for most common tire installations.
- Large Mount & Balance for installations of large tires, usually on trucks.
- Difficult Mount & Balance for difficult installations.
- Premium Mount & Balance for "top of the line" installations.
Each pricing package must contain two main components:
- A parts kit that includes all the parts - other than the tire - to complete the installation such as valves or wheel weights.
- A labor operation that includes the labor for each type of installation.
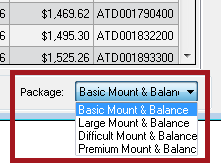
In Tire Quote, you'll see the price of one tire, the price of that tire with the package applied, then the price for the total quantity with the package applied. As you select different packages, the package and total prices adjust accordingly.
There are four steps to creating price packages for Tire Quote:
- Tire Package Step 1 - Create Parts Kits
- Tire Package Step 2 - Create Labor Operations
- Tire Package Step 3 - Attach Parts Kits to Labor Operations
- Tire Package Step 4 - Select the Labor Operations in Tire Quote Options
Tire Package Step 1 - Create Parts Kits
You can create however many parts kits you need, but you can only use four at one time. Parts kits should include all parts required for the type of installation you want to offer.
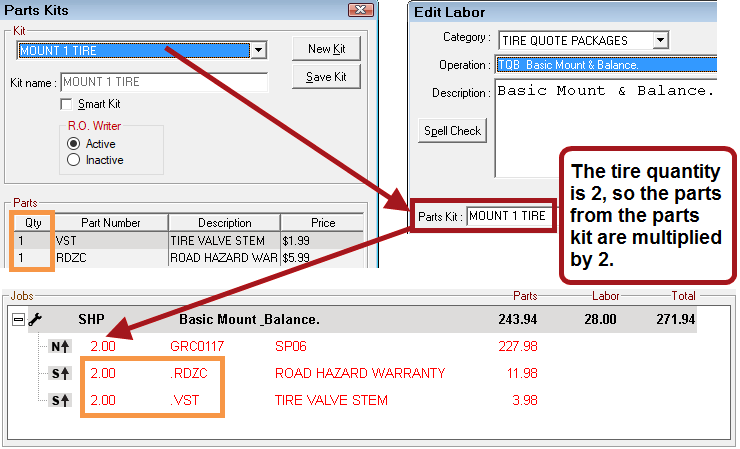
The quantity of each part should be one.
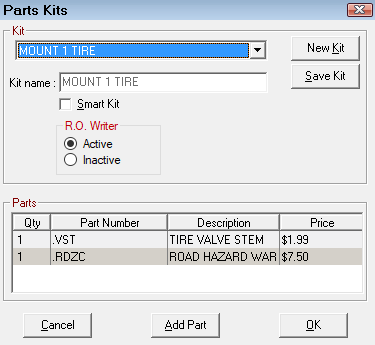
Tire Quote will multiply the number of each part in the kit by the number of tires selected for the open ticket.
Fees and Tire Part Kits
Any fees added to the tires or other parts in Inventory are automatically calculated with the price of the tire(s) or part(s).
Some shops add fees to the tire itself and some like to add tire fees as part numbers from Inventory.Those should also be added to the parts kit. You could also have a valve stem part that had an Environmental disposal fee, while the tires themselves in Inventory would have the State Tire Tax.
Tire Package Step 2 - Create Labor Operations
To make things easier to track, set up one category for Tire Quote labor operations. You could even name that category something like "Tire Quote Packages" to distinguish it from all other categories.
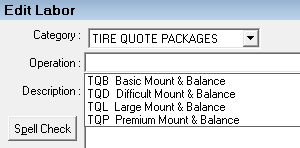
In the Tire Quote category, you can create however many labor operations you need, but only four can appear in the Packages dropdown list in Tire Quote itself.
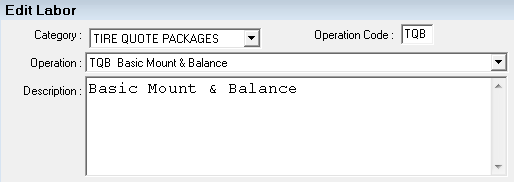
- The name of the labor operation is the name of the package in Tire Quote.
- If you are creating labor operations for different types of installations, adjust the labor rates as necessary.
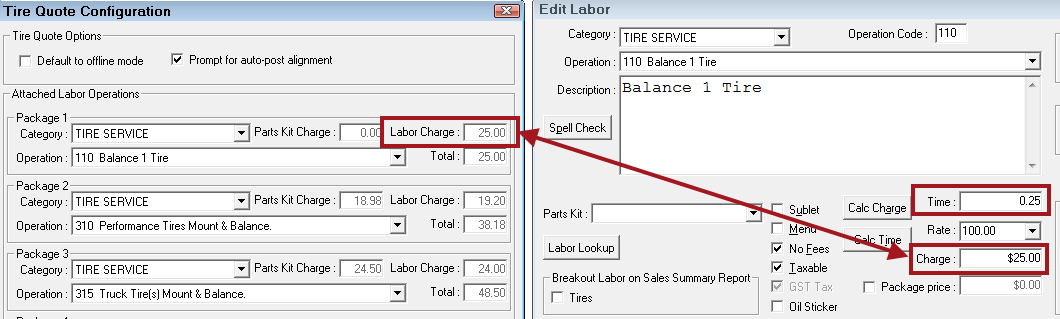
Labor Charge
The labor charge is calculated as the Charge amount X the tire quantity. This allows you to charge a flat fee for tire labor and multiply it by the quantity.
For example, if the labor operation used for the tire package is configured as follows:
- Time = .25
- Charge = $25
If this package is selected and four tires are posted to a ticket, the
- Billed Time = 1 hour (.25 X 4)
- Charge = $100 ($25 X 4)
Essentially, this makes the labor charge on the labor operation in the tire package a flat fee.
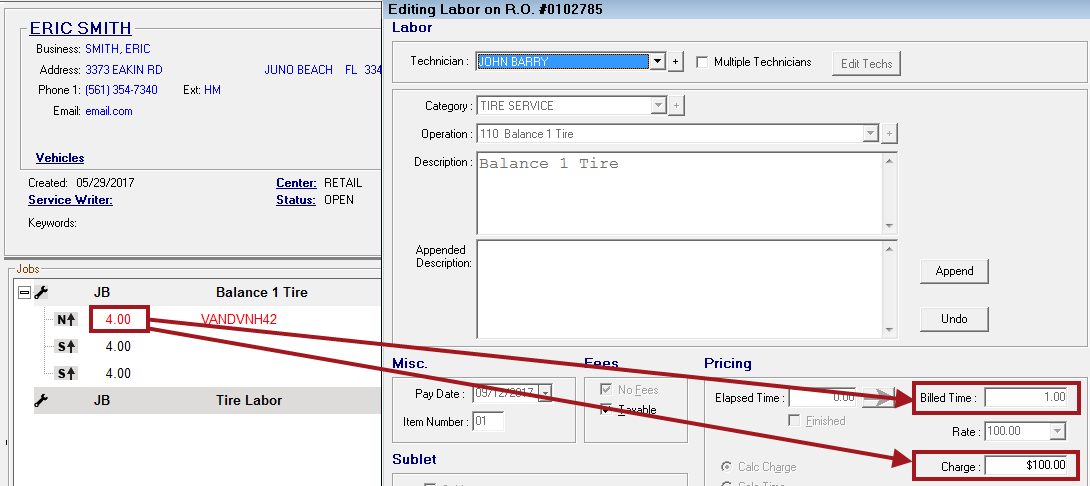
It is important to note that this labor charge calculation is specific to Tire Quote packages added from Tire Quote. After the tire and tire package are added to a ticket, the charge no longer adjusts to the quantity the way it does in Tire Quote.
If you open the tire part from the ticket and change the quantity, the labor charge does not adjust to the new quantity. You would need to open the labor operation and change the Charge manually to match the new quantity.
Tire Package Step 3 - Attach Parts Kits to Labor Operations
Reopen each labor operation and attach the parts kit you want to use with it.
NOTE: You must attach a part kit to the labor operation that you plan to use as a tire quote package.
Complete these steps:
- Click Configuration menu > Labor > Operations.
- Open the labor operation.
- Select the Category and Operation from the dropdown lists.
- In the Parts Kit dropdown list, select the parts kit.
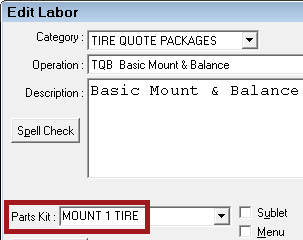
- Click Save to save the labor operation.
Tire Package Step 4 - Select the Labor Operations in Tire Quote Options
You can choose up to four pricing packages for Tire Quote.
Complete these steps:
- Click Configuration menu > Repair Order > Tire Quote Options.
- The Tire Quote Setup window opens displaying the four packages in the Attached Labor Operations section.
- In Package 1-4 sections, choose a unique labor operation.
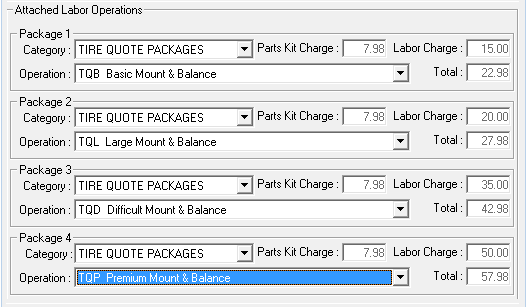
The number of the section determines the sequence of packages in the Packages dropdown list in Tire Quote.
Each package must be unique. If you choose the same labor operation for two different packages, that labor operation will show up only once in the dropdown list.
- When you select a labor operation, the Parts Kit Charge, Labor Charge, and Total appear.
- These values are determined by the labor operation and its parts kit.
- You cannot edit these values Tire Quote Options.
- The Total is the Parts Kit Charge plus the Labor Charge.
The package price that displays in Tire Quote - in the Package column and the Package price on the Tire Details window - includes the fees, sales tax, and supply charges.
- When you have selected all the desired labor operations, click OK.
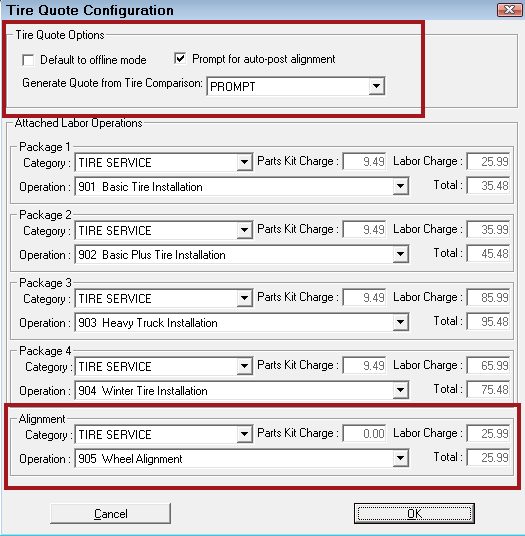
Step 5 - Set Other Tire Quote Options
There are some important settings in Tire Quote Options other than the package settings.

Step 6 - Configure Tire Parts in Local Inventory
You can run Tire Quote without having tires in local inventory. If so, all Tire Quote searches would be outside purchases.
If you do want to search for tires in your local inventory, you need to configure the tire records in Inventory for Tire Quote.
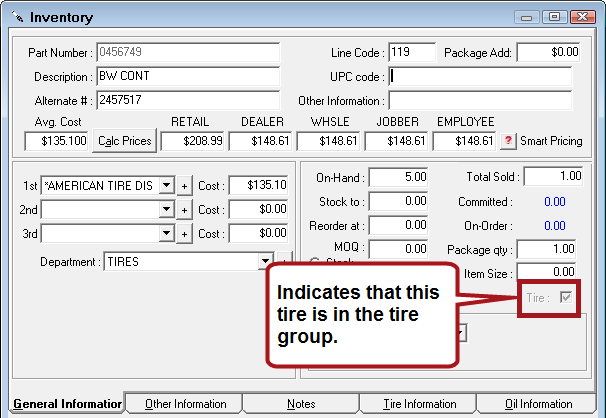
- Make Sure the Tires Are in the Tire Group
- Enter the Tire Size in the Alternate # Field
- Enter the Tire Specification Information
- Set the Price Level and Average Cost
Make Sure the Tires Are in the Tire Group
Local inventory parts must be in the tire group to be included in Tire Quote searches. When a part is included in the tire group, the Tire option on the General Information tab is checked and disabled on the part record.
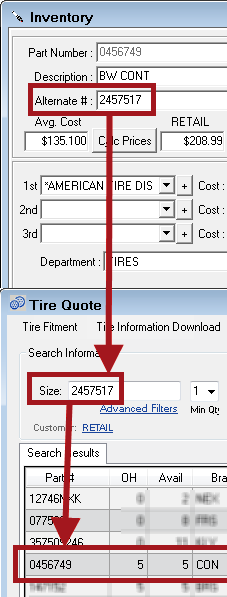
Enter the Tire Size in the Alternate # Field
Searching by tire size is perhaps the most common search in Tire Quote; however, there is no searchable tire size field in the part record. As a result, Tire Quote searches the Alternate # field for the size information.
Make sure that tires in your tire group have the correct tire size entered - without slashes or letters - in the Alternate # field.
Enter the Tire Specification Information
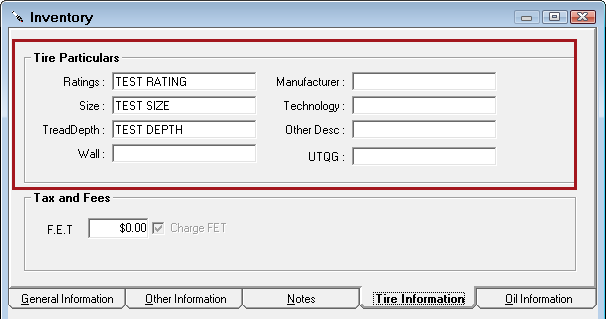
When a tire is in the tire group, tire specification information appears in the search results. Tire information is entered on the Other Information tab and Tire Information tabs.
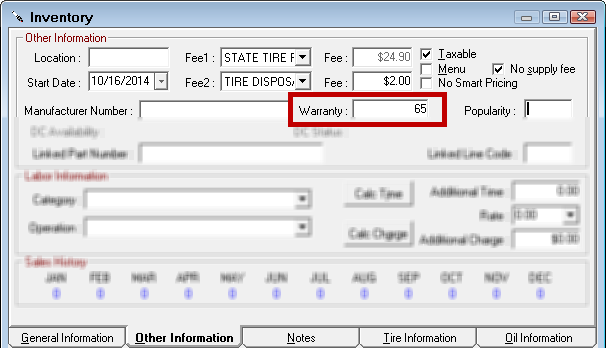
Other Information Tab
The Other Information tab contains the Warranty information, which is usually the mileage of the warranty.
Tire Information Tab
The Tire Information tab appears for all Inventory records; however, the fields display only for tires in the tire group.
The information entered here appears on the Specification tab for local tires. For details, click the following link: Entering Tire Information on Parts.
Set the Price Level and Average Cost
You set up pricing for tire parts the way you would for any other part; however, it's helpful to know how pricing information for tire parts shows up in Tire Quote.

Average Cost
The average cost appears in the SC, SM, and DM columns after the supplier code. For details, click the following link: Cost and Margin.
Pricing Level
The price level appears in the Search Tires section. Pricing in Tire Quote is determined by the price level selected.
The link name is the name of the Price Level. Click the link to see all price levels.
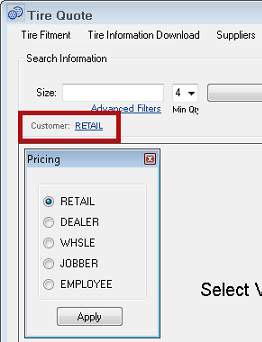
- For a size search, you can choose the price level before searching.
- In the image above, the price level field is labeled "Customer" because a price level is selected in the customer record.
- When opened from a ticket, Tire Quote uses the price level selected for the customer.
Optional Steps
These setup steps impact Tire Quote functionality but are not required to run Tire Quote.
NOTE: Tire Quote requires Epicor 1.6.13.79 or higher. If the Epicor catalog has expired, you can search by tire size, but you cannot search by vehicle until the Epicor catalog is updated.
Validate Epicor Vehicle Information
Tire Quote can search only for vehicles that are valid for Epicor. Therefore, it's a good idea to check the validation status of vehicles in your system. If Tire Quote cannot find the vehicle when searching by vehicle, it could be because that vehicle is not valid for Epicor.
When a vehicle is valid for Epicor, a green "EPICOR" appears in the vehicle section of the Parts/Labor tab.
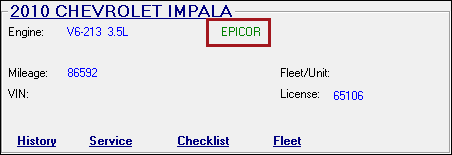
If these validation indicators do not appear, you can validate the vehicle on the Vehicle Tab of the Edit Vehicle window before accessing Tire Quote.
If the vehicle is not valid when you do access Tire Quote, you can validate the vehicle for Epicor on the Vehicle Selector Window when searching by vehicle.
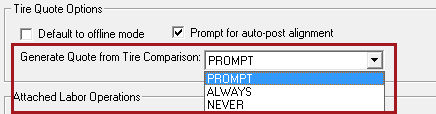
Configure the Tire Comparison
The Tire Comparison is a document you can generate from Tire Quote to compare up to three tires in the search results.
For information about configuring this feature, click the following link: Configuring the Tire Comparison.