Extracting Accounting Information (.iif File)
If you use the Accounting Interface module to create .iif files that you can import into QuickBooks, the process has changed in the new Central Office.
Now, the .iif file process is as follows:
- On the Central Office store computer, the .iif record created from the Reconcile process is sent to the database instead of a separate file.
- The .iif file in the database is then transmitted to the Central Office server as part of the data synchronization process.
- On the Central Office server computer, you export the information to an .iif file.
- In QuickBooks, you import the .iif file as always.
NOTE: The contents of the .iif file have not changed, only the method of producing it has changed.
Step 1 – Configure the Central Office Store to Send the .iif Information to the Database
You need to configure the Central Office store to send the .iif information to the database every time the Reconcile process is run in the Accounting Interface.
Complete these steps:
- On the Central Office store computer, open R.O. Writer Configuration.
- Click Configuration menu > Cash Drawer/Accounting. The Cash Drawer/Accounting Configuration window opens.
- In the Cash Control/Accounting Interface section, QuickBooks for Windows should be selected in the Accounting Package dropdown list.
-
Check the Send .iif files to the Central Office Server box. (This setting applies to all computers that use the current license number.)
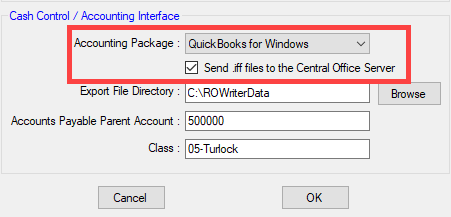
- Click OK to save the change.
The next time the Reconcile process is run in the Accounting Interface on the Central Office store computer, the .iif record is sent to the database.
Step 2 - Create the .IIF File(s) on the Central Office Server
The Central Office server receives the .iif information from the Central Office store through standard data transmissions. As a result, you can export the .iif information from the database into an .iif file on the Central Office server.
NOTE: There may be more than one file created; it depends on how far behind Central Office transmissions are.
Complete these steps:
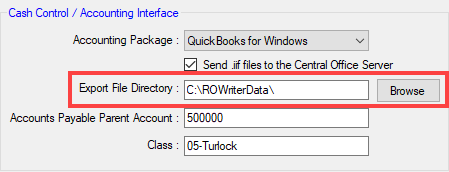
- On the Central Office server computer, open R.O. Writer Configuration.
- Click Configuration menu > Cash Drawer/Accounting. The Cash Drawer/Accounting Configuration window opens.
-
In the Cash Control/Accounting Interface section, check the folder location entered in the Export File Directory field. This is where the .iif file will be stored after it is created.
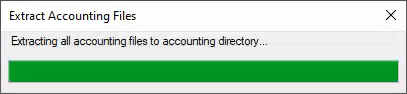
- On the R.O. Writer main window, click the Accounting Interface button in the Quick Launch. The Accounting Interface opens.
- Click the Extract Accounting Files toolbar button. (This button appears in the toolbar only on the Central Office server computer.)
-
The Accounting Interface begins extracting the accounting information stored in the database.
You may see a progress bar briefly. The extraction process can complete in less than a second if there is not much information to extract.
-
The .iif file is created and saved to the Export File Directory.
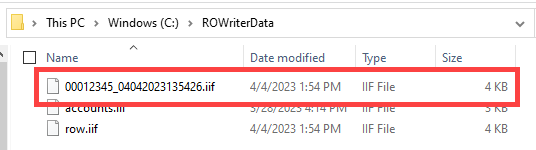
NOTE: After the .iif file is extracted, the .iif record is deleted from the database.
Step 3 - Import the .iif File Into QuickBooks
The process of importing the .iif file is the same as it’s always been. Open QuickBooks for Windows and import the .iif file from the Export File Directory.