Transtar
R.O. Writer has built an integration with the Transtar
R.O. Writer searches the eSource website based on the vehicle information in the open ticket and displays the results in the Smart eCat for R.O. Writer window.
![]()
The Transtar catalog
- Works the same in R.O. Writer as it does on the eSource website.
- Always opens in the Smart eCat interface (even if you are not licensed for the full Smart eCat catalog).
Watch the video below to see an overview of this functionality.
Configure R.O. Writer for Transtar
You need to integrate R.O. Writer with Transtar.
Refresh Your License
Transtar is a licensed feature. You can see if your license for R.O. Writer includes Transtar as follows:
- Open R.O. Writer.
- Click the Help menu > About.
- Click the Display License Details button.
- On the window that opens, look for “Transtar Catalog Integration” in the Licensed Options box.
![]()
- If you don’t see it, you need to contact your Sales Representative to update your license.
Electronic Interface for Transtar
You need to add Transtar as a supplier and configure an electronic integration for it. When you establish your account with Transtar Industries, they provide you with the WebKey and Service URL you need for the integration.
NOTE: You can create only one Transtar interface.
Complete these steps:
- Open Configuration.
- Click Configuration menu > Parts > Suppliers.
- Select Transtar in the Supplier dropdown list.
- Click Add in the Electronic Ordering Interfaces section.
![]()
- On the Electronic Ordering Interface window, select Transtar. The Transtar options appear in the bottom half of the window.
![]()
- Enter the Transtar.
- Click Save.
Transtar Interface Options
| Option | Description | ||||||||
|---|---|---|---|---|---|---|---|---|---|
|
Post Orders to Accounts Payable |
Select this option to automatically post part orders with Transtar to Accounts Payable. You will be prompted to post to Account Payable during the order process. |
||||||||
|
WebKey |
Enter the WebKey from Transtar. |
||||||||
|
Service URL |
Enter the web address of the Transtar online catalog. If you click the Set to Default URL button, the correct URL should appear in the Service URL field. (You would only need to change it if Transtar changes their URL.) |
||||||||
|
Inventory Line Code |
If you want to use a line code for all Transtar parts enter it here. The line code can be alpha-numeric but must be unique – meaning no other parts in your local inventory have the same line code. “TRA” is recommended. If you do enter a line code here, that line code is automatically added to all Transtar parts when those parts are added to tickets. However, the line code is not submitted to Transtar when ordering. Your decision to use a line code for Transtar depends on whether your current inventory includes Transtar parts and if those parts have a line code already assigned. For more information, see Line Code Recommendations. |
||||||||
|
Default Department |
Choose the default department to use for Transtar. This list contains parts departments and one should be created for Transtar and selected here. |
||||||||
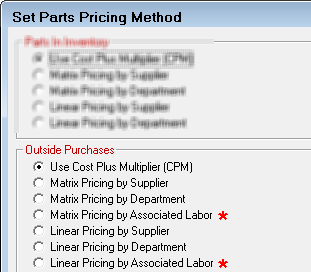
|
Pricing |
These options set the pricing method R.O. Writer uses for Transtar parts in the Default Department. Use List Price __% is the default and uses the list price percentage. Other pricing options appear depending on the Parts Pricing Method selected for Outside Purchases (Configuration menu > Parts > Set Pricing Method > Outside Purchases section).
These options determine what pricing method is used when purchasing Transtar parts as outside purchases.
|
Line Code Recommendations
When you assign a line code to a supplier, that line code is added to the supplier’s part automatically when added to estimates and repair orders. Transtar does not use line codes on its parts; however, you might want to use line codes for Transtar parts in R.O. Writer as a way to sort parts with the same part number by supplier.
R.O. Writer returns Transtar parts in your local inventory as part of a search only if the part number/line code combination match. However, because Transtar does not use line codes, line codes are never sent to Transtar when ordering parts.
Your decision to use a line code for Transtar depends on whether your current inventory includes Transtar parts and if those parts have a line code already assigned.
If there are Transtar parts in local inventory with a line code assigned:
- Enter the same line code for the Transtar electronic interface.
- R.O. Writer searches your local inventory for the part number/line code combination.
- The line code is added to non-stock Transtar parts when posted to tickets.
- Only the part number is sent to Transtar in Smart eOrder.
If there are Transtar parts in local inventory with NO line code assigned:
- Do NOT enter a line code for the Transtar electronic interface.
- R.O. Writer searches your local inventory by part number/line code combination.
- The line code is NOT added to non-stock Transtar parts when posted to tickets.
- Only the part number is sent to Transtar in Smart eOrder.
If there are no Transtar parts in your local inventory:
- Enter a line code of “TRA”. If you decide to stock Transtar parts at some point, those parts won’t accidentally match other parts in inventory.
- R.O. Writer searches your local inventory for the part number/line code combination.
- The line code is added to non-stock Transtar parts when posted to tickets.
- Only the part number is sent to Transtar in Smart eOrder.
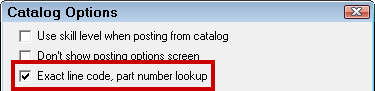
Part Lookup Setting
In Configuration, open Repair Order Catalog Options (Configuration menu > Repair Order > Catalog Options) and check Exact Line Code, Part Number Lookup.
Local Inventory Coverage List
If you use Smart eCat, the Local Inventory coverage list works off of Epicor data. Transtar does not have any parts listed in the Epicor catalog; therefore, you cannot add Transtar to your Local Inventory coverage list.
The Transtar parts in your local inventory appear in search results if the part number and line code match. The Available column of the part line displays “Stock [# on hand]” when the Transtar part is available in local inventory.
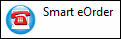
Accessing Transtar from the Quick Launch
![]()
Transtar opens in the Smart eCat interface.
![]()
If you don’t see the Transtar button, you need to put it on the Quick Launch in Configuration.
Complete these steps:
- Open Configuration and click File menu > General Options. Select the Transtar option.
![]()
- Click OK and close Configuration.
- Open R.O. Writer main module.
- Transtar appears in the Catalogs section of the Quick Launch.
![]()
- Open an estimate or repair order.
- Click the Transtar button.
- R.O. Writer connects to the Transtar eSource catalog and searches for the vehicle in the open ticket.
- If a match is found, the part search window opens in Smart eCat.
- If the vehicle is not found, the vehicle search window opens in Smart eCat.
NOTE: If you access Transtar when no estimate or repair order is open, you can search the Transtar eSource catalog but cannot post parts to a ticket.
Automatic Vehicle Matching
Transtar has its own vehicle database. When you access Transtar in the Catalogs section, R.O. Writer automatically searches the Transtar database for a vehicle that matches the vehicle record in the open ticket. Then, Transtar
Matches the R.O. Writer vehicle all the way to the transmission type.
Opens to the Vehicle Selection window if the transmission type needs to be selected. Select the Transtar vehicle and transmission type on this window and click Next.
![]()
The Status bar shows the R.O. Writer vehicle information in blue on the left side followed by the Transtar vehicle in red.
![]()
The Transtar vehicle information is added to the R.O. Writer vehicle record. The next time you access Transtar from a ticket with this vehicle, Transtar recognizes the Transtar vehicle information and selects it immediately.
NOTE: NOTE: The Transtar vehicle information does NOT replace the R.O. Writer vehicle information; it simply adds the Transtar information to the vehicle record in the database.
If the R.O. Writer Vehicle Doesn’t Match the Transtar Vehicle
Occasionally, there will be a mismatch between the R.O. Writer vehicle and the Transtar vehicle. This can happen because
- The vehicles are wildly different (e.g., a Buick and a Cadillac).
- The make is spelled differently (e.g., “Buic” vs. “Buick”).
- A different submodel is selected (e.g., base vs. LS).
If there is a mismatch, a popup message appears showing the difference between the two vehicles.
![]()
Click No to search for and select another Transtar vehicle.
Click Yes to continue with the Transtar vehicle. This information
- Is added to the R.O. Writer vehicle record.
- Used to look up parts.
Then, click Next and the parts selection window opens showing the categories for the Transtar vehicle.
If There Are No Parts for the Transtar Vehicle
Occasionally, there are vehicles in the Transtar database whose transmission type has no parts associated with them. If one of those vehicles is in the estimate or repair order when you click access Transtar, the following prompt appears:
![]()
Click OK and the parts selection window opens but there is nothing in the list to select.
![]()
If this happens,
- Check the eSource website. Because R.O. Writer has already queried eSource, there shouldn’t be any parts there either; however, you can definitely double-check the site.
- Click the Reselect Transtar Vehicle button to choose another vehicle and search again.
Select a Different Transtar Vehicle
If you want to use a different vehicle than the one in the ticket, click the Reselect Transtar Vehicle button and choose a new one.
![]()
When you select a new Transtar vehicle, that vehicle replaces the Transtar vehicle information on record for this R.O. Writer vehicle.
![]()
Searching for Transtar Parts
After the Transtar vehicle is selected, you search for and select the parts to post to the ticket.
Complete these steps:
- Open an estimate or repair order.
- Access Transtar.
R.O. Writer calls and logs into the eSource web site and matches the R.O. Writer vehicle all the way to the transmission type, if it can. If so, the part selection window opens.
If the vehicle in the ticket doesn’t match the Transtar vehicle, you are prompted to select a vehicle.
- When the vehicle is found, the part selection window opens displaying Transtar Groups for the Transtar vehicle. (These are the same groups as on the eSource website.)
![]()
- Choose the parts you want and click Next. R.O. Writer searches the Transtar eSource website for matching parts.
- The parts appear on the Catalog tab.
- Check the box of the part you want to order.
![]()
NOTE: NOTE: If the part is in your local inventory, the Available column says “Stock: [# on hand]”.
- Use the navigation buttons:

- Click Next to post the part to the Posted Parts tab and move to that tab.
- Click Post to post the part to the Posted Parts tab but stay on the Catalog tab.
- Click Back to not post the part and search for more parts on the Catalogs tab.
Manually Searching for Transtar Parts
On the Catalogs tab, instead of using the groups, you can search for parts manually in the Part Search section.
![]()
Enter an Item Number, Description, and Part Type from the dropdown list, and then click Search.
Posting Transtar Parts to an Open Ticket
Complete these steps:
- When you have selected all the parts and they appear on the Posted Parts tab, select the posting options in the right panel.
![]()
- Select the Technician (optional)
-
Choose the way parts and labor are posted to the ticket.
Option Select this option to… Post Parts and Labor to a New Job
Post the parts and labor to a new job that is not currently on the ticket. The dropdown list contains all labor categories and operations.
Select the labor Category (required) and Operation (optional).
Post Parts and Labor to an Existing Job
Post the parts and labor to a job that is currently on the ticket. The dropdown lists contains only jobs on the open ticket.
Select the job in the dropdown list.
Add Individual Parts
and Labor to Invoice
Add the parts and labor as separate lines. Use this option if the jobs listed are not included in the same labor operation.
Each part is added as a separate item.
All labor jobs are grouped together.
- Click the Post/Exit button.
![]()
- Smart eCat closes and the part(s) appears on the ticket.
![]()
Parts of the Window
This section describes the most common parts of the window.
Catalog Toolbar
The toolbar at the top of the Catalog tab contains a number of options.
![]()
The toolbar options are as follows.
| Item | This item… |
|---|---|
|
Part |
Displays the Transtar Group selected on the previous window. |
|
Show/Hide Unavailable |
Controls if parts that are not available at any location appear in the list of search results. The default setting is to hide parts with no available quantity. Click Show Unavailable to see matching parts with no available quantity.
|
|
|
Selects all parts on the screen. |
|
|
De-selects all parts on the screen. |
|
|
Hides the cost of parts on the screen. The Cost and List columns are hidden.
|
|
Prefix Key Legend |
Is the legend for the Prefix Key. Some part numbers have a prefix letter and this legend helps you understand what those letters mean.
|
Navigation Buttons
These buttons appear in the top right corner and help you move through the windows.
![]()
- Click Back to not post the part and search for more parts on the Catalogs tab.
- Click Post to post the part to the Posted Parts tab but stay on the Catalog tab.
- Click Next to post the part to the Posted Parts tab and move to the Posted Parts tab at the same time.
Part Columns
The following columns appear for each part.
![]()
The columns are as follows.
| Column | Description |
|---|---|
|
|
Click on this box to select or de-select a part. |
|
|
There is an image available for this part. Click it to see the image:
|
|
Description |
The part’s description. |
|
Part Number |
The part number. Refer to the Prefix Key in the toolbar if you see certain letters before or after the part number. |
|
PC |
The number of pieces needed for the part. For example, brake pads usually come in a pack of two; therefore, there are two pieces per part number. To enter a new number, click in this field, type in the new number, and click in an empty space on the screen. |
|
Core |
The core cost (if available or required). |
|
Cost |
The cost if available. If not available, “$0.00” displays. |
|
List |
The list price. |
|
Price |
The price to the customer. You can change the price by clicking inside the field and typing in a new price.
Click on an empty space on the window outside the Price field and the new price appears.
|
|
Availability
|
The location of the part and its available quantity in that location. The format is as follows: “Location [quantity]”. By default, the closest location with on-hand quantity appears on the line. There are three locations available. Click the down arrow to see the other locations. Stock – Your local inventory (part number/line code must match) Branch – The location closest to you. This is usually where you buy most of your parts. Region – The wider Transtar system. |
Ordering Transtar Parts
When Transtar parts are on a repair order, you can
- Order them directly from the open repair order in Smart eOrder.
- Build purchase orders in P.O. Management.
Ordering Guidelines
Keep in mind the following when ordering Transtar parts in R.O. Writer:
- Rebuilt transmission assemblies and complete torque converter assemblies cannot be ordered through this interface at this time.
- Pricing is subject to standard Transtar pricing terms. The price at the time of the order may not be the final price because Transtar may add shipping charges from the Branch or Region.
- When posting to Accounts Payable in Smart eOrder, all parts must be ordered from the same location. If you order parts from multiple locations – both Branch and Region - you need to post an invoice to Accounts Payable for each location, even if all the parts are on one repair order.
![]()
If this occurs, click OK. Then, uncheck the boxes of the all the Region parts or all the Branch parts to de-select them. When only the Region parts or only the Branch parts are selected, click the Post/Exit button again.
Ordering in Smart eOrder
Smart eOrder is an R.O. Writer tool that lets you order parts directly from open repair orders.
Complete these steps:
- Open the repair order.
- Click the Smart eOrder button in the Quick Launch
 . The Transtar parts from the repair order appear on the Smart eOrder window.
![]()
- Click the Truck button to place the order. The Order Options window pops up.
The purchase order number is the repair order number. You can enter another number but it is not recommended.
You can type a message for the purchase order in the white box.
![]()
- Click OK to place the order.
- The post to Accounts Payable window opens only IF
The Post Orders to Accounts Payable option is selected in the Transtar electronic interface.
AND
All parts are available from the Branch.
![]()
R.O. Writer generates the Invoice Number. You can enter another number but it is not recommended.
Click OK to post these orders to Accounts Payable.
- The Parts tab shows that the parts are “On Order”.
![]()
- Click the Post/Exit button to update the parts on the open repair order. Smart eOrder closes and the parts on the repair order now appear black.
- Double-click on one of the parts to open it.
The Invoice # appears on the Edit Parts window and cannot be changed because the part has been posted to Accounts Payable.
The To Order box is unchecked because the part has been ordered.
![]()
- Click OK to close the part.
Ordering in P.O. Management
P.O. Management is a tool in the Inventory module that allows you to build purchase orders for parts on different repair orders at one time. You can use it to create purchase orders for stocking orders Transtar.
For more information, see Purchase Order Management.
eSource is a registered trademark of Transtar Industries, Inc.