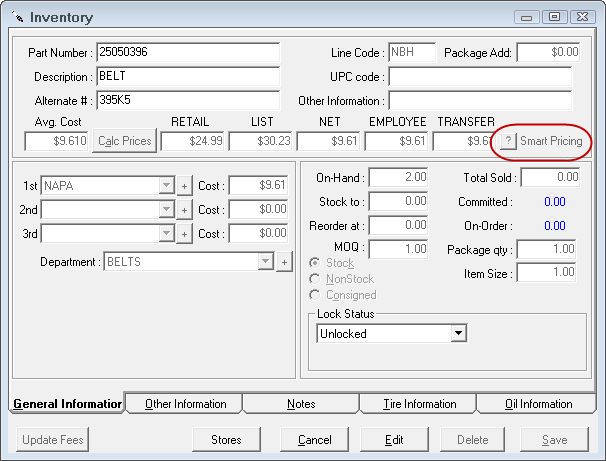
Default Inventory Pricing
Smart pricing gives the user the ability to set pricing using cost ranges by supplier, parts department or type of work. You will now be able to price inventory parts using smart pricing matrices.
Inventory Pricing options include:
- Cost Plus Multiplier (CPM) - Default Pricing
- Matrix by Supplier
- Matrix by Department
- Linear by Supplier
- Linear by Department
Watch the video below to see an overview of this functionality.
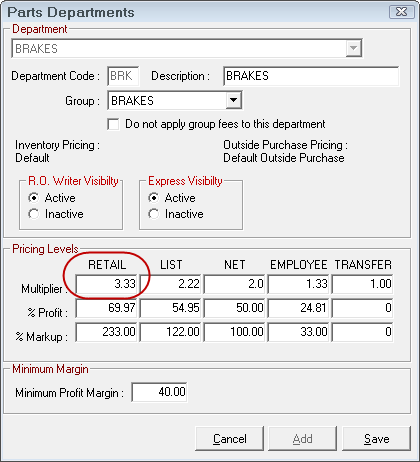
Cost Plus Multiplier (CPM)
This matrix is accessed when the Use Cost Plus Multiplier (CPM) option is selected for either Parts in Inventory or Outside Purchase. This matrix can also be accessed regardless of what option is set in Set Pricing Method from Configuration Parts Price Levels Default Pricing.
A change to any one of the fields (Multiplier, % Profit, or % Markup) will cause a corresponding change in the other two fields. By adjusting these fields, the relation between profit margin and markup can been seen. A different margin can be set for each of the five pricing levels. The price is calculated as follows: Average cost * Multiplier.
Also as part of the default pricing, there is a minimum margin that must be set. This should be set several percent lower than the retail margin. If the overall profit margin for a part falls below this amount, R.O. Writer will warn the user, and ask if the pricing should be modified. As a starting guideline, set the minimum about 1.5 to 2.0 percentage points lower than what is set for the retail margin.
The minimum profit margin is a global setting and applies to all matrices.
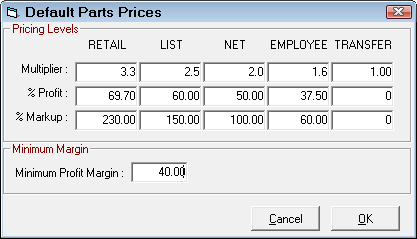
NOTE: This is the default CPM matrix. When parts departments are selected, the matrix for that department is used. To access the matrices for each department, select Configuration > Parts > Parts Departments.
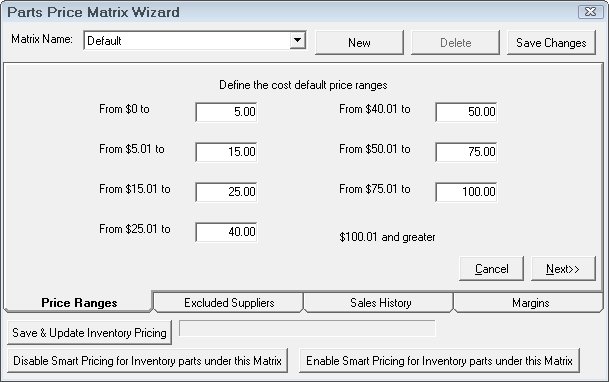
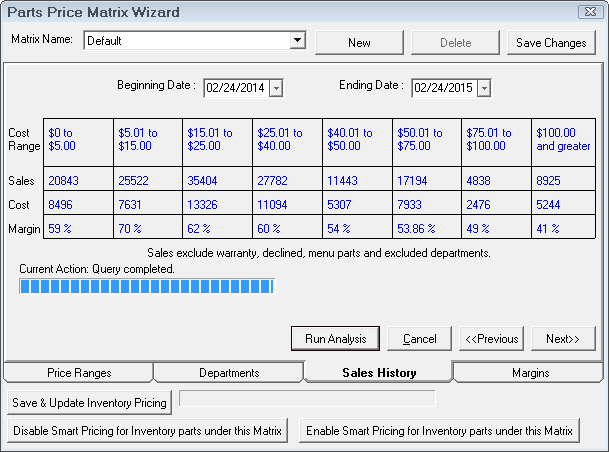
Matrix by Supplier
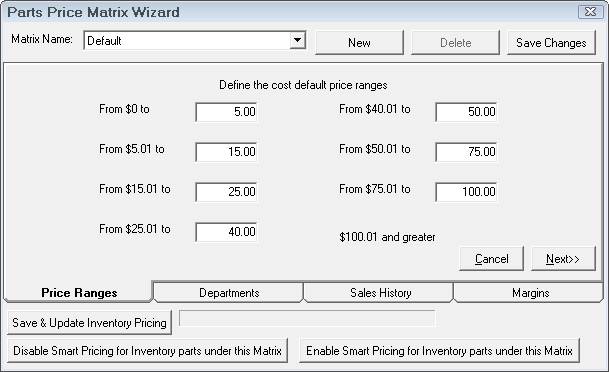
Define the cost ranges. If certain suppliers will have different pricing, decide who those suppliers are, and separate matrices can be set up. Click the New button to add a new price matrix.
If the shop has been using R.O. Writer and has historical information, it is advisable to run the sales history and see what the historical margins have been.
Select the dropdown list to edit other matrices. Click the New button to create a new matrix for alternate suppliers. It is recommended when naming new matrices to use a descriptive enough name so you can identify the correct matrix when editing (Example: CARQUEST Inventory or CARQUEST Outside Purchase). Click the Save Changes button to save the matrix.
The first item to configure is the cost ranges. Enter the dollar values to define the pricing matrix.
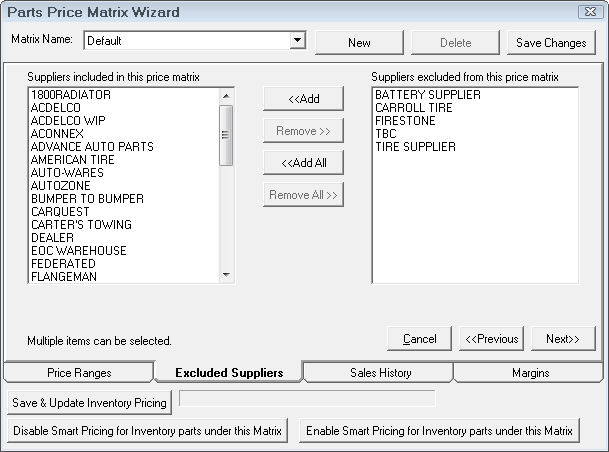
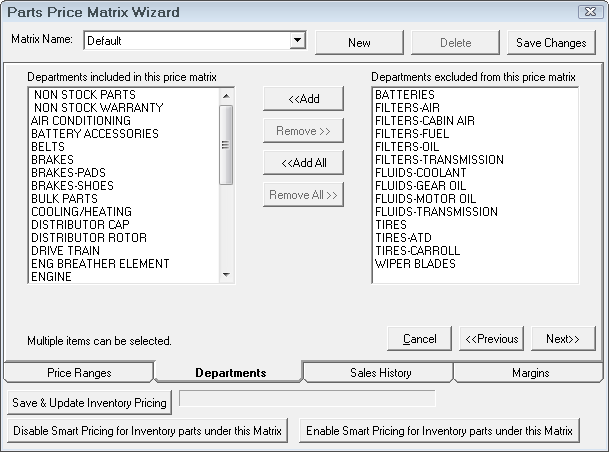
Next, select the suppliers that are to be included in the pricing matrix. Individual suppliers may have their own pricing matrix.
Suppliers in the Included list are assigned to this matrix.
If historical information is available, the next step would be to review the parts sales history to see what the historical margins have been for the newly established pricing range. This information could prove to be useful in establishing the pricing matrix margins. If historical information is not available, the user would proceed to the next step of establishing margins for each of the pricing levels.
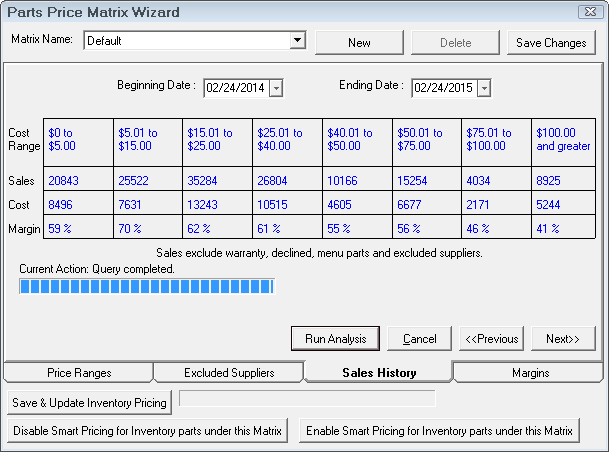
If needed, set the date range. By default, R.O. Writer selects the last 12 rolling months.
Based on the cost ranges you set and your included suppliers, R.O. Writer will run an analysis of your actual purchases during the date range.
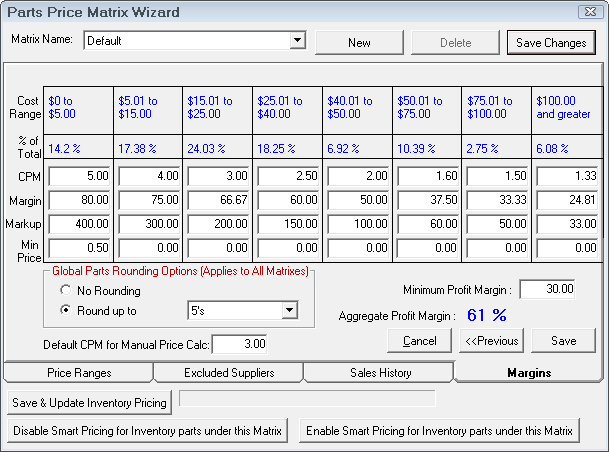
The last step of establishing the pricing matrix is to set the margins for the pricing levels. The margins screen displays the pricing levels established in step one. If the sales analysis was run for historical information, the percent of total parts sales for each pricing level will appear below the pricing levels. To complete the pricing matrix, enter the cost plus multiplier, the margin, or the markup that is desired for each pricing level. Entering one of these values will cause the others to be calculated.
As part of the matrix pricing, there is a minimum price that can be set for each cost range. If the calculated price is less than the minimum price, then that price is used.
When the information has been entered, select Save Changes to save and remain in this screen or select Save to save and exit.
Careful attention should be paid to the Aggregate Profit Margin. This percentage provides powerful information regarding total parts sales profitability.
As part of the matrix pricing, there is a minimum margin that must be set. This should be set several percent lower than the aggregate profit margin. If the overall profit margin for a repair order falls below this amount, R.O. Writer will warn the user, and ask if the pricing should be modified. As a starting guideline, set the minimum about 1.5 to 2.0 percentage points lower than what is set for the aggregate profit margin.
The minimum profit margin is a global setting and applies to all matrices.
Setting the Global Parts Rounding Option applies to all matrices.
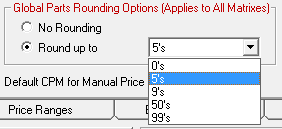
- No Rounding - Does not round the values up or down.
- Round Up To - Select the number you wish to round prices up to.
The Default CPM for Manual Price Calc is the multiplier that is used when using the Price Calc button is clicked on the Editing Part Window.
The Save & Update Inventory Pricing button will update the retail price on every part that would be affected by the selected matrix including parts marked as stock, non-stock, or consigned.
Parts with the No Smart Pricing box checked in inventory will not be updated using the Save & Update Inventory Pricing button.
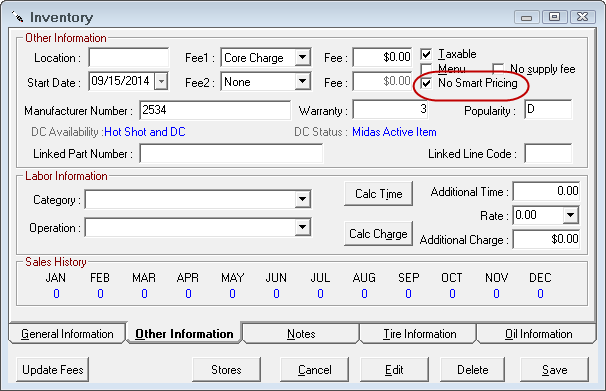
When the No Smart Pricing box is checked, the price can only be updated using the Calc Prices button or manually entering a price. When this box is checked, the Smart Pricing option is grayed out.
When the Calc Prices button is selected, the prices are calculated using either the default CPM matrix or if a department is selected, the department CPM matrix.
You are able to globally enable or disable smart pricing on all parts that would be affected by the selected matrix including parts marked as stock, non-stock, or consigned by selecting the Disable Smart Pricing for Inventory parts under this matrix button or the Enable Smart Pricing for Inventory parts under this matrix button.
Matrix by Department
Define the cost ranges. If certain departments have different pricing, decide what those departments are and separate matrices can be set up. Click the New button to add a new price matrix.
If the shop has been using R.O. Writer and has historical information, it is advisable to run the sales history and see what the historical margins have been.
Select the dropdown list to edit other matrices. Click the New button to create a new matrix for alternate departments. It is recommended when naming new matrices to use a descriptive enough name so you can identify the correct matrix when editing (Example: Brakes Inventory or Brakes Outside Purchase). Click the Save Changes button to save the matrix.
The first item to configure is the cost ranges. Enter the dollar values to define the pricing matrix.
Next, select the departments that are to be included in the pricing matrix. Individual departments may have their own pricing matrix.
Suppliers in the Included list are assigned to this matrix.
If historical information is available, the next step would be to review the parts sales history to see what the historical margins have been for the newly established pricing range. This information could prove to be useful in establishing the pricing matrix margins.
If historical information is not available, the user would proceed to the next step of establishing margins for each of the pricing levels.
If needed, set the date range. By default, R.O. Writer selects the last 12 rolling months.
Based on the cost ranges you set and your included departments, R.O. Writer will run an analysis of your actual purchases during the date range.
The last step of establishing the pricing matrix is to set the margins for the pricing levels. The margins screen displays the pricing levels established in step one. If the sales analysis was run for historical information, the percent of total parts sales for each pricing level will appear below the pricing levels. To complete the pricing matrix, enter the cost plus multiplier, the margin, or the markup that is desired for each pricing level. Entering one of these values will cause the others to be calculated.
As part of the matrix pricing, there is a minimum price that can be set for each cost range. If the calculated price is less than the minimum price, then that price is used.
When the information has been entered, select Save Changes to save and remain in this screen or select Save to save and exit.
Careful attention should be paid to the Aggregate Profit Margin. This percentage provides powerful information regarding total parts sales profitability.
As part of the matrix pricing, there is a minimum margin that must be set. This should be set several percent lower than the aggregate profit margin. If the overall profit margin for a repair order falls below this amount, R.O. Writer will warn the user, and ask if the pricing should be modified. As a starting guideline, set the minimum about 1.5 to 2.0 percentage points lower than what is set for the aggregate profit margin.
The minimum profit margin is a global setting and applies to all matrices.
Setting the Global Parts Rounding Option applies to all matrices.
- No Rounding - Does not round the values up or down.
- Round Up To - Select the number you wish to round prices up to.
The Default CPM for Manual Price Calc is the multiplier that is used when using the Price Calc button is clicked on the Editing Part Window.
The Save & Update Inventory Pricing button will update the retail price on every part that would be affected by the selected matrix including parts marked as stock, non-stock, or consigned.
Parts with the No Smart Pricing box checked in inventory will not be updated using the Save & Update Inventory Pricing button.
When the No Smart Pricing box is checked, the price can only be updated using the Calc Prices button or manually entering a price. When this box is checked, the Smart Pricing option is grayed out.
When the Calc Prices button is selected, the prices are calculated using either the default CPM matrix or if a department is selected, the department CPM matrix.
You are able to globally enable or disable smart pricing on all parts that would be affected by the selected matrix including parts marked as stock, non-stock, or consigned by clicking the Disable Smart Pricing for Inventory parts under this matrix button or the Enable Smart Pricing for Inventory parts under this matrix button.
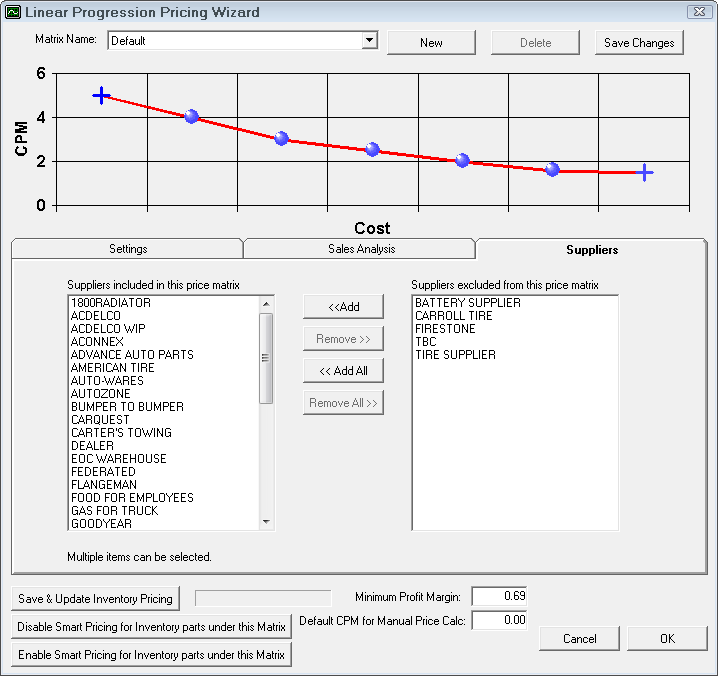
Linear by Supplier
Define the cost ranges. If certain suppliers will have different pricing, decide who those suppliers are, and separate matrices can be set up. Click the New button to add a new price matrix.
If the shop has been using R.O. Writer and has historical information, it is advisable to run the sales history and see what the historical margins have been.
Select the dropdown list to edit other matrices. Click the New button to create a new matrix for alternate suppliers. It is recommended when naming new matrices to use a descriptive enough name so you can identify the correct matrix when editing (Example: CARQUEST Inventory or CARQUEST Outside Purchase). Click the Save Changes button to save the matrix.
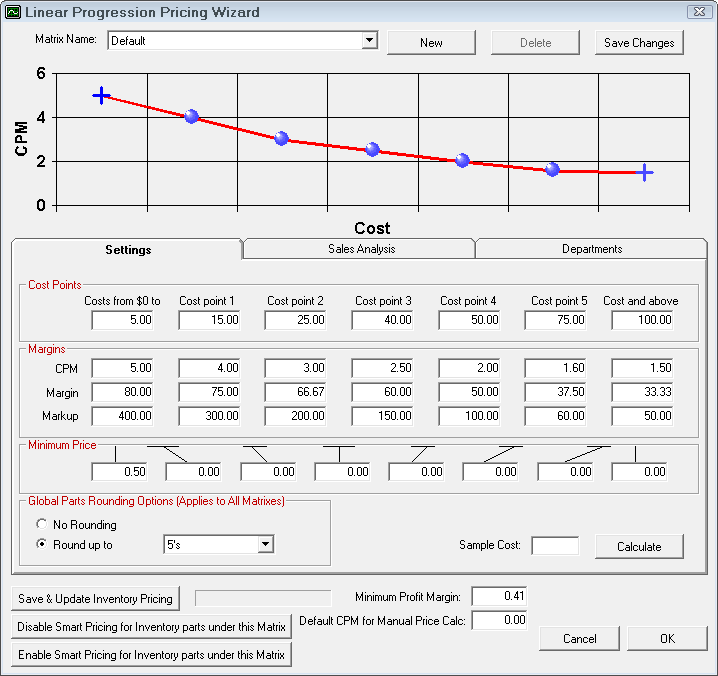
The first item to configure is the cost ranges. Enter the dollar values to define the pricing matrix. With Linear Pricing, the levels are infinite. It is a gradual stair step effect where halfway is 50%. It's usually a progression down but it doesn't have to be.

The next step of establishing the pricing matrix is to set the margins for the pricing levels. The margins screen displays the pricing levels established in step one. If the sales analysis was run for historical information, the percent of total parts sales for each pricing level will appear below the pricing levels.
To complete the pricing matrix, enter the cost plus multiplier, the margin, or the markup that is desired for each pricing level. Entering one of these values will cause the others to be calculated. When the information has been entered, select Save Changes to save and remain in this screen or select Save to save and exit.
As part of the linear pricing, there are minimum prices that can be set for each cost range. If the calculated price is less than the minimum price, then that price is used.
Setting the Global Parts Rounding Option applies to all matrices.
- No Rounding - Does not round the values up or down.
- Round Up To - Select the number you wish to round prices up to.
The Default CPM for Manual Price Calc is the multiplier that is used when using the Price Calc button is clicked on the Editing Part Window.
As part of the linear pricing, there is a minimum margin that must be set. This should be set several percent lower than the aggregate profit margin. If the overall profit margin for a repair order falls below this amount, R.O. Writer will warn the user, and ask if the pricing should be modified. As a starting guideline, set the minimum about 1.5 to 2.0 percentage points lower than what is set for the aggregate profit margin.
The minimum profit margin is a global setting and applies to all matrices.
The Save & Update Inventory Pricing button will update the retail price on every part that would be affected by the selected matrix including parts marked as stock, non-stock, or consigned.
Parts with the No Smart Pricing box checked in inventory will not be updated using the Save & Update Inventory Pricing button.
When the No Smart Pricing box is checked, the price can only be updated using the Calc prices button or manually entering a price. When this box is checked, the Smart Pricing option is grayed out.
When the Calc Prices button is selected, the prices are calculated using either the default CPM matrix or if a department is selected, the department CPM matrix.
You are able to globally enable or disable smart pricing on all parts that would be affected by the selected matrix including parts marked as stock, non-stock, or consigned by clicking the Disable Smart Pricing for Inventory parts under this matrix button or the Enable Smart Pricing for Inventory parts under this matrix button.
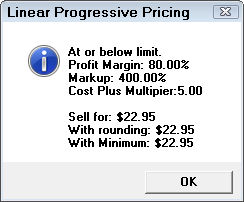
When in doubt you are able to enter a sample cost and click the Calculate button to see what price would be calculated using the currently saved matrix.
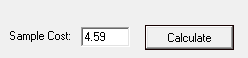
Click Calculate to see how the price was calculated.
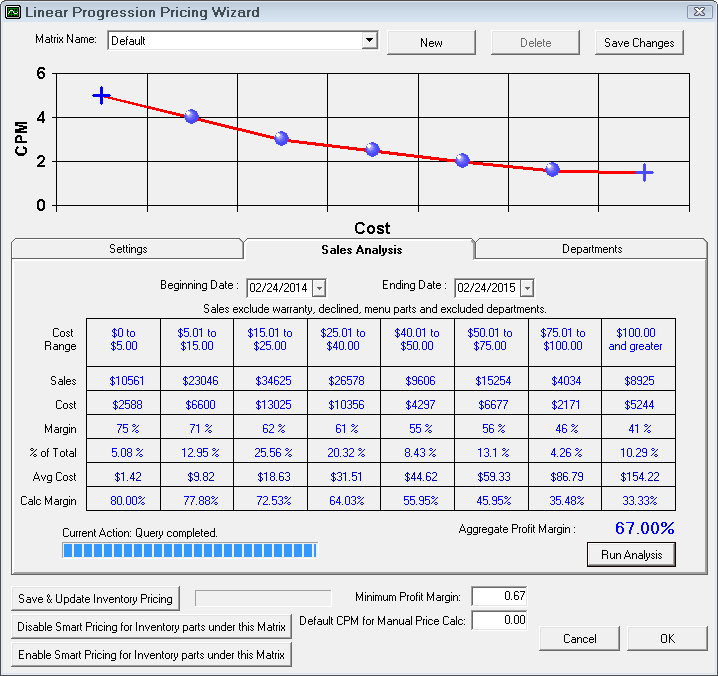
If historical information is available, the next step would be to review the parts sales history to see what the historical margins have been for the newly established pricing range. This information could prove to be useful in establishing the pricing matrix margins. If historical information is not available, the user would proceed to the next step of establishing margins for each of the pricing levels.
Careful attention should be paid to the Aggregate Profit Margin. This percentage provides powerful information regarding total parts sales profitability.
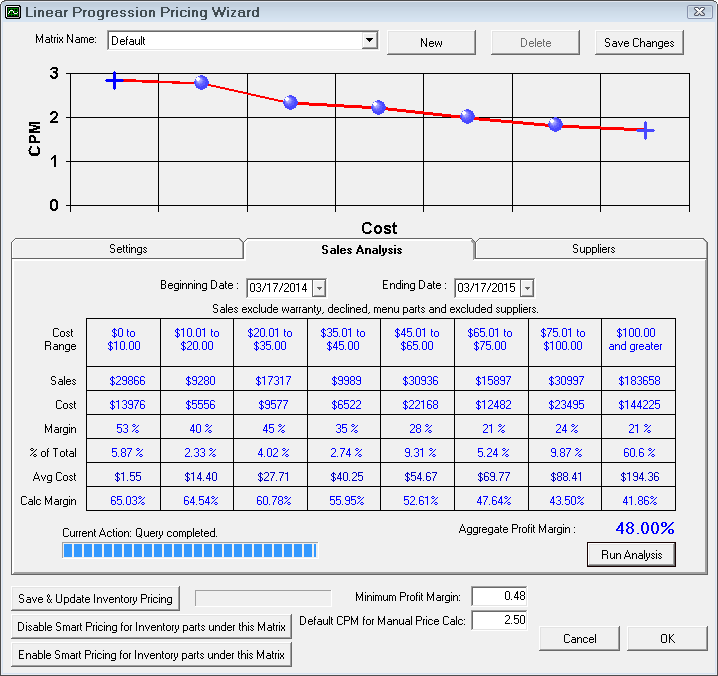
If needed, set the date range. By default, R.O. Writer will select the last 12 rolling months
Based on the cost ranges you set and your included suppliers, R.O. Writer will run an analysis of your actual purchases during the date range.
The last step of establishing a price matrix is to select the suppliers that are to be included in the pricing matrix. Individual suppliers may have their own pricing matrix.
Suppliers in the Included are assigned to this matrix.
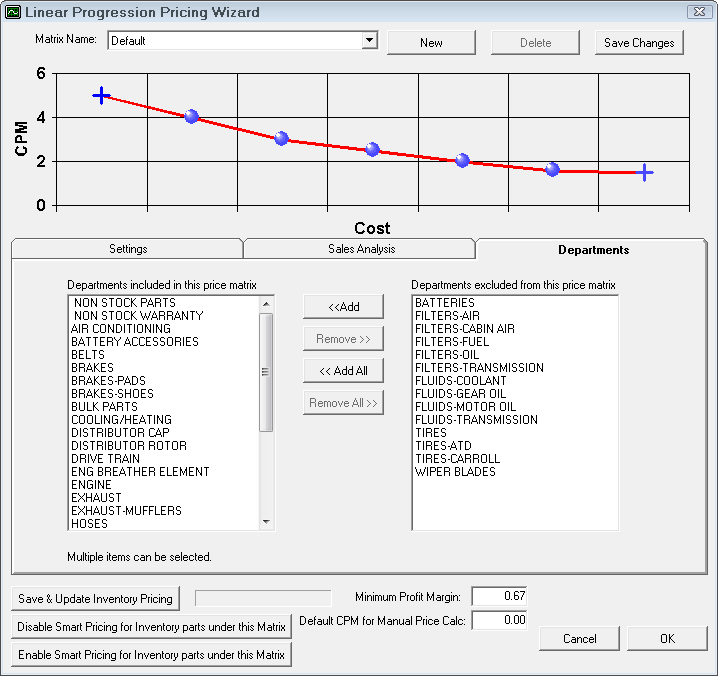
Linear by Department
Define the cost ranges. If certain departments will have different pricing, decide what those departments are, and separate matrices can be set up. Click the New button to add a new price matrix.
If the shop has been using R.O. Writer and has historical information, it is advisable to run the sales history and see what the historical margins have been.
Select the dropdown list to edit other matrices. Click the New button to create a new matrix for alternate parts departments. It is recommended when naming new matrices to use a descriptive enough name so you can identify the correct matrix when editing (Example: Brake Inventory or Brake Outside Purchase). Click the Save Changes button to save the matrix.
The first item to configure is the cost ranges. Enter the dollar values to define the pricing matrix. With Linear Pricing, the levels are infinite. It is a gradual stair step effect where halfway is 50%. It's usually a progression down but it doesn't have to be.
The next step of establishing the pricing matrix is to set the margins for the pricing levels. The margins screen displays the pricing levels established in step one. If the sales analysis was run for historical information, the percent of total parts sales for each pricing level will appear below the pricing levels.
To complete the pricing matrix, enter the cost plus multiplier, the margin, or the markup that is desired for each pricing level. Entering one of these values will cause the others to be calculated. When the information has been entered, select Save Changes to save and remain in this screen or select Save to save and exit.
As part of the linear pricing, there is a minimum price that can be set for each cost range. If the calculated price is less than the minimum price, then that price is used.
Setting the Global Parts Rounding Option applies to all matrices.
- No Rounding - Does not round the values up or down.
- Round Up To - Select the number you wish to round prices up to.
The Default CPM for Manual Price Calc is the multiplier that is used when using the Price Calc button is clicked on the Editing Part Window.
As part of the linear pricing, there is a minimum margin that must be set. This should be set several percent lower than the aggregate profit margin. If the overall profit margin for a repair order falls below this amount, R.O. Writer will warn the user, and ask if the pricing should be modified. As a starting guideline, set the minimum about 1.5 to 2.0 percentage points lower than what is set for the aggregate profit margin.
The minimum profit margin is a global setting and applies to all matrices.
The Save & Update Inventory Pricing button will update the retail price on every part that would be affected by the selected matrix including parts marked as stock, non-stock, or consigned.
Parts with the No Smart Pricing box checked in inventory will not be updated using the Save & Update Inventory Pricing button.
NOTE: When the No Smart Pricing box is checked, the price can only be updated using the Calc prices button or manually entering a price. When this box is checked, the Smart Pricing option is grayed out.
When the Calc Prices button is selected, the prices are calculated using either the default CPM matrix or if a department is selected, the department CPM matrix.
You are able to globally enable or disable smart pricing on all parts that would be affected by the selected matrix including parts marked as stock, non-stock, or consigned by clicking the Disable Smart Pricing for Inventory parts under this matrix button or the Enable Smart Pricing for Inventory parts under this matrix button.
When in doubt you are able to enter a sample cost and click the Calculate button to see what price would be calculated using the currently saved matrix.
Click Calculate to see how the price was calculated.
If historical information is available, the next step would be to review the parts sales history to see what the historical margins have been for the newly established pricing range. This information could prove to be useful in establishing the pricing matrix margins. If historical information is not available, the user would proceed to the next step of establishing margins for each of the pricing levels.
Careful attention should be paid to the Aggregate Profit Margin. This percentage provides powerful information regarding total parts sales profitability.
If needed, set the date range. By default, R.O. Writer will select the last 12 rolling months
Based on the cost ranges you set and your included suppliers, R.O. Writer will run an analysis of your actual purchases during the date range.
The last step of establishing a price matrix is to select the suppliers that are to be included in the pricing matrix. Individual suppliers may have their own pricing matrix.
Departments in the Included are assigned to this matrix.