Assigning Vehicles to Fleets
The Fleet Wizard is a series of tab windows that guides you step-by-step through the assignment process. In it,
- Tabs are inactive until you are able to use them.
- The next step is indicated by the tab name turning green.
- You can go back to previous tabs but not forward unless the tab is active.
Assigning Vehicles to House and COD Accounts
Complete these steps:
- Create a new estimate or repair order.
- Select the customer and vehicle.
- Click the Fleet button in the ticket toolbar
 . The Fleet Wizard opens to the Fleet Type tab.
- Select the type of fleet account: House Account or Fleet Account - COD. The Client Fleet Name tab activates and turns green because it is the next step.
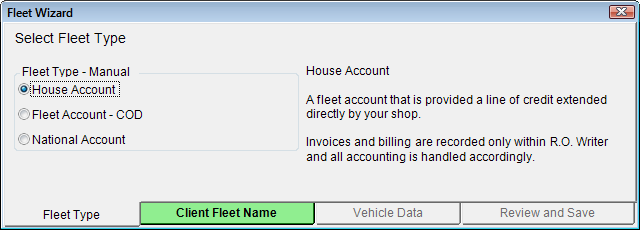
- Select the client company you want to assign this ticket to by clicking the Client Fleet Name tab. It opens displaying a list of the house and COD accounts in the system.
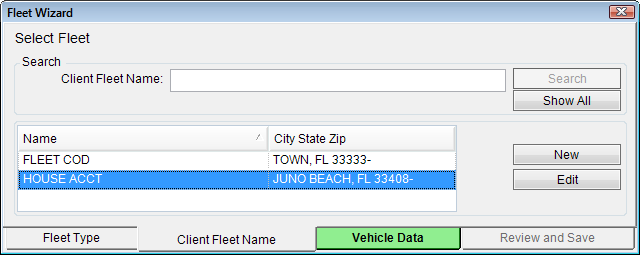
- To find the account, scroll through the list or search for it by name in the Client Fleet Name field.
(You can also add or edit client companies from this tab.)
- Select the account. The Vehicle Data tab activates and turns green.
- Click the Vehicle Data tab. It opens displaying the vehicle's information from the ticket.
- Enter any information that might be missing. The Review and Save tab activates and turns green.
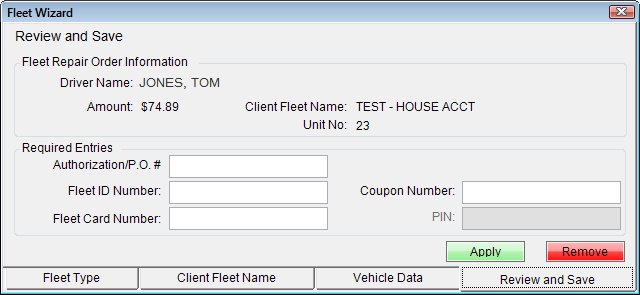
(The Unit No. is usually the number that the client company has assigned to the vehicle.) - Click the Review and Save tab. It opens displaying the Fleet Repair Order Information selected on previous tabs.
- Enter the required information: Authorization/P.O.#, Fleet ID Number, Fleet Card Number, or Coupon Number.
- Click the Apply button to assign the repair order to the selected client. The Fleet Wizard closes.
Assigning Vehicles to National Accounts
Assigning tickets to national accounts follows the same basic process as house and COD accounts; however, you need to select the parent company first (National Account tab) and then one of its client companies (Fleet Name tab).
Complete these steps:
- Create a new estimate or repair order.
- Select the customer and vehicle.
- Click the Fleet button in the ticket toolbar .
- The Fleet Wizard opens to the Fleet Type tab.
- Select the National Account as the Fleet Type. The Fleet Name tab activates and turns green because it's the next step.
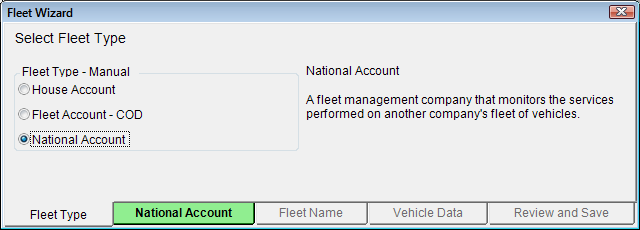
- Select the national company by clicking the National Account tab. It opens displaying a list of national accounts, which are highlighted in yellow.
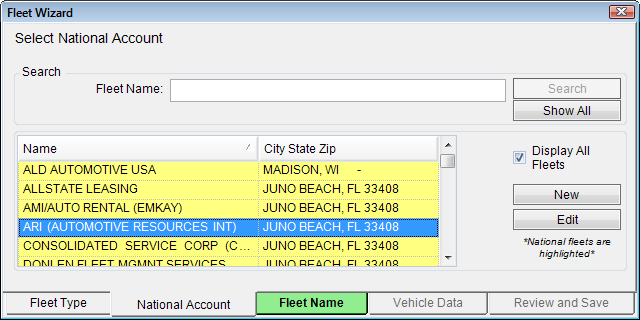
- To find the account, scroll through the list or search for it by name in the Fleet Name field.
(You can also add or edit national or client accounts from this tab.) - You must select a client fleet that is assigned to the national account. When you do, the Fleet Name tab activates and turns green.
Otherwise, the following prompt appears.
- Click the Fleet Name tab. It opens displaying client fleet companies. Those fleet companies already assigned to the national account you selected are highlighted in yellow.

- To find the account, scroll through the list or search for it by name in the Fleet Name field.
(You can also add or edit client companies from this tab.) - You must select a client fleet that is assigned to the national account. When you do, the Fleet Name tab activates and turns green.
Otherwise, the following prompt appears.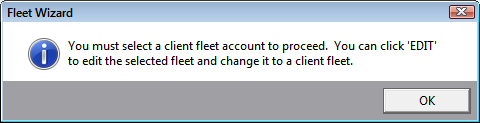
- Select the client account. The Vehicle Data tab activates and turns green.
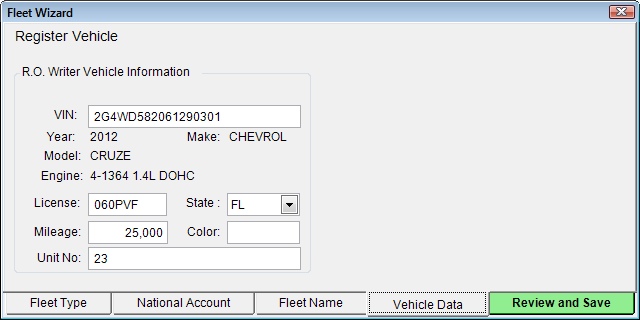
- To see the vehicle information and add more information, click the Vehicle Data tab. It opens displaying the vehicle's information.
- Vehicle information already entered in the ticket appears on this tab automatically. Enter any information that might be missing.
(The Unit No. is usually the number that the client company has assigned to the vehicle.)
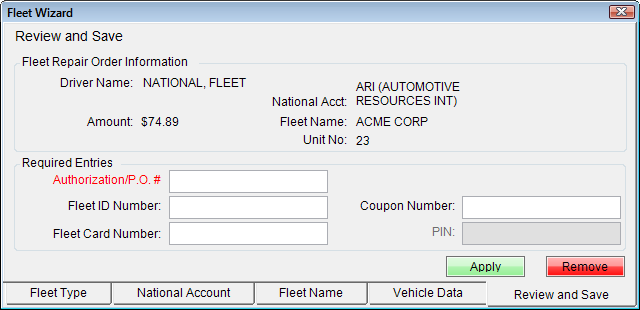
The Review and Save tab activates and turns green. - Click the Review and Save tab. It opens displaying the Fleet Repair Order Information selected on previous tabs.
- Enter the required information: Authorization/P.O. #, Fleet ID Number, Fleet Card Number, or Coupon Number.
- Click the Apply button to assign the repair order to the selected client. The Fleet Wizard closes.
NOTE: R.O. Writer uses the options and information for the national account instead of the client fleet company. However, if the national account discounts are $0.00 and the client fleet discounts more, then R.O. Writer applies the discounts of the client fleet and not those of the national account.
Unassigning Vehicles from Fleet Accounts
- When you click the Fleet button on an open ticket that has been previously assigned to a fleet, it opens to the Review and Save tab.
- Click the Remove button. The Fleet Wizard closes and the following prompt opens:
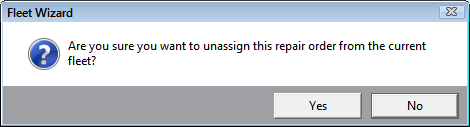
- Click Yes and the repair order and vehicle are no longer assigned to the fleet.