ACES Vehicle Information
ACES stands for “Aftermarket Catalog Exchange Standard”. ACES has replaced AAIA as the industry standard for automotive vehicle data for catalog applications data in North America.
ACES vehicle information:
- Enables suppliers to publish automotive data with standardized vehicle attributes, parts classifications, and qualifier statements.
- Uses a universal format (XML) when exchanging catalog information electronically.
Some online catalogs and repair databases require ACES vehicle information and will request it if there is no VIN in the vehicle record (or if the VIN cannot be decoded for some reason).
There are two ways to add ACES vehicle information:
- On the Vehicle tab of the Edit Vehicle window.
- On the ACES Vehicle Selector window that pops up when you access a repair lookup or online catalog that requires ACES information and cannot find it (or a VIN) on the vehicle.
Configuring ACES
You do not need to configure R.O. Writer for ACES. R.O. Writer is compatible with ACES automatically and immediately when you finish installing or upgrading.
This means you can add ACES vehicle information to vehicle records when
- Entering or editing the vehicle on the Vehicle tab of the Edit Vehicle window.
- ACES vehicle information is requested by the online catalog or repair database.
ACES Vehicle Information
ACES vehicle information comes from the ACES database that installs on each workstation when R.O. Writer Client installs.
During R.O. Writer Client installation, the ROWriterData folder is updated with an ACES folder that contains the "ACES" database.
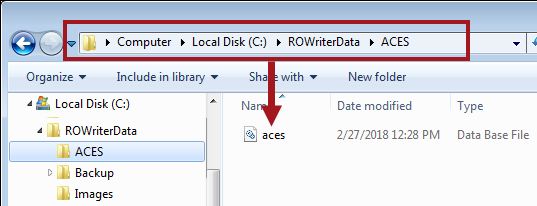
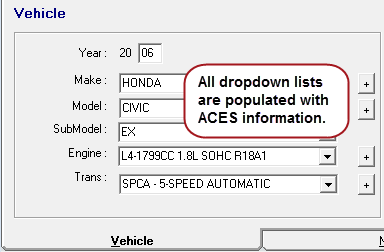
All dropdown lists of ACES vehicle information are populated by this ACES database.
The ACES database is updated by R.O. Writer through the R.O. Writer Updater. You do NOT need to run an update or program to update this database.
Adding ACES Vehicle Information on the Vehicle Tab
The Vehicle Tab of the Edit Vehicle window allows you to
- Review ACES information already added.
- Add ACES information before it is requested by the ACES Vehicle Selector window.
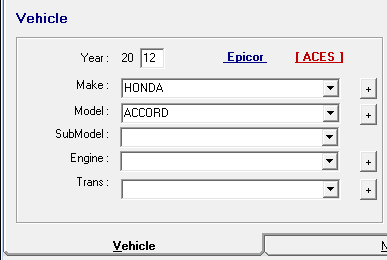
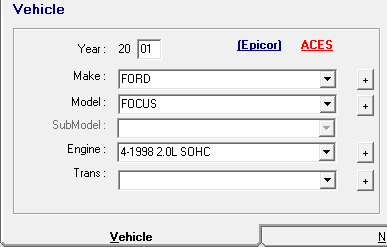
If Epicor is Installed and Configured
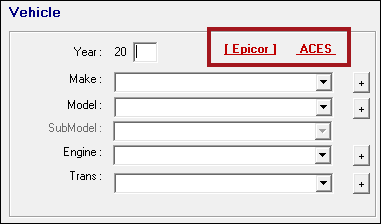
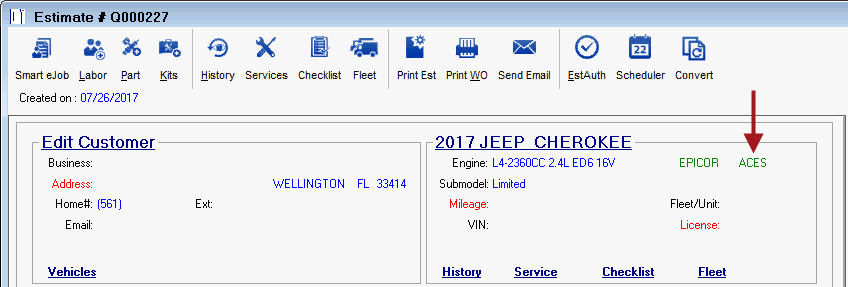
If you have Epicor installed, there are two links on the Edit Vehicle window: one for ACES and one for Epicor. The Epicor link is selected by default. You need to click the ACES link to enter ACES vehicle information.
Epicor and ACES Links
The Epicor and ACES links allow you to review and enter Epicor information and ACES information for the same vehicle. These links also:
- Appear red when valid information has NOT been entered and saved.
- Appear in brackets [] to indicate which vehicle information you are using.
- Appear in green when the vehicle information is valid.
- ACES vehicle information is validated when you select the engine.
- ACES vehicle information is validated when you select the engine.
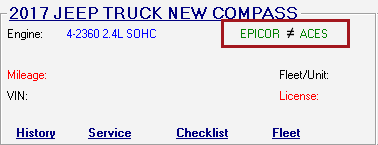
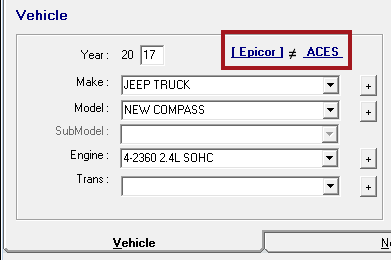
- Have a ≠ between them if there is a mismatch.
If Epicor is NOT Installed and Configured
If Epicor is NOT installed and configured, ACES is the default for vehicle information on the Edit Vehicle window and the Parts/Labor tab. The vehicle dropdown lists on the Edit Vehicle window are populated with ACES Vehicle Information automatically.
As a result, the Epicor and ACES links do not appear on the Vehicle tab.
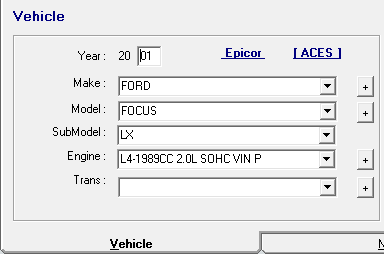
Vehicle Information Dropdown Lists
When entering ACES vehicle information, the following dropdown lists are available for ACES:
- Year
- Make
- Model
- SubModel
- Engine
- Trans
These dropdown lists are the same for every vehicle. New lists are not added or removed based on the vehicle. The ACES Vehicle Selector may ask you for more information even if the vehicle is valid for ACES.
These dropdown lists are populated by the ACES database that installs with R.O. Writer Client.
To View or Add ACES Vehicle Information
After you add ACES information on the Edit Vehicle window the first time, the ACES information is added to the vehicle record in your database permanently. The vehicle is then valid for ACES for all online catalogs and repair databases going forward. The ACES Vehicle Selector will not appear the next time you access an online catalog or repair database.
Complete these steps:
- Open the vehicle.
- On the Edit Vehicle window, click the ACES link.
- The fields clear and the ACES indicator appears in brackets.
- If Epicor vehicle information has already been entered, R.O. Writer tries to enter the Year, Make, and Model using the ACES information.
- Select the Sub-Model.
-
Select the Engine.
The vehicle is validated for ACES when the engine is selected. The ACES link turns blue. Vehicles are not valid for ACES until the engine is selected.
If the vehicle was not valid for Epicor when you clicked the ACES link, the vehicle is validated for both Epicor and ACES when the ACES engine is selected. Both Epicor and ACES links turn blue.
- Click OK to close the Edit vehicle window. The vehicle appears in the vehicle section of the Parts/Labor tab as valid for ACES.

- Epicor information still displays; however, the ACES information is stored in the database.
- You can see it by clicking the ACES link on the Edit Vehicle window at any time.
- If you enter ACES vehicle information before you enter Epicor information, the ACES validation process also validates the vehicle for Epicor as well.
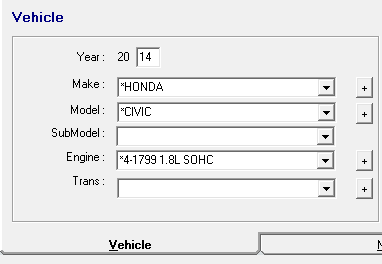
Vehicles Entered Before ACES Compatibility
ACES compatibility was added to R.O. Writer 2.1. Vehicles entered before R.O. Writer 2.1 are not valid for ACES until you validate them on the Edit Vehicle window or the ACES Vehicle Selector.
The ACES link is not selected and appears red when you open the Edit Vehicle window.
Vehicles entered before R.O. Writer 2.1
- Appear as custom with an asterisk (*) on the Edit Vehicle window.
- Are not be valid for ACES.
You can choose to leave the vehicle as custom; however, you will be prompted to enter ACES information when accessing online catalogs and repair databases if there is no VIN.
If You Enter ACES Information Before You Enter Epicor Information
Because Epicor is the default, you would typically enter Epicor information first. However, let’s say you open a phone quote and access a catalog that requires ACES information. Typically, the ACES Vehicle Selector window opens and you need to enter ACES information. This will validate the vehicle for ACES before it is validated for Epicor.
If Epicor is configured correctly on your workstation, Epicor can generate an Epicor ID from ACES information, which means validating a new vehicle for ACES can also validate it for Epicor at the same time.
To Verify ACES Settings in Epicor
The “ACES” entry must be included as a feature in the Epicor license. To verify, open C:\NetCatData\CatalogAssign.exe and confirm that “ACES” displays at the bottom of the list.
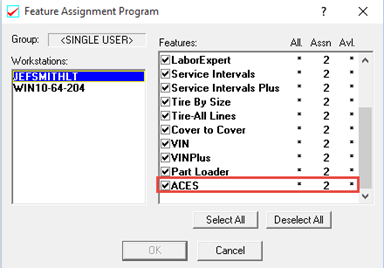
NOTE: Epicor cannot generate ACES information even with this license installed.
Adding ACES Information on the ACES Vehicle Selector Window
Some online catalogs and repair databases require ACES vehicle information to search by vehicle.
When you access one of the repair databases or online catalogs that require ACES information:
- If a VIN is included in the vehicle information, the online catalog or repair database decodes the VIN first.
- If the VIN can be decoded, the vehicle information appears on the window and searches are based on that vehicle.
- If the VIN cannot be decoded, you will need to select the vehicle using the vendor's vehicle selection fields. Your selections here do not save to the vehicle record in R.O. Writer.
- If no VIN is present but the vehicle is valid for ACES, the online catalog or repair database uses the ACES vehicle information.
- If the ACES Vehicle Selector still appears, that means the online catalog or repair database needs more ACES information than is saved in the vehicle record.
- If no VIN is present and the vehicle is not valid for ACES, the ACES Vehicle Selector appears automatically.
NOTE:
ACES Vehicle Selector Window
The ACES Vehicle Selector window appears when accessing catalogs or repair databases that require ACES information if
- No VIN is present and the vehicle is not valid for ACES.
- A VIN is present but the catalog could not decode it.
The dropdown lists on this window are populated by the ACES database that installs with R.O. Writer Client.
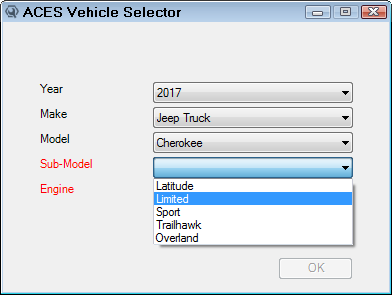
ACES Categories
The ACES Vehicle Selector displays the ACES vehicle information the online catalog or repair database is requesting for the vehicle. If the name of the category on the dropdown list is red, that information is required.
The categories on the ACES Vehicle Selector are dynamic based on the vehicle and what the online catalog or repair database needs. This means that you may see categories that do not appear on the Vehicle Tab of the Edit Vehicle window, which has static vehicle dropdown lists.
When you add information in these additional categories, those selections are saved and stored to the vehicle record if you validate the vehicle for ACES by selecting the engine.
Validating for ACES
On this window, you select ACES vehicle information for the current search AND add that information to the vehicle record at the same time.
When the ACES engine is selected, the vehicle is validated for ACES and saved in the vehicle record in your database immediately. This has the same effect as validating on the Vehicle Tab of the Edit Vehicle window.
The ACES information is added to the vehicle record in your database permanently. If ACES information is stored in the vehicle record, the ACES Vehicle Selector will not appear the next time you access an online catalog or repair database.
Epicor Information
Any Epicor information entered for the vehicle displays above the category dropdown lists.
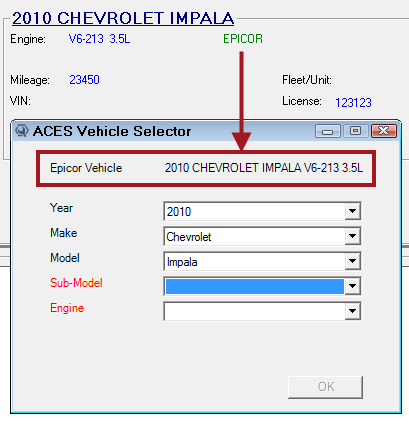
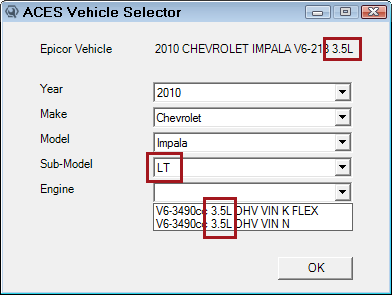
This can help you select the correct ACES information. For example, in the graphic above, the Epicor vehicle information tells you that the vehicle has a 3.5 liter engine. This helps you determine that the Sub-Model must be an LT or an LTZ because 3.5 liter engines are available only for those sub-models.
NOTE: The vehicle information does not need to be valid for Epicor to appear on the ACES Vehicle Selector. If any Epicor vehicle information is entered for the vehicle, it will appear in the Epicor label.
To Add ACES Information on the ACES Vehicle Selector
The following steps show the process when an online catalog requests ACES vehicle information.
Complete these steps:
-
Open a quote, estimate, or repair order that contains a vehicle
- That is not valid for ACES.
- Has no VIN entered.
-
Click one of the online catalogs or repair databases.

-
The catalog window opens and the ACES Vehicle Selector pop-up window opens.
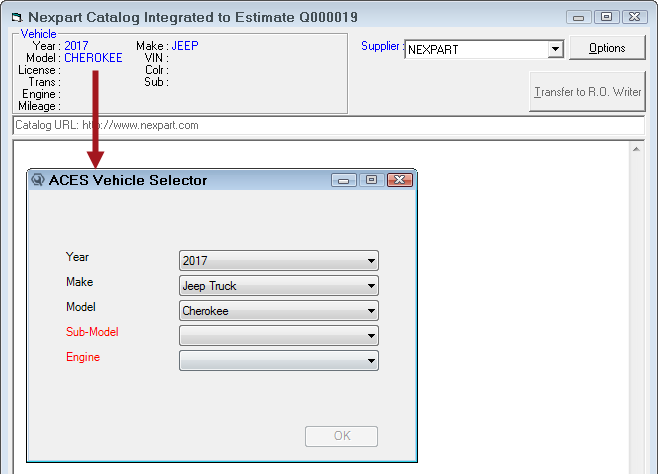
- If year, make, and model were entered for the vehicle, those items are selected already.
- This window displays dropdown lists for the information required by the online catalog or repair database. Required items appear in red.
- If the catalog or repair database you accessed requires additional ACES information, those fields appear on this window in red. You need to select those items to proceed with the vehicle search in the catalog or repair database.
-
Select the remaining required items in the dropdown lists.
- Click OK. (The OK button is not active until all the required vehicle information is entered.)
- The ACES information is
- Sent to the online catalog or repair database.
- Saved to the vehicle record in your database.
-
The catalog window appears with the ACES vehicle information loaded.
- At this point, you can continue to search for parts and post them to the ticket.
However, if you close the catalog window without posting anything, the ACES information is still added to the vehicle record. -
After you close and re-open the quote, estimate, or repair order, the ACES indicator appears in the vehicle section of the Parts/Labor tab.
- The Epicor information still displays in the vehicle section. When you open the Edit Vehicle window to the Vehicle tab:
- The ACES link appears blue.
The ACES information entered appears when you click the ACES link.
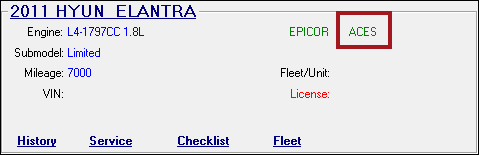
How Do I Know if a Vehicle is Valid for ACES?
You know if a vehicle is valid for ACES if “ACES” appears in green text in the vehicle section of the Parts/Labor tab.
ACES IDs
To be considered valid for ACES, online catalogs and repair diagnostic databases are looking for ACES IDs in the vehicle record. If no ACES IDs are in the vehicle record, you are prompted to select ACES vehicle information, which adds the ACES IDs to the vehicle record in the R.O. Writer database permanently.
You add these IDs when you validate a vehicle for ACES. Vehicles are validated by entering the ACES vehicle information (including the engine) on the
- ACES Vehicle Selector window that pops up when you access an online catalog or repair database that requests it.
- Edit Vehicle window when you click the ACES link.
Mismatches Between ACES and Epicor Information
Descriptions for the same vehicle can different in Epicor and ACES. In addition, you might pick a totally different vehicle for ACES accidentally.
Mismatch Prompt
R.O. Writer checks for these differences whenever you enter ACES vehicle information. If the ACES information is different from the Epicor information, a prompt appears showing you the differences.
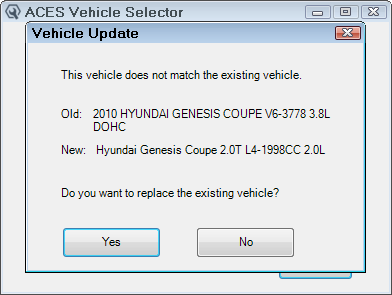
This prompt is asking you if you want to update the Epicor information to match the ACES information.
- Click Yes to automatically update the Epicor information.
- Click No to close the prompt and correct your ACES selections.
Mismatch Indicator
If the Epicor and ACES vehicle information do not match, a mismatch indicator appears in two locations to let you know that the values are different:
- Between the Epicor and ACES links on the Edit Vehicle window:
- Between the Epicor and ACES validation indicators in the vehicle section of the Parts/Labor tab.