Electronic Payment Setup for PayPros
Configuration menu > Electronic Payment Setup > PayPros option
| Setting | Description |
|---|---|
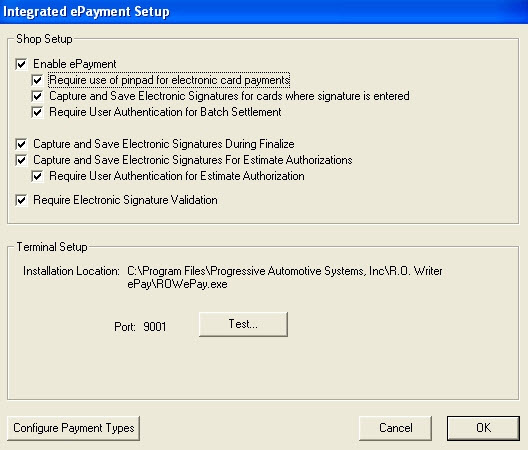
| Enable ePayment* | Select to activate or deactivate electronic payments throughout R.O. Writer. |
| Require use of pinpad for electronic card payments |
Select to require that R.O. Writer connect to an electronic pinpad for electronic payments. When selected
|
| Capture and Save Electronic Signatures for cards where signature is entered | Select to use the signature capture feature. |
| Require User Authentication for Batch Settlement | Select to require the user to log in to settle batches. |
| Capture and Save Electronic Signatures During Finalize* | Select to include the customer's signature on the finalized repair order. |
| Capture and Save Electronic Signatures for Estimate Authorizations* | Select to include the customer's signature on ticket authorizations. |
| Require User Authentication for Estimate Authorizations | Select to require the user to log in when authorizing tickets. |
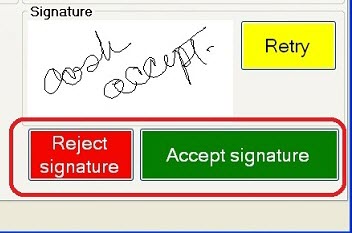
| Require Electronic Signature Validation |
Select to require the user to accept or reject the customer's signature. When selected, the Reject Signature and Accept Signature buttons appear below the captured signature.
You must click one of these buttons to proceed to the next step in the payment process. |
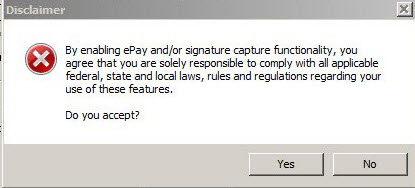
*When the following settings are selected:
- Enable ePayment
- Capture and Save Electronic Signatures During Finalize
- Capture and Save Electronic Signatures for Estimate Authorizations
The Disclaimer prompt appears. Only the shop owner should accept the terms.
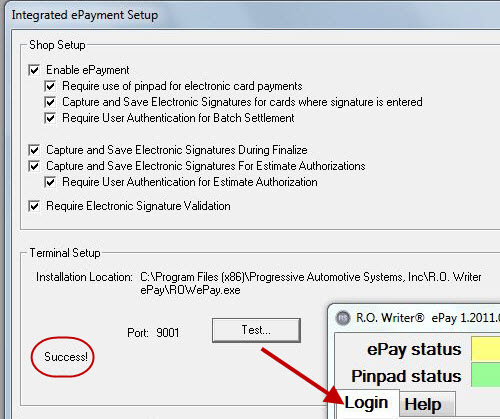
Terminal Setup Section
When ePayment software has been installed, the installation location displays in this section. Click the Test button to verify that the installation is successful. If successful, the ePay login screen displays and "Success!" displays in the Terminal Setup section.
Configure Payment Types
Click the Configure Payment Types button to display the Payment Types window.
Select the Form Types for ePay Transactions
R.O. Writer has created forms types for tickets and receipts that include transaction information for each electronic payment. These forms
- Are stored in the Term folder: (C:\Users\[username]\AppData\Roaming\Progressive Automotive Systems, LLC\ROWriter\Term)
- Are stored in the database
- Have an .rpt extension
- Include all electronic signatures
- Ensure that the appropriate fields and information from any credit card transaction appears in the payment area on the printed form
Form Types for ePay Transactions
Several custom forms have been designed for printed tickets. Select the form you want to use in the Form Types Configuration setting.
| Form | Use For | Layout | Orientation | Prints When You: |
|---|---|---|---|---|
| USEst.rpt | Estimates | Job-Based | Portrait | Click the print estimate button  in the ticket toolbar. in the ticket toolbar. |
| USPO.rpt | Parts-only tickets | Job-Based | Portrait |
Click the print button in the |
| USRO.rpt* | Unfinalized repair orders | Job-Based | Portrait | Click  in the ticket toolbar. in the ticket toolbar. |
| USInv.rpt* | Finalized repair orders | Job-Based | Portrait | Print a finalized repair order. |
| USNJEST.rpt | Estimates | Non-Job-Based | Landscape | Click in the ticket toolbar. |
| USNJRO.rpt* | Unfinalized repair orders | Non-Job-Based | Landscape | Click in the ticket toolbar. |
| USNJINV.rpt* | Finalized repair orders | Non-Job-Based | Landscape | Print a finalized repair order. |
 toolbar of a parts-only ticket and a print a finalized parts-only invoice.
 *RO and INV Forms
These forms are the same except for the line at the bottom.
The last line of RO.rpt forms indicates that this is not an invoice and should not be paid.

The last line of INV.rpt forms thanks the customer for their business. This is the form that is paid.

Estimate Forms
Estimate forms do not contain payment information because you cannot accept payments on estimates.
Choosing Form Types for Repair Orders
You choose which form types to use for each type of document in the Form Types Configuration setting.
Complete these steps:
- In the Configuration module, click File > Form Types. The Forms Setup window opens.
- In the Repair Orders dropdown list, select CUSTOM FORM at the bottom of the list.
- In the Custom Form File field, type in the name of the form you want to use.
- To ensure that the pre-finalized form prints when you click the Print RO button and the finalized form prints after finalization, enter the form names as follows: "USRO.rpt|USInv.rpt"

- Check Portrait if the form is in portrait orientation.
- Job-based forms are portrait.
- Check Landscape if the form is in landscape orientation.
- Non-job-based forms are landscape.
- Check Job Based if the form is job-based.
- Unless the form name contains “non-job-based”, it is usually job-based. If the form is job-based and this box is not checked, the printed form is blank.
- If you want to use the same form type for all repair orders, select Same as repair order in all the other repair order dropdown lists:
- Click OK and your selections are saved.
Printed Transaction Information
If a credit or debit card payment is processed, the electronic payment information appears in its own section of printed repair orders and customer invoices.
Swiped Credit Cards:

Inserted Chip Cards:

Debit Cards (swipe only):
