Reference Tab
The Reference tab stores images related to the service as part of the ticket record. This includes:
- Images from software applications integrated with R.O. Writer.
- PDFs of tickets printed to PDF in R.O. Writer.
- Captured electronic signatures.
- ALLDATA bookmarks.
In addition, you can add images to tickets on the Reference tab.
NOTE: Images do not print with the ticket at this time but are retained in History.
Category Buttons in the Left Column
The category buttons in the left column remain inactive until an image in that category has been added. When the button is active, you can click it to see the images added in that category.
To add an image to the ticket, you click the Add Image button, which is always active, then select the category. When the image has been added in the category, the category button activates.
| Buttons | Name | This button becomes active when: |
|---|---|---|
|
|
iShop | The computer is integrated with an alignment machine. |
| Signature | When a signature was captured during finalize. Therefore, this button is active only when the ticket is opened for review in History. | |
| Customer | A customer image has been added. | |
| Vehicle | A vehicle image has been added. | |
| Invoice | An invoice image has been added. This is where PDFs are stored. | |
| Add Image | You click the Reference tab. This button is always active. |
Adding Images to Tickets
The following image types can be added to the Reference tab:
- *.jpg and *.jpeg
- *.gif
- *.tif
Complete these steps:
- Open a ticket and click the Reference tab.
- Click the Add Image button.
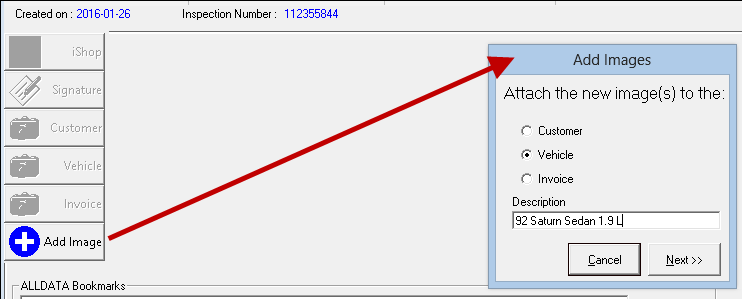
-
Select the Customer, Vehicle, or Invoice option.
- If you select Customer, the image is always linked to this customer.
- If you select Vehicle, the image is always linked to the vehicle.
- If you select Invoice, the image is always linked to the ticket.
- Enter a Description. This is optional.
- Click the Next button.
- Browse to a location.
- Select an image or PDF.
- Click the Open button.
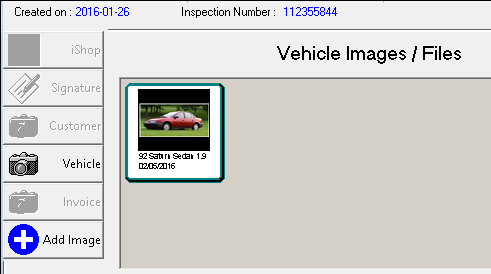
- The image appears as a thumbnail in the center of the window.
- The category activates in the left column.
Images saved or added to the Reference tab remain on the Reference tab
- Through all conversions from one ticket type to another.
- In History.
Opening Images on the Reference Tab
Click the category button in the left column and double-click the image or file in the center box to open it.
Tickets Printed to PDF
When tickets are printed to PDF, the PDF of that ticket is saved to the Reference tab automatically.
For complete details about this process, click the following link:
Images of Electronic Signatures
If you captured and saved an electronic signature when finalizing a repair order, an image of the captured signature is stored on the Reference tab. This image is visible and available only when the repair order is opened for review in History.
When you open a repair order with a captured electronic signature from History, the Signature button on the Reference tab is active. Click the Signature button to see the image of the captured signature.
If you print the repair order from history, the captured signature prints as well.
ALLDATA Bookmarks
When you access ALLDATA Connect Catalog from the ticket and save a bookmark, the ALLDATA Bookmarks are saved to the Reference tab. Saved bookmarks appear in the ALLDATA Bookmarks section.
Double-click on the bookmark to open the ALLDATA Connect Catalog to the selected bookmark.