Searching and Posting in Smart eCat
Smart eCat can be accessed without having a ticket open if you just wish to view the catalog without posting labor or parts.
Vehicle Information
Part and labor searches in Smart eCat are based on the vehicle. Therefore, Smart eCat must be able to identify the vehicle to search.
When you open Smart eCat from an open ticket, the vehicle information from the ticket passes to Smart eCat automatically.
- If the vehicle is recognized as valid for Epicor, Smart eCat selects it automatically. You can begin searching for parts and labor for that vehicle immediately.
- If the vehicle is not recognized as valid for Epicor, Smart eCat opens to its Vehicle Selection tool on the Catalog tab.
The Epicor vehicle information always appears at the very bottom of the Smart eCat window.

To Select a Vehicle
Complete these steps:
- Click the Smart eCat button in the Quick Launch
 to open Smart eCat.
 - If the Vehicle Selection columns appear, you need to select the Year, Make, Model, and Engine in the columns.
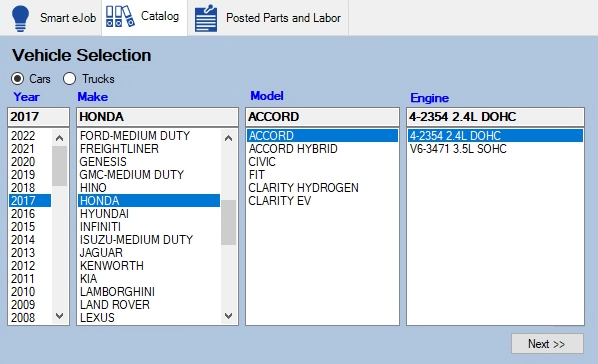
Vehicles are valid when the Engine is selected.
- Double-click on the engine or click Next.
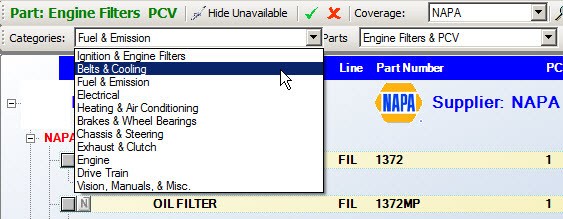
- The categories for that vehicle appear on the Catalog tab.

NOTE: The categories that appear on this window are determined by the Standard Categories setting on the Options tab of Smart eCat Configuration.
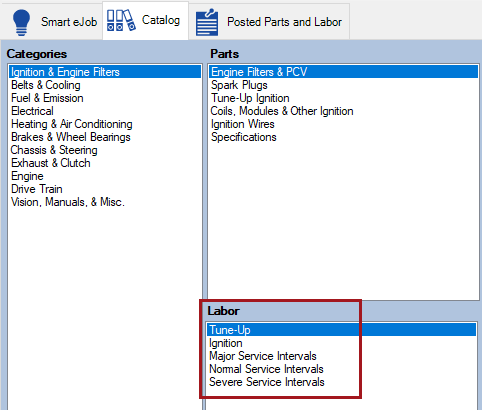
- Click a category in the Categories column.
- Double-click a part in the Parts column to search for it.
- The search results appear.
To Select Another Vehicle
To select another vehicle, click the Vehicle toolbar button  . The Vehicle Selection columns appear.
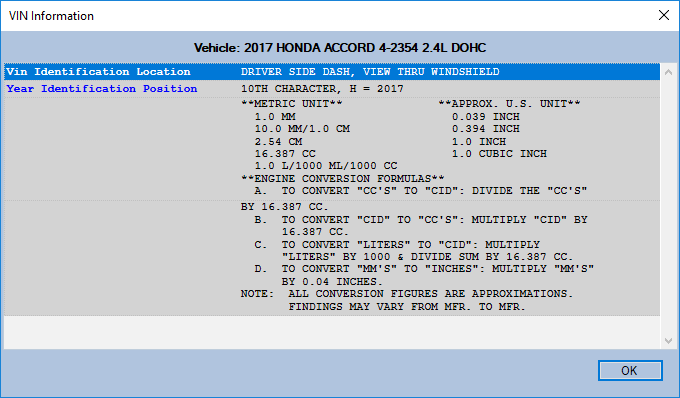
To See VIN Information
To see VIN information for the selected vehicle, click the VIN button  . The VIN Information window from Epicor appears.
Specific Condition Questions
Sometimes Epicor prompts you to answer additional questions about the vehicle. These answers help Epicor (and therefore Smart eCat) determine the correct parts and labor for the vehicle.
Answers to the Specific Condition Questions are saved to the Epicor Tab of the vehicle record. When the answers are saved to the vehicle record, you are not prompted to answer them again.
Searching by Epicor Part Description
You can search by the Epicor description of a part.
Click the Categories toolbar button at any time  . The Epicor Categories appear.
NOTE: The categories that appear on this window are determined by the Standard Categories setting on the Options tab of Smart eCat Configuration.
To search by keyword, type in the keyword in the Search box and click Find after the vehicle is selected  . The search results are based on the Epicor categories.
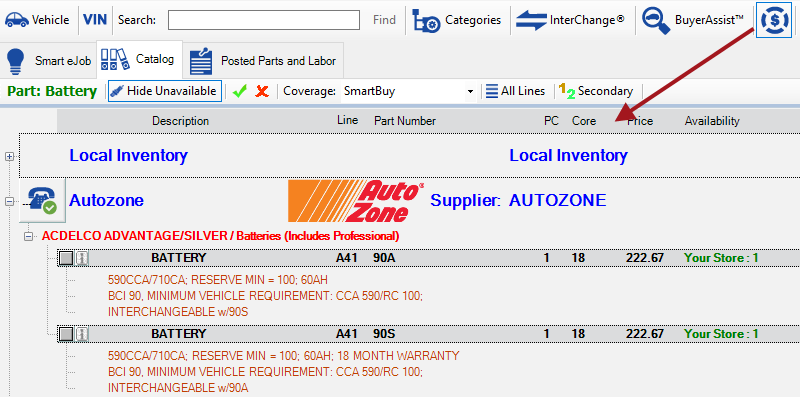
Working with Search Results
The search results window contains many options that enable you to find the appropriate part as quickly as possible.
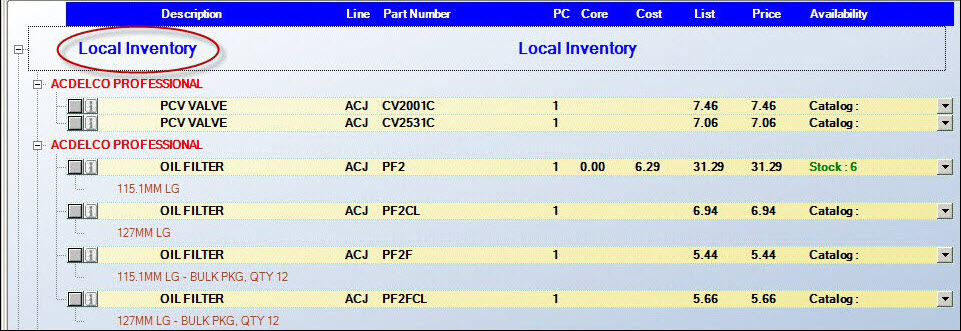
When Smart Buy is selected in the Coverage dropdown list, all coverages included in your Smart Buy are searched automatically. Local Inventory should appear first at the top of the list.
If parts are found in your local inventory, the Local Inventory section is open at the top of the window.
If no parts are found in local inventory,
- The Local Inventory section is closed.
- The primary (first) supplier section is open.
- The window is scrolled down so that the primary supplier is at the top.
Phone Button for Suppliers
While searching for matching parts, the running timer button appears at the top of each supplier section.
When the search is complete, the phone button appears with an indicator describing the results of the search.
- A green checkmark
 means the parts are available from the supplier.
 - A red X
 means the parts are not available from the supplier.
 - A yellow exclamation point
 means the search could not be completed.
To resolve this problem, you can- Check the supplier's configuration in R.O. Writer Configuration.
- Check the supplier's coverage in Smart eCat.
- Contact the supplier directly.
You can click the phone button at any time to search again.
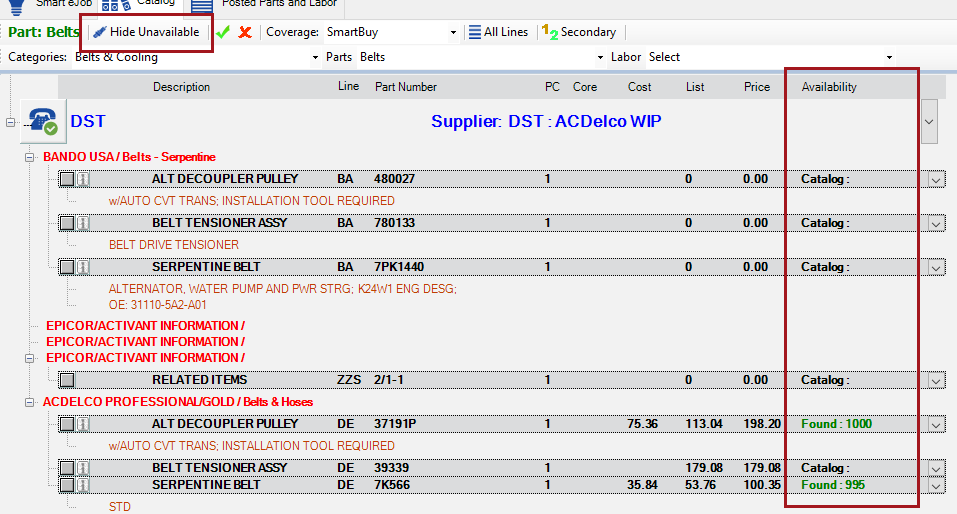
To Show/Hide Unavailable Parts
Click the Show Unavailable and Hide Unavailable toolbar button to show and hide unavailable parts from suppliers. The name of the button toggles from Show to Hide after you click it.
When the Show Unavailable button appears in the toolbar, only available parts appear in the search results.
When the Hide Available button appears in the toolbar, unavailable parts appear in the search results.
To Select Different Categories After a Search
After a search has been completed, you can select different categories, parts, and labor in two ways:
- To return to the window with the columns, click the Categories toolbar button .
- To stay on the search results window, you use the Categories, Parts, and Labor dropdown lists:
Use the Categories dropdown list in the toolbar to change categories.
Use the Parts dropdown list in the toolbar to view different types of parts.
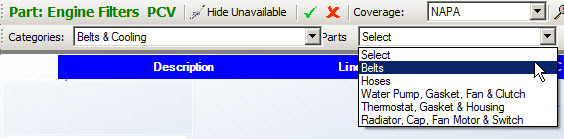
Use the Labor dropdown list in the toolbar to view labor.

To Show/Hide the Cost
Click the Cost button in the toolbar  to display or hide the Cost column. This is useful if you need to show the customer his options on the screen.
When there is no border around the cost button, the Cost and List columns display.
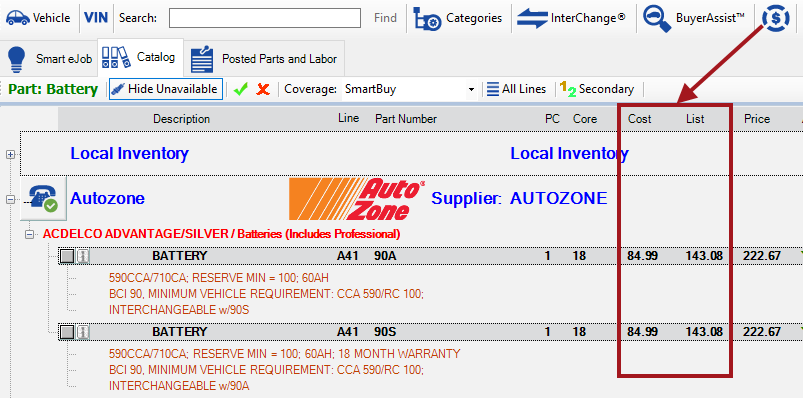
When there is a border around the cost button, the Cost and List columns are hidden.
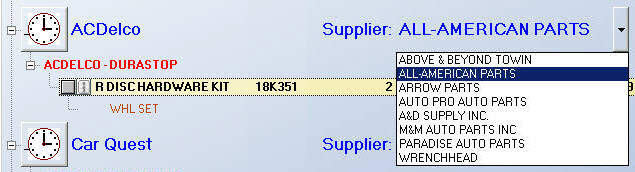
To Select a Different Coverage
If you wish to select one specific coverage (other than the Smart Buy coverage which includes multiple suppliers), select it in the Coverage dropdown list. The search results are narrowed to show only the lines included in that coverage list.
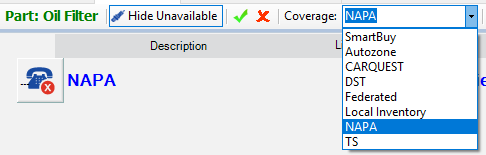
When there is a dropdown arrow next to a supplier, it means there are several suppliers available for that coverage. Click the dropdown arrow to see the list of suppliers in the coverage.
To Select Specific Lines
If you only wish to see selected lines of parts, click the All Lines button. The All Lines window pops up showing the lines that were searched.
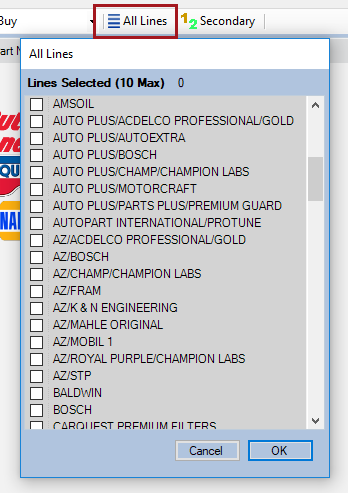
The lines that were already selected as part of your selected coverage(s), appear in bold.
Select the lines you wish to view (maximum 10) and click OK.
To Switch Primary and Secondary Lines
In Smart eCat you can switch between viewing Primary lines and Secondary lines by clicking on the  or
or  buttons in the toolbar. The color of the "1" and "2" indicate what lines you are looking at in the search results.
When you are viewing primary lines, the button displays "1" in green and the word "Secondary" . Clicking on this button changes the word to "Primary" and the number "2" is green.
NOTE: When you set up your coverage lists, you can set up certain lines as Primary or Secondary in the Priority dropdown list.
Epicor Parts Specifications
Epicor specifications provide information about the part or the labor. This information comes from the Epicor database.
These specifications are selected automatically if Automatically Post Specifications is checked in Smart eCat Configuration.
When selected, specifications
- Appear on the Notes tab of the Posted Parts and Labor tab.
- Are appended to the Description box of the labor when transferred to open tickets.
- Print on the customer invoice from the Description box.
To select and de-select specifications:
- Click the gray boxes on each specification to select and de-select them individually.
- Click the red X button in the toolbar to select none.
- Click the green checkmark button in the toolbar to select all.
NOTE: If the specifications appear on the same window with parts, selecting all or none applies to the parts on the window as well.
TIP! Create a separate coverage list just for Epicor specification information and remove that coverage from all your other coverages. This way specification and parts will not return in the search results together.
Part Columns
Each part row displays information in specific columns.

Description
This is the Description of the part.
Line
This is the line code of the part.
Part Number
This is the part number.
PC
This is the number of pieces needed.
You can edit this number by clicking in the field and entering the new number. Then, click outside the field to save the new entry.
Core
This is the core cost if the part requires one or if there is another core cost available.
Cost
This is the Cost (if available).
List
This is the list price.
Availability
This is where the part is available: Stock (your local inventory), Region, or Branch.
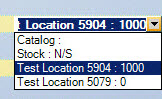
You can select the ordering location in the dropdown list. The core, cost, and list prices are recalculated to match the new location.
Stock (local inventory)
"Stock : [# on-hand]" displays if you have the part on hand in your R.O. Writer inventory.
- The on-hand quantity depends on the Ignore On Order Parts When Displaying On Hand Inventory Quantities option in Configuration.
- If the ignore option is selected, this is the on-hand quantity minus the quantity committed on open repair orders.
- If the ignore option is not selected, this is the on-hand quantity minus the quantity committed on open repair orders, plus the quantity on order (the quantity of that part on purchase orders not yet received).
"N/S" displays if you have an inventory record for the part but none are available.
Region or Branch (online supplier)
The entry in the dropdown list displays "Location Name : [# on-hand]" if the supplier's Region or Branch has the part.
Part Buttons
Buttons appear with the part:
- Click the blank gray box
 to select the part for posting or ordering. A red check appears in the box
  to indicate that it is selected.
 - Click the information button
 to view Epicor or NAPA Cover to Cover information for this part.
If the Cover to Cover option is selected in Smart eCat configuration, the ”C” and “N” buttons appear when supplier information is available:

 for NAPA.
Click the “C” or “N” button to see that information for the part:
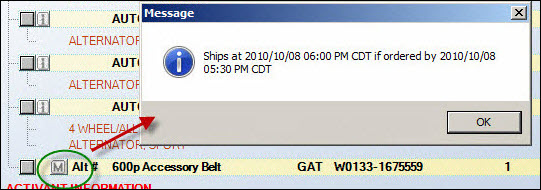
If vendor messages are available, an “M” button  appears on the part line.
If exhaust diagrams are available, a “D” button appears on the part line. Click it to see those diagrams.

Exhaust diagrams are extracted during the Epicor data load.
Miscellaneous
Alternate part numbers have "Alt #" before the description. The part is also outlined in a white box which makes it very easy to tell the difference between an alternate number and a standard part number.
Selecting any other option automatically will change all the other fields to match. For example, if you had multiple stores and wanted to select the lowest cost, you could click on the cost and click the lowest one.
To Post Found Parts
When part results appear on the window, there is a blank gray box to the left of each part. Click the blank gray box to select it. A red check appears in the box to indicate that it is selected.
- Click
 to post the part but stay on the Catalog tab.
 - Click
 to post the part and move to the next part or labor included in the search or job.
The part is posted to the Parts tab of the Posted Parts and Labor Tab in the background. You can click the Posted Parts and Labor tab at any time to verify.
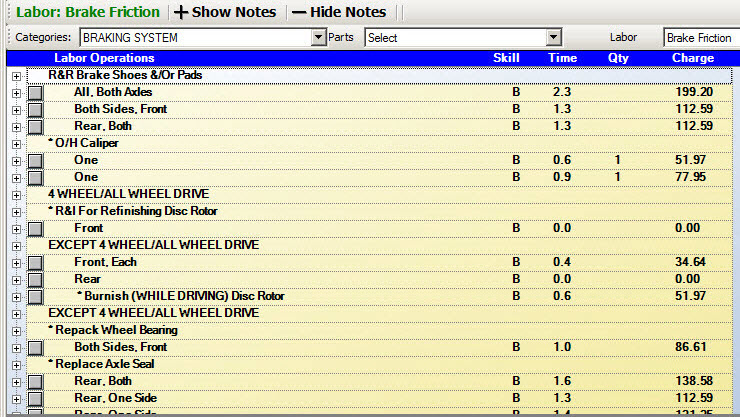
Catalog Labor
To post labor using Smart eCat, click the Smart eCat button in the Quick Launch from an open ticket.
Select the Category and then double-click on the subcategory under labor.
You may need to answer one or more vehicle condition questions. Your answers are saved to the vehicle record on the Epicor tab.
Labor Notes
You can collapse or expand the notes for each job by clicking the + sign to expand or the - sign to collapse.
To show notes for all jobs, click the Show Notes button in the toolbar  .
.
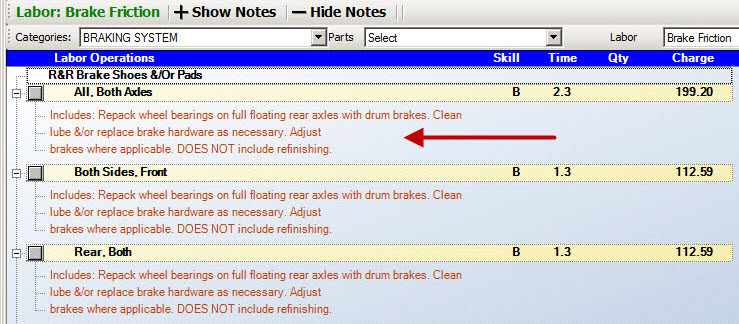
To hide notes for all jobs, click the Hide Notes button in the toolbar  .
.
Selecting and Posting Labor
Click to the left of the job description to select the job. A red check appears in the box to indicate that it is selected.
Click to post the labor but stay on the Catalog tab.
Click to post the labor and move to the next part or labor included in the search.
Posted Parts and Labor Tab
The Posted Parts and Labor tab appears automatically after all parts and labor have been transferred or posted to Smart eCat. There are three sub-tabs:
- Parts Tab - This tab appears first if any parts have been transferred or posted to Smart eCat.
- Labor Tab - This tab appears first only if the labor transferred or posted to Smart eCat contains no parts. Otherwise, you need to click this tab to see the labor.
- Notes Tab - This tab never appears first. Click it to see notes on items that have been transferred or posted.
On the Posted Parts and Labor tab, you review the parts and labor and then post both to the open ticket.
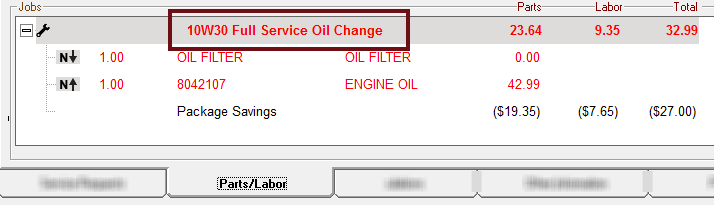
Parts Tab
The Parts tab shows all the parts that have been transferred or posted to Smart eCat. Parts can be transferred because they are included in labor such as a service, labor operation, or Smart eJob.
To Delete Parts from the Parts Tab
To delete one part, click on the gray area before the part number to highlight the entire line and press the DELETE key. A prompt appears letting you know how many parts you selected to delete. Click Yes to delete the parts.
- To delete multiple parts that are next to each other, press and hold the SHIFT key as you click the first part and the last part. All lines in between display.
- To delete multiple parts that are not next to each other, press and hold the CTRL key as you click each part. All lines in between display.
To Order Parts Before Posting to the Open Ticket
The Parts tab has the same functionality as Smart eOrder for one ticket. You can order parts before posting them to the open ticket. For more information, click one of the following links:
- Excluding Parts from an Order
- Checking Availability with the Phone Button
- Ordering with the Truck Button
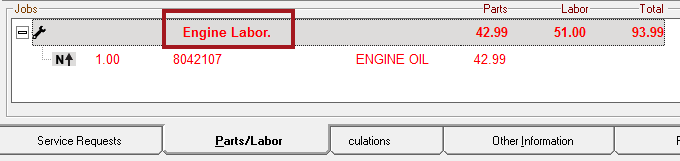
Labor Tab
The Labor tab shows the labor details that were transferred to Smart eCat.
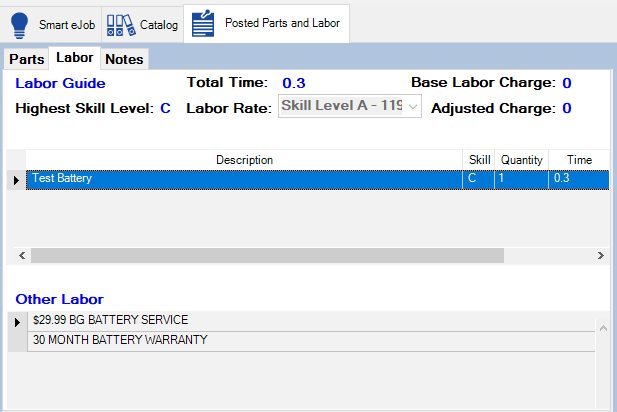
Labor Guide Section
This section displays the details of the selected labor.
- For Smart eJobs, the Labor Guide section displays the details of the selected Smart eJob.
- For catalog labor from Epicor, the Labor Guide section displays the sum of all catalog labor lines on the window.
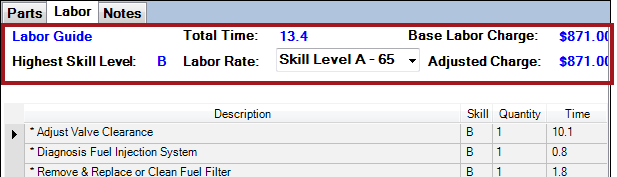
If only one labor is on the Labor tab, these values represent that labor line.
| Item | Description |
|---|---|
| Total Time | The total time for all labor transferred to Smart eCat. |
| Base Labor Charge | This is the labor charge for the service without any adjustments. |
| Highest Skill Level | The highest skill level in the sub-labor lines. |
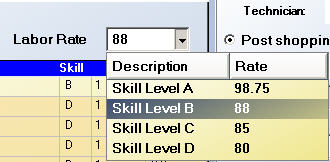
| Labor Rate |
The available labor rates in R.O. Writer. The labor rate is determined by the highest skill level. You can change the labor rate if needed.
These labor rates are set up in the Configuration module. |
| Adjusted Charge |
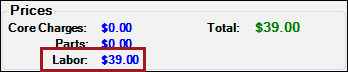
The adjusted labor charge for the service, which is calculated as Base Labor Charge + Any adjustments that apply. Adjustments depend on the service. Some services adjust the labor charge and some do not. If this charge matches the Base Labor Charge for one service, then no adjustment has been applied. The total Labor charge in the Prices section in the right column matches the Adjusted Charge.
|
Labor Lines
Labor lines appear only for catalog labor from Epicor selected during the search.
NOTE: Typically, these lines do not appear for Smart eJobs; however, if catalog labor from the Labor Guide was added to the Smart eJob and that catalog labor was selected during the search, the selected labor lines appear here.
Other Labor
Smart eJobs may include Other Labor but it does not appear on the Labor tab. The Other Labor does post to the open ticket when the Smart eJob posts.
If there is Other Labor, that labor appears in the Other Labor section. However, Other Labor is not included in
- The total time at the top in the Labor Guide Section.
- The Prices section in the lower, right corner of the posting options column.
To Delete Labor Lines
To delete labor lines, you click on the labor line and press the DELETE key.
- To delete one labor line, click on it once and press the DELETE key.
- To delete multiple labor lines that are next to each other, press and hold the SHIFT key as you click the first line, then the last line. All lines in between the first and last select. Press the DELETE key.
- To delete multiple labor lines that are not next to each other, press and hold the CTRL key as you click on each line. Then, press the DELETE key.
A prompt appears telling you how many lines you have selected to delete. Click Yes to delete the selected lines.
To Post Multiple Labor Lines
Labor lines post according to the Posting Options in the Right Column that you select.
If you choose to
- To post to a new or existing labor operation in the right column AND
- Append or replace the predefined description.
Then, all labor lines post to the Description box of that labor operation.
If you choose to post all parts and labor individually, the labor lines post according to the grouping on the Labor tab. Smart eCat uses colors and shading to define groups of labor lines that post as one labor operation.
Notes Tab
The Notes tab contains catalog specifications or Epicor specifications for the parts.
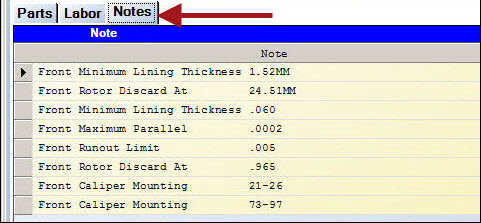
These notes post to the Description box of the labor on the open ticket.
To delete a full line, click once on the gray bar at the far left of each line and press the DELETE key.
Posting Options in the Right Column
The options on the right side of the window, determine how the part is connected to labor operations on the open ticket.
Posting Options
This section determines how the selected parts and labor on the Posted Parts and Labor tab post to the open ticket.
The option selected in the Default Posting section of the Options tab in Smart eCat Configuration is selected here automatically.
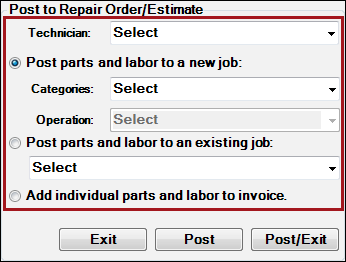
| Option | Select this option to… |
|---|---|
| Post Parts and Labor to a New Job |
Post the parts and labor to a new labor operation. If this option is enabled select the category (required) and operation (optional). For Smart eJobs, this option is selected and disabled. The category and operation in the Smart eJob are selected on the Smart eJob tab. For catalog labor, this is the labor category and a general labor operation for that category. |
| Post Parts and Labor to an Existing Job |
Post the parts and labor to a labor operation already posted to the ticket. The dropdown list contains only labor operations on the open ticket. |
| Add Individual Parts and Labor to Invoice |
Add the parts and labor as separate, individual lines.
|
Labor Descriptions
The Labor Option selected determines how the labor selected in the Posting Options section appears when posted to the open ticket.
The labor option selected here determines:
- The name of the labor line in the Jobs section on the Parts/Labor tab.
- The contents of the Description box of the labor operation.
- These contents print on the final invoice to the customer.
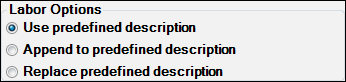
| Labor Option | Select this option to… |
|---|---|
| Use Predefined Description |
Use the description of the R.O. Writer labor operation instead of the Epicor description displayed on the Labor tab.
Use... is usually the default. |
| Append to Predefined Description |
Add the Epicor description to the end of the description of the R.O. Writer labor operation.
|
| Replace Predefined Description |
Replace the R.O. Writer description of the labor operation with the Epicor description displayed on the Labor tab.
|
NOTE: A default option is chosen in Smart eCat Configuration in the Options section. There are different defaults selected for different kinds of labor.