Configuring Electronic Ordering Interfaces
R.O. Writer has built supplier interfaces that allow you to connect to supplier catalogs to search, post, and order parts directly from R.O. Writer.
Configuration menu > Parts > Suppliers > select a supplier > Electronic Ordering Interfaces section.
The interfaces section is active only when a saved supplier is selected in the Supplier dropdown list.
NOTE: R.O. Writer Support cannot provide you with the access credentials for any supplier catalog. If there is an issue regarding the access credentials, you must contact your supplier to obtain the correct login credentials for your account.
Configuring Electronic Ordering Interfaces
Each supplier has different login credentials that you must obtain from the supplier directly. R.O. Writer cannot supply you with this information and R.O. Writer cannot contact parts suppliers on behalf of our customers.
To Configure Electronic Ordering Interfaces
The instructions in this section describe the basic process. Instructions for each supplier appear in the sections that follow.
Complete these steps:
- On the Suppliers window, select a supplier in the Supplier dropdown list at the top of the window.
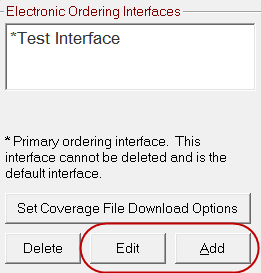
- In the Electronic Ordering Interfaces section, click the Add or Edit buttons. The Electronic Ordering window opens displaying the available supplier interfaces at the top.
- Select the supplier interface in the Electronic Order Type section at the top of the window.
- Type in the Interface Name you want to use.
- This name appears in the Electronic Ordering Interface section.
- If you do not enter an Interface Name, the name of the connection option selected in the Electronic Order Type section is assigned as the Interface Name.
- Enter the supplier information you obtained in the bottom half of the window.
- Click Save. This window closes and the Suppliers window appears with the Interface Name in the Electronic Ordering Interface section.
The Electronic Ordering options for that supplier appear in the bottom of the window. The options change according to the supplier selected.
NOTE: You can configure multiple interfaces for one supplier. Smart eOrder displays multiple ordering locations for suppliers with more than one electronic ordering interface configured.
Electronic Ordering Interfaces
The available supplier integrations appear in the top half of the window.
To configure the interface for the following suppliers, click the following links:
- Configuring the IAP/EZConnect Interface
- Configuring the AConneX Interface
- Configuring the NAPA Interface
- Configuring the Nexpart Interface
- Configuring the ACDelco Interface
- Configuring the Alliance Interface (Bumper to Bumper or Auto Value)
- Configuring the CARQUEST Interface
- Configuring the Autoi Interface
- Configuring the DST Interface
To Configure Other Supplier Interfaces
To configure the interface other integrated suppliers, click the following links:
- Configure the AutoZone Interface
- Configure the Federated Interface
- Configure the IMC Interface
- Configure the OEConnect RepairLink Interface
To Configure Tire Supplier Interfaces
To configure the interface for tire suppliers, click the following links:
- Configure the ATDConnect Interface
- Configure the Carroll Tire Interface
- Configure the National Tire Warehouse Interface
Most Common Connection Information
The most important connection for almost every supplier is the username, password, and URL for your account.
R.O. Writer cannot provide you with your account information; you must obtain your account information directly from the supplier.
| Setting | Description |
|---|---|
|
Username and Password (Required) |
All suppliers require you to enter the login credentials for your account. For most suppliers, the login credentials are username and password. Some suppliers also require specialized codes and IDs. You obtain this information directly from the supplier when you create your partnership. |
|
Set to Default URL button (Required) |
The URL is the website or network location of the supplier's catalog. Click the Set to Default button. R.O. Writer enters the correct URL for the supplier in the field automatically. Use the default URL unless your account uses a different URL. |
|
Check Post Orders to Accounts Payable to be prompted to post orders before ordering:
NOTE: This setting overrides the global Create A.P. Transaction When Posting P.O. setting for the supplier. |
|
|
Some suppliers allow you to configure more than one interface but only one interface can be used to search for and order parts. These suppliers have a Primary checkbox. If there are multiple interfaces for a supplier, check the Primary box of the interface you want to use in Smart eCat, Smart eOrder, and eOrder. The Primary setting is not available for tire suppliers. Tire suppliers can have only one interface, which is always primary. |
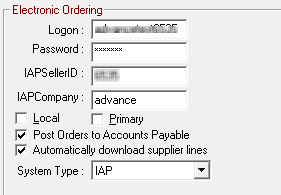
Configuring the IAP/EZConnect Interface
Information is passed through Internet Auto Parts (IAP), which works with several large aftermarket parts providers.
R.O. Writer cannot provide you with your account information; you must obtain your account information directly from the supplier.
Enter the interface information you obtained from your supplier in the bottom half of the window.
|
Setting |
Description |
|---|---|
|
Logon, Password, IAPSellerID, and IAP Company |
Enter the access information. |
|
Local |
Check Local if this is a local supplier. |
|
Primary |
Check Primary if this is the primary supplier for IAP. |
|
Check to be prompted to post orders to Accounts Payable before ordering. |
|
|
Check to configure the interface to automatically download the MCL file every seven days. |
|
|
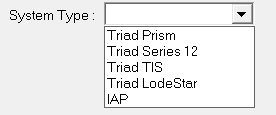
System Type |
Select the system type from the dropdown list:
|
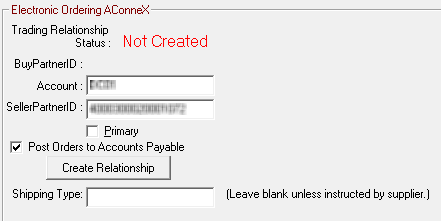
Configuring the AConneX Interface
R.O. Writer cannot provide you with your account information; you must obtain your account information directly from the supplier.
Enter the interface information you obtained from your supplier in the bottom half of the window.
| Item | Description |
|---|---|
|
Account Number |
Enter the account number. This field is case-sensitive. |
|
Seller Partner ID Number |
You need to obtain the partner ID from AConneX before you can enter it here. |
|
Primary |
Some suppliers allow you to configure more than one interface. These suppliers have a Primary box. Check the Primary box of the interface you want to use as the primary interface. |
|
Post to Accounts Payable |
Check Post Orders to Accounts Payable to be prompted to post orders before ordering:
This setting overrides the global Create A.P. Transaction When Posting P.O. setting for the supplier. |
|
Create Relationship |
The Partner information needs to be set up before you can create the relationship. |
|
Shipping Type |
Enter the shipping type if required. |
NOTE: You can also access the AConneX settings from eOrder or Smart eCat Configuration.
You do not need to configure anything extra to connect to the AConneX Cloud. R.O. Writer connects to the AConneX Cloud automatically.
To Obtain the Partner ID
You generate the ID on the AConneX Settings window:
-
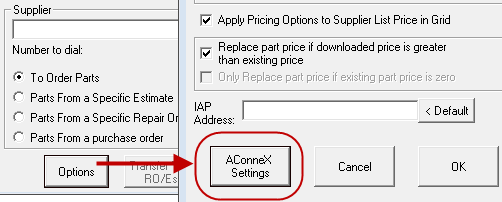
Open eOrder and select the supplier on the Electronic Order Options window. Click the Options button then the AConneX Settings button.
-
Open Smart eCat and click the Configure toolbar button
 > Connections tab > AConneX Settings button.
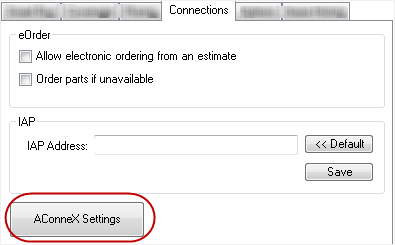
The AConneX Settings window opens.
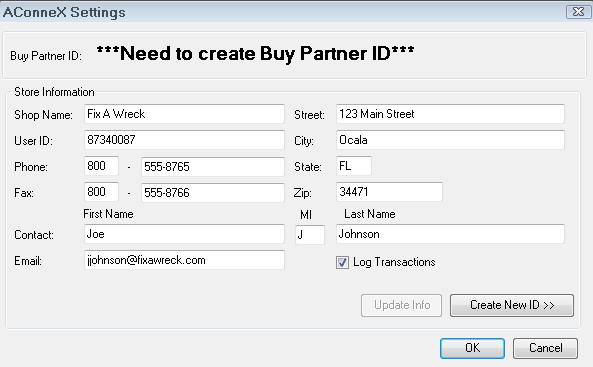
Complete these steps:
- Enter the Shop Name, User ID, address, phone, and contact information for your local trading partner.
- Select the Log Transactions checkbox to track your orders.
- Logs are saved in the ROWriter directory in a text file named ACXTrackNum.log.
- When you have entered all required information, click the Create New ID button. The AConneX Gateway Member Agreement opens.
- When you have read the agreement, check the I confirm… box and click the I Accept button to continue.
- The new Partner ID appears on a popup message.
To Create the Relationship
Complete these steps:
- Reopen the AConneX supplier, select the AConneX interface, and click the Edit button.
- The AConneX information appears in the bottom half of the window.
- The Tracking Relationship Status is Not Created.
- The Create Relationship button appears.
- Click the Create Relationship button and click OK on the success message.
- The Trading Relationship Status should now be Active.
- If you select the Primary box, please note that AConneX Multiple Locations Support allows you to order from the primary store and if the primary store back orders the part from its sister store, the bill is still from the primary store.
- Click the Save button to save and return to the Edit Supplier window.
- After the connection is active, the AConneX Button appears next to the AConneX option in the top half of the window.
- Click the AConneX button to find additional interface partners.
Configuring the NAPA Interface
After you receive the interface information from your NAPA partner, enter it on this window.
R.O. Writer cannot provide you with your account information; you must obtain your account information directly from the supplier.
After this interface is configured, you can order directly from NAPA PROLink.
Enter the interface information you obtained from your supplier in the bottom half of the window.
|
Setting |
Description |
|---|---|
|
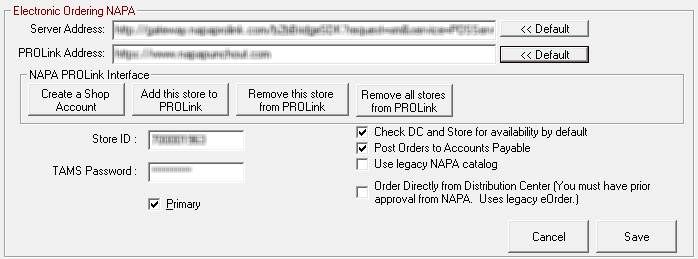
Server Address |
Click Default to use the default server address. |
|
PROLink Address |
Click Default to use the default PROLink address. |
|
Store ID |
You must obtain the Store ID from the NAPA supplier. |
|
TAMS Password |
You must option the password from the NAPA supplier. |
|
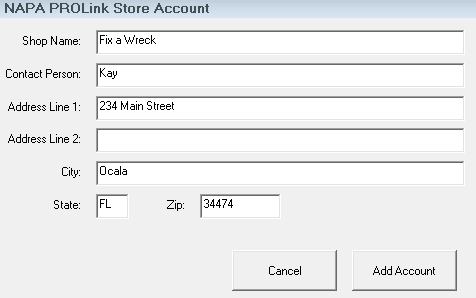
Create a Shop Account button |
Click to create a shop for the NAPA PROLink Interface in Smart eCat. Enter your shop information on the NAPA PROLink Store Account window and click the Add Account button.
You can use one ship ID per store. If you enter the same ID for two stores, R.O. Writer prompts you to delete the existing account and replacing it with the new one. |
|
Add This Store to PROLink button |
Click to add this store ID. Only one shop account may be created. If you have already created a shop account, a prompt appears asking if you want to delete the existing account and replace it with this one.
|
|
Use Legacy NAPA Catalog |
NAPA PROLink is only available in the United States at this time. Those outside the United States should check the Use NAPA Legacy Catalog box. |
|
Check DC and Store for availability by default |
Select if you wish to always check both each time you query parts. |
|
Primary and Post to Accounts Payable |
Check Primary and/or Post to Accounts Payable if applicable. |
|
Order Directly from Distribution Center |
Select only if you use the legacy eOrder and have approval from NAPA. |
NOTE: For NAPA, you must set the coverage file download to manually create and import into Smart eCat.
Configuring the Nexpart Interface
R.O. Writer cannot provide you with your account information; you must obtain your account information directly from the supplier.
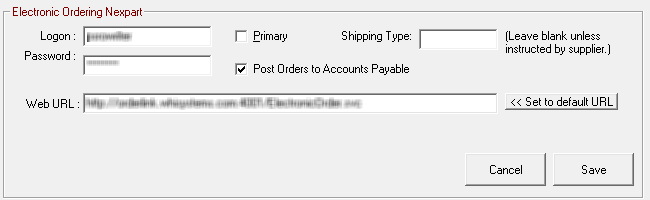
Enter the interface information you obtained from your supplier in the bottom half of the window.
-
Enter the
-
Username and Password for your account.
-
Shipping Type if the supplier instructed you to do so.
-
Click the Set to Default URL button to enter the default URL to access the catalog.
-
-
Check Primary and/or Post to Accounts Payable if applicable.
After this interface is configured, you can order parts through the Nexpart interface.
The Nexpart interface has unique coverage file download settings. For details, click the following link: Nexpart Coverage File Options.
Configuring the ACDelco Interface
After you receive the interface information from your ACDelco Connect supplier, enter them on this window.
R.O. Writer cannot provide you with your account information; you must obtain your account information directly from the supplier.
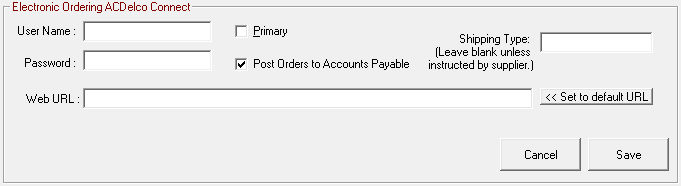
Enter the interface information you obtained from your supplier in the bottom half of the window.
-
Enter the
-
Username and Password for your account.
-
Shipping Type if the supplier instructed you to do so.
-
Click the Set to Default URL button to enter the default URL to access the catalog.
-
-
Check Primary and/or Post to Accounts Payable if applicable.
After the interface is configured, you must also configure how the price of posted parts is determined.
Use the supplier's catalog coverage file instead of downloading the manufacturer’s line code.
Configuring the Alliance Interface (Bumper to Bumper or Auto Value)
R.O. Writer cannot provide you with your account information; you must obtain your account information directly from the supplier.
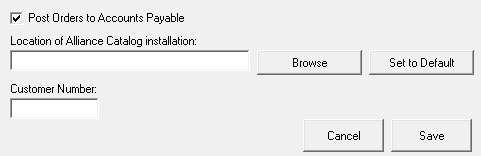
Location of the Alliance Catalog Installation
You connect to these catalogs via a file that you download from the Auto Value or Bumper to Bumper Supplier. In the Location field, you enter the location of that file. You can
-
Type in the location.
-
Click the Browse button to navigate to and select the location.
-
Click the Set to Default button to enter the default location. Use this method only if the file is located in the default location.
Customer Number
The customer number is the number required by R.O. Writer to access your account. Enter your customer number by typing it in.
To Assign an Alliance Catalog to Another Supplier
If you attempt to assign Bumper to Bumper or Auto Value to another supplier, you are prompted to change the supplier.
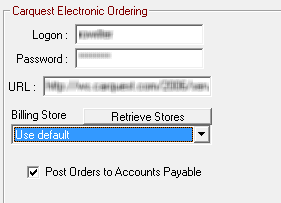
Configuring the CARQUEST Interface
The CARQUEST interface does not work in eOrder. It is available only in Smart eCat and Smart eOrder.
R.O. Writer cannot provide you with your account information; you must obtain your account information directly from the supplier.
Enter the interface information you obtained from your supplier in the bottom half of the window.
- Enter the Logon and Password for your account.
- Select the Billing Store in the dropdown list.
- Click the Retrieve Stores button to populate the dropdown list with stores in your local area.
-
Check Primary and/or Post to Accounts Payable if applicable.
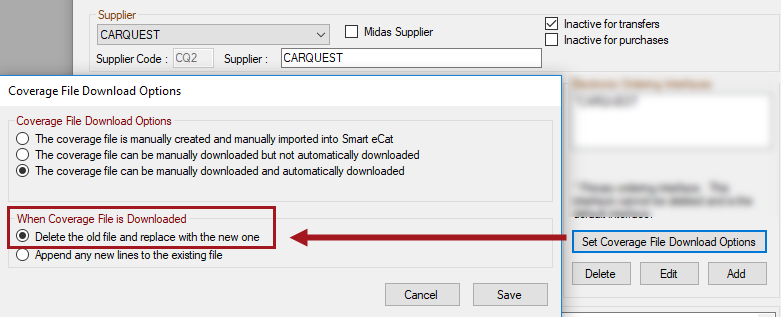
When configuring the coverage file download for CARQUEST, you must check Delete the Old File and Replace it With the New One in the When Coverage File is Downloaded section.
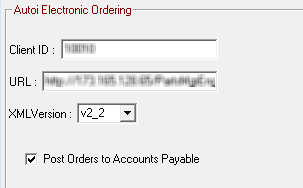
Configuring the Autoi Interface
The Autoi method does not work in eOrder. It is available only in Smart eCat and Smart eOrder.
R.O. Writer cannot provide you with your account information; you must obtain your account information directly from the supplier.
Enter the interface information you obtained from your supplier in the bottom half of the window.
Enter the login credentials:
- Client ID - The login provided by your Federated representative.
- URL - Enter the default URL to access the catalog.
- XML Version - Select the XML version using the dropdown list.
Check Primary and/or Post to Accounts Payable if applicable.
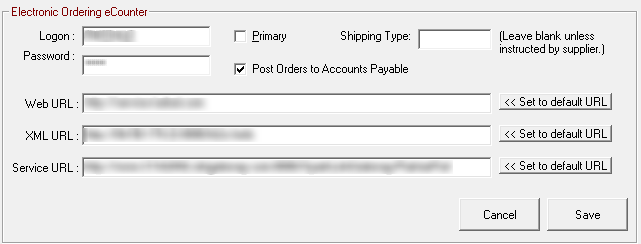
Configuring the DST Interface
There are three DST interfaces: Motorcraft eCounter, ACDelco WIP from DST, and TurboParts. You can set up an interface for each per supplier or one supplier with an interface for each depending on your business agreements.
R.O. Writer cannot provide you with your account information; you must obtain your account information directly from the supplier.
Enter the interface information you obtained from your supplier in the bottom half of the window.
-
Enter the
-
Username and Password for your account.
-
Shipping Type if the supplier instructed you to do so.
-
-
Check Primary and/or Post to Accounts Payable if applicable.
- Web, XML, and Service URLs - Click the Set to Default URL button for each to enter the default URL in each field.
- Type in a different URL ONLY if you know you need to use a different URL to access your account.