Printing to Email
Printing to email is not available automatically. The Email tab still appears on the new Printing window; however, it remains inactive until the requirements for printing to email have been met.
Requirements for Printing to Email
Printing to email still requires that
- You set up your email server in the Email configuration setting.
- Access this setting by clicking Configuration > Configuration menu > E-mail Setup).
- For more information, click the following link:
- When emailing a customer a document, the customer must have a valid email address.
- The customer’s email address appears on the Parts/Labor tab of the ticket window. LINK
- The first tab of the Edit Customer window.
Printing to Email
When you print to email, you are emailing a PDF copy of the document you are printing. This removes the extra steps involved with printing to PDF and emailing that PDF from your email application.
The email is sent from the email address you have configured as the default on the current machine in the E-mail Setup Configuration setting (File menu > E-mail Setup).
Complete these steps:
- Click the Print button or button in the R.O. Writer module.
- If you are printing a report, the report compiles until the report is ready to print.
- The Output Selection window appears with the Printer tab showing.
-
Click the Email tab.
This tab appears only when R.O. Writer is configured to send emails.
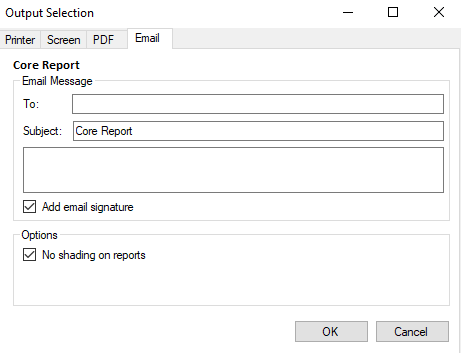
- Review the information in the Email Message section:
The To box is for the email addresses. Type or paste in the email address or addresses.
You can email multiple email addresses at the same time by separating the addresses with a comma.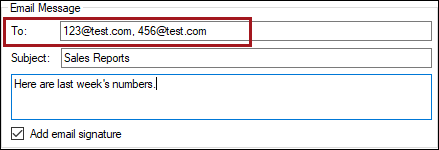
- The Subject is the name of the PDF file by default. TAB key or click inside the box to change the text.
- The message box is where you type the message to the person in the To line.
- The Add Email Signature box is checked by default. You can uncheck it to remove the email signature from the email.
- Review the Options section:
- The No Shading on Reports checkbox is checked by default.
- When checked, no background lines appear on report rows.
- Uncheck this box only if you are printing a report and want shading on every other row.
- This checkbox applies only to reports and has no impact on other documents.
- Click OK.
-
The email sends.
TIP: You may want to add your email address in the To line to verify that the email sends correctly.
Email Signature
The email signature is created by R.O. Writer. The signature is formatted as follows:
+++++++++++++++++++++++++++++++++++++++++++++++++++++++++++++
Company Name
Company Phone Number
The company name and phone number are pulled from the shop header in your R.O. Writer license.
TIP: To see the contents of your signature before you send an email to a customer, send an email of a document with the Add Email Signature box checked to someone inside your organization.