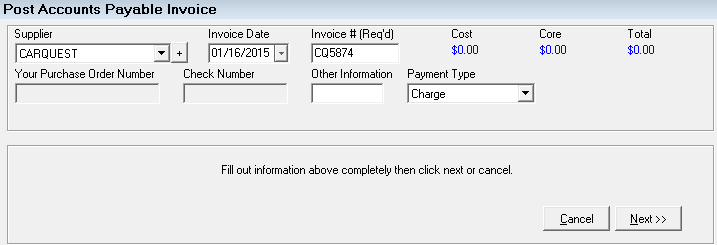
Posting an invoice by detail begins similarly to posting by summary.
Click the
- Post AP toolbar button in the main module (if it was set to post by detail in General Options).
- Post to AP Button on the Edit Parts window of individual parts that need to be posted.
The Post Accounts Payable Invoice by detail window opens.
Post to AP
The Your Purchase Order Number field can be disabled by selecting the Disable Editing PO in AP and Inventory option in Configuration.
Complete these steps:
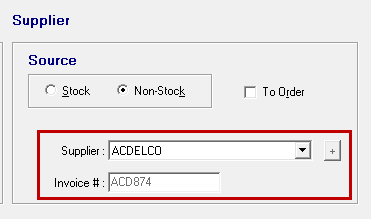
- Select the supplier from the dropdown list. If the supplier does not appear in the list, return to the toolbar and select the Suppliers tool to enter the appropriate supplier.
- Enter the date of the invoice. The current date will be entered by default.
- Enter the supplier’s Invoice number. This field is required and may be used to track parts back to a specific invoice.
- If the shop issued a purchase order to the supplier, enter that information in the Your Purchase Order Number field.
- Enter additional information about the transaction in the Other Information field. This field is limited to seven characters.
- Select the Payment Type from the dropdown list:
- Selecting Petty Cash, Check, or one of the credit card types as the payment method marks the transaction or invoice as paid.
- Selecting check requires that you enter the check number. However, if you use the Accounting Interface module and prefer to print the checks out of QuickBooks instead, the check number should be left blank so they show as "To Print" when imported into QuickBooks.
- To print the check to the supplier immediately, click the Print Check button. If the check is not printed at this time, it can be printed later.
- To have a check marked as printed without physically printing a check, print to the screen.
- When printing checks out of R.O. Writer, use the QuickBooks voucher forms.
- To leave the invoice open, select Charge as the method of payment. All invoices that are shown as charged may be selected for payment later.
To cancel the posting of the invoice, click the Cancel button.
To complete the details of the invoice, click the Next button.
Invoice Details
The next step is to complete the details of the invoice. Each item entered on the invoice may either be posted to an open repair order, to inventory, or to a cost account.
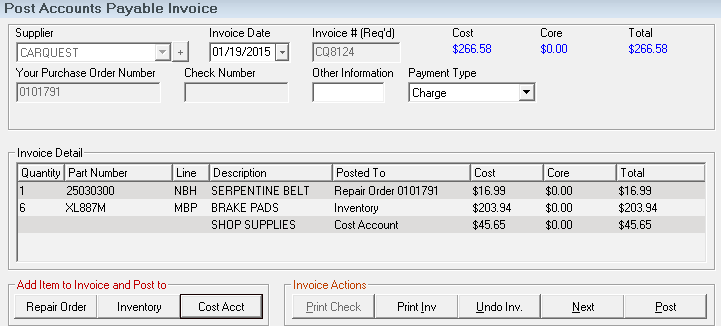
The totals for the invoice is determined as each item is added. The totals cannot be edited, only modified by an entry in the invoice details.
Add Item to Invoice and Post To Buttons
- Repair Order - A part number is posted to an open repair order as a non-stock item.
- Inventory - A part number is posted to inventory.
- Cost Account - The invoice item to be posted is posted to a cost account. This could be items such as freight, shipping, etc.
Invoice Actions Buttons
After all the details for an invoice have been completed, select the Invoice Actions to be taken.
- To pay the invoice immediately by check, click the Print Check button. If the check is not printed at this time, it can be printed later.
- To have a check marked as printed without physically printing a check, select Print To Screen on the Printing window.
- All invoices shown as charged may be selected for payment later.
- To post this transaction and post another invoice by detail, click the Next button.
- To post the transaction and exit, click the Post button.
Post to Repair Order
Post to Repair Order allows you to purchase non-stock parts and post them directly to the repair order where those parts will be used. The on-hand inventory does not increase. Instead, the part is posted to the repair order as a non-stock part.
NOTE: If you also check Track On Hand for Non-Stock in R.O. Options - Parts, the on-hand inventory will be decreased and you will need to post the parts to Inventory to increase the on-hand inventory, then manually add the part to the repair order.
To Post an Invoice Item to a Repair Order
Complete these steps:
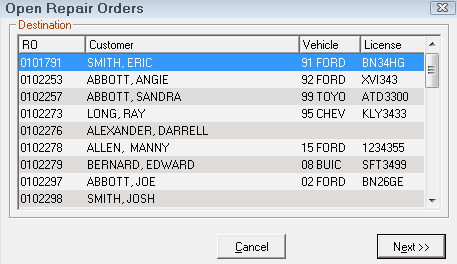
- Click the Repair Order button. A list of open repair orders appears.
- Select the appropriate repair order, and click the Next button.
- Select the repair order.
- All non-stock parts on that repair order without an invoice number appear on the Parts window.
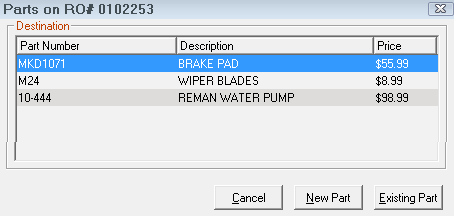
- Select the parts you are purchasing on this invoice by selecting the part and clicking the Existing Part button.
You can also click the New Part button to add a new part to the repair order and place on this invoice to purchase. The Editing Part Window opens with the supplier and invoice number added; they cannot be changed.
- To enter multiple parts for posting, click the Next button, or click OK to return to the posting detail screen.
When posting an Accounts Payable Detail invoice to the repair order for parts that include a core, the core total is also posted to your Default Core AccountPO Transfer and Other Parts Options.
Post to Inventory
This option allows you to purchase parts and post them to inventory.
To post a part to inventory, enter a portion of the part number, and click Search Inv or press Enter. This will execute a search of the existing inventory for this part. Alternate number may also be used to search by checking the Alternate Number box.
The Parts List appears.
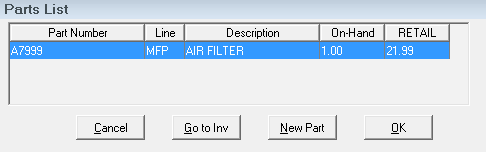
Double-click on the desired part, or select the part, and press OK. The Current Statistics display on the Post Parts Receipts window.
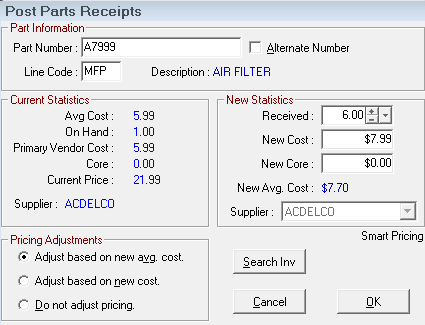
Current Statistics Section
The Current Statistics section is read-only and cannot be changed on this window.
Avg Cost
The average cost of all parts currently on your shelf.
On-Hand
The current quantity shown on-hand (not including the number committed on open repair orders). To see the number committed, you can click the Search Inv button to view the part in inventory.
Primary Vendor Cost
The cost of the part the last time it was purchased from the primary vendor.
Core
The core cost if this part includes a core.
Current Price
The current retail price being charged to customers.
Supplier
The primary vendor.
New Statistics Section
You must enter the information in the New Statistics section to post the part and update inventory information.
Received
The quantity of parts that have been purchased.
New Cost
The actual cost of the parts that have just been purchased.
New Core
The new core cost if this part includes a core.
New Avg. Cost
The new calculated average cost once this part has been posted to inventory.
Supplier
The vendor for whom the invoice is being posted. This cannot be changed.
- If the supplier is different from the primary supplier listed in the inventory record, you are prompted about changing the primary supplier for the part to the selected vendor.
- If the new vendor is selected as the primary vendor, the old primary vendor is moved to the second supplier.
- If the vendor is not selected as the primary vendor, it is entered as the second supplier.
Pricing Adjustments
You must select the pricing adjustment to complete the transaction.
Adjust Based on New Avg. Cost
The pricing levels are recalculated based on the new average cost. The multipliers set for the department selected for this part or the default pricing if there is no department selected.
Adjust Based on New Cost
The pricing levels are recalculated based on the new cost you entered under New Statistics. The multipliers set for the department selected for this part or the default pricing if there is no department selected.
Do Not Adjust Pricing
The pricing levels are not adjusted. This option should be selected if prices are manually adjusted.
When all of the information has been completed, click OK to update the inventory information and return to the posting detail screen.
Post to Cost Account
The total from the invoice to be applied to the cost account should be entered in the Amount field. If cores are included on this invoice, enter the total core amount. The default account you set up for cores should be selected. Select the account to which the transaction will be applied from the dropdown list.
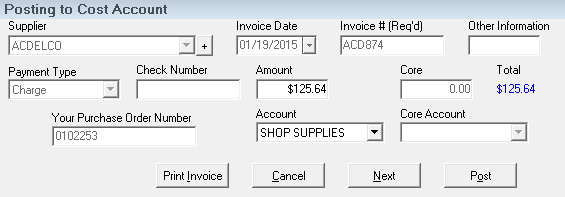
- Click Next to post this transaction and to enter another transaction to be posted to a cost account.
- Click Cancel to return to the posting detail screen without posting the transaction, or click the Post button to post the entry and return to the posting detail screen.
Accounting Interface with QuickBooks
If you use the to import sales data to QuickBooks, when parts are purchased that is sold on a repair order, the Accounts Payable invoice needs to be coded to the inventory account, which already exists under standard accounts. If you do not, inventory in QuickBooks goes to a negative number because when you sell the parts, we reduce inventory in QuickBooks by the total cost of those parts and increase parts costs (cost of goods sold) account.