The first step is to edit the R.O. Writer accounts if needed.
Click the Configuration button in the toolbar ![]() .
.
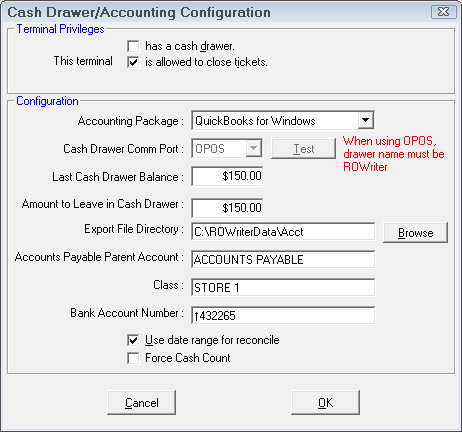
Terminal Privileges
The Terminal Privileges section contains the settings listed below.
- Has a Cash Drawer - This should be checked if you have an electronic cash drawer attached to your computer that interfaces with R.O. Writer.
- This Terminal is Allowed to Close Tickets - You are able to assign terminal privileges as to whether or not you will allow it the ability to close tickets.
Configuration
The Configuration section contains the settings listed below.
Accounting Package
This should say "QuickBooks for Windows". If you are only using the Accounting Interface to the report and are not importing into QuickBooks, you can select No Accounting Interface.
Cash Drawer Comm Port
This option is used only if you have an electronic cash drawer attached to your machine that interfaces with R.O. Writer. Select the com port number the cash drawer is plugged into.
- We recommend the following cash drawer from MMF, POS model number: MMF 226-125161872-04. For more information, please visit www.mmfcashdrawer.com.
- We added support for the OPOS interface, if the cash drawer supports it.
- Configure the cash drawer’s interface software as documented and where appropriate, assign it the device name "ROWriter".
- In the Configuration module Cash Drawer/ Accounting, the Cash Drawer Comm Port should be set to "OPOS".
Last Cash Drawer Balance and Amount to Leave in Drawer
These are defaults for cash drawer balances; however, they can be edited when doing the daily reconcile and import to QuickBooks.
Amount to Leave in Drawer is the amount to leave in your cash drawer which is the same as petty cash in QuickBooks.
Export File Directory
This can be C:\program files\intuit\QuickBooks Pro depending on what directory QuickBooks shows as default directory for importing files assuming Quick Books has been loaded on the computer you are importing from. You can also create your own folder to save these files in such as R:\data\accounting which could be a mapped drive on the server.
Accounts Payable Parent Account
R.O. Writer Accounts Payable Invoices import into QuickBooks under individual supplier accounts rather than Accounts Payable. This is help s you identify how much is owed to each supplier in QuickBooks but can make it difficult to determine your total Accounts Payable liability.
You can set up the Accounts Payable account as the parent account and R.O. Writer Accounts Payable Invoices import to individual supplier accounts as sub accounts under the Accounts Payable or other specified account. This is helpful with QuickBooks reports where you just want an Accounts Payable total. You will then be able to click the collapse button to only show the Accounts Payable account and the total or expand to see what is owed to each supplier.
NOTE: Do not use Inventory for the Accounts Payable Parent account. Inventory is an asset account not a liability account like Accounts Payable. This would generate errors importing.
Class
In QuickBooks, classes give you a way to classify your transactions. The classes you create appear on your class list and some reports in Quick Books can be selected by Class. This field allows you to specify a Class for R.O. Writer data imported into QuickBooks. This especially useful if you have a Central Office location where multiple stores import data into it. Each store can be set up to be a separate class, such as Store 1.
To set up to use classes in QuickBooks, click on File Preferences Accounting
Company Preferences
Click the box for Use Class Tracking. Click Report for a Quick report for a particular class. For regular reports, use the Filter button after selecting the report to select the class to print.
Use Date Range for Reconcile
Check this box to allow entry of a date range when reconciling. This is generally not recommended if importing into QuickBooks because it can’t track what has already been posted and it is easy to duplicate information. It can be used if you are careful never to use the same date ranges twice and not to skip days in between.
- If you are using the date range option, records do not get marked as posted and only the date of the transaction is used.
- If not using the date range option the following applies:
The Accounting Interface does not post by date. When transactions have been posted to QuickBooks, it is flagged as posted in the system. The reconcile procedure will include ALL transactions regardless of date that have not yet been posted to QuickBooks. When you answer YES the reconcile report is correct, they are marked as posted and cannot be posted again.
Reopening Repair Orders
Reopening repair orders already posted to QuickBooks results in that repair order showing up on a reconcile report again and being posted to Quick Books twice. Take special care reopening repair orders when you are using the Accounting Interface and only reopen repair orders that have not already been posted.
If you answer no to the question, is the report correct because a repair order has wrong pay type or other entry errors, you can reopen it, fix it, run end of day again and run the reconcile again. When you have answered yes, it’s too late; therefore, it’s good practice to check the printed report before answering YES.
Force Cash Count
Check this box to force the user to count and enter the correct currency amounts during the reconcile rather than just enter the total amount.
Troubleshooting
See Troubleshooting for information on common errors and other information.