To configure multiple databases, you must do two things in the Configuration module:
- Enable Multiple Database Configuration in General Options
- Configure the Data Locations for each database in Data Locations
Do NOT close the Configuration module before both are completed.
Complete these steps:
- In the Configuration module, click File > General Options > Critical Settings section> Enable multiple database configuration.
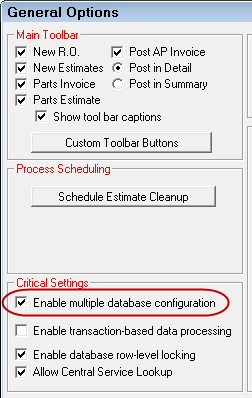
- R.O. Writer warns you about the configuring multiple databases.
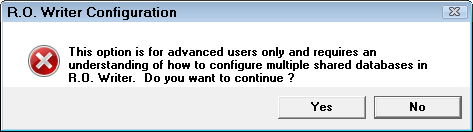
- If you are an advanced user who knows the required information, click Yes to continue.
- You are returned to the Configuration module.
NOTE: Do NOT exit the Configuration module at this point. You must configure Data Locations for each database before you exit the Configuration module.
- Select File menu > Data Locations.
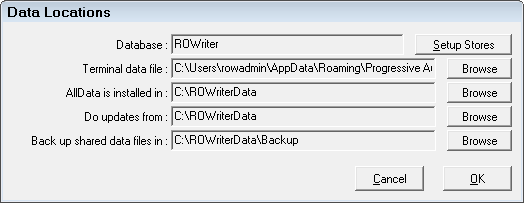
- Click the Setup Stores button. The first time you click on Setup Stores, you see the following:
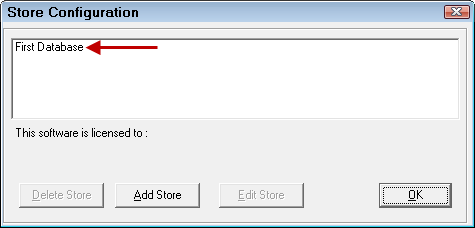
This is the default database or the database that was in use before this was turned on. It can be edited to be your training database if this is a new installation or the store name of this location.
- Select First Database (the buttons activate) and click the Edit Store button.
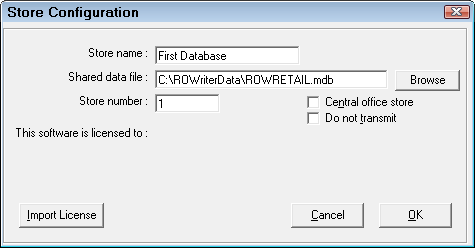
- Enter the Store Name; it should be something identifying the location.
- Choose the database for this store name and number in the Shared Data File field; it should point to the correct database on the computer.
- Enter the Store Number for the database.
- Do NOT click the Import License button until all stores have been set up.
- Click OK and you are returned to the initial Store Configuration window.
- Click the Add Store button. The Store Configuration window opens.
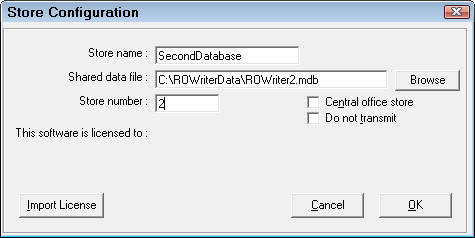
- Enter the information for the second store; connect it to a different database.
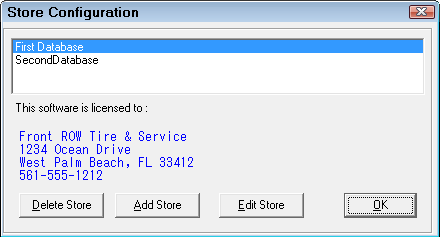
- Click OK and you are returned to the Store Configuration screen, which now shows two databases.

- Repeat the Add Store process until all the stores and databases are added.
- Click OK on this window after all the stores and databases have been added.
- Close Configuration and R.O. Writer.
NOTE: You must close all modules of R.O. Writer so the system can read the changes during the next launch.
Switching Between Databases
When you re-launch R.O. Writer and open Configuration, a dropdown list of the databases appears in the upper right corner.

The database selected here is the database that the system uses. When you want to switch databases in the future, you MUST do so here, then close and re-open all modules.
Multiple Databases in R.O. Writer Main Module
When you open main R.O. Writer, you should now see the same dropdown list on the main window. It indicates which database is displaying in the WIP and Estimates in Progress windows.
When multiple databases are set up, you should see a "Working on" dropdown list in the upper right corner of each module. When you select a different store, you may need to click the Refresh button in the Work in Progress (WIP) Window or the Estimates in Progress Window.

NOTE: We recommend that you change databases in the Configuration module. Then, close and reopen all modules before working with the new database. This is the best method of switching between databases.
Importing Licenses for Each Database
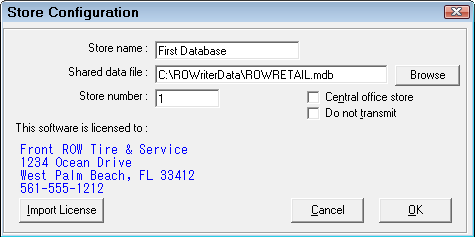
After all stores have been set up, click this button to display the company information associated with the license in the selected database.
If You Are Using Central Office
If you are using the Central Office module and this is the Central Office location, the following must be configured:
In the Store number field, enter the number that corresponds to this store. It MUST MATCH the store number that was set up at the client location for that store.
This field is very important. If the Store Number entered at the Central Office and the Store Number entered at the client or store side do not match, the information from the store will not be received at the Central Office and the information from the Central Office will not be received at the store.
Select the Central office store option if both the Central Office and the store will be creating purchase orders. This will add 1000 to the purchase order numbers created on the central office side to avoid creating duplicate purchase order numbers. If the store is not ready to begin transmitting, select the Do Not Transmit option.
NOTE: The client and store databases may be set up in advance of installing and transmitting the stores. Mark each store as "Do not transmit" until they are ready to begin communicating. If a store is transmitting data, this option must not be selected for the Central Office to receive the data.
The next step is to add each store.
To Add a Store
Complete these steps:
- Click the Add Store button and complete the information.
- The store name should be something identifying the location.
- The shared data file should point at the database for that location that resides on a computer in the shop being configured.
- Enter the Store number that corresponds to this store if you are using the Central Office module. It MUST EXACTLY match the store number that was set up at the client location for that store.
- Do not select Import License until all stores have been set up and you have exited this window using the OK button and clicked Setup Stores again.
Import the License File of Each Store
The final step is to import the license file of each store being configured.
Complete these steps:
Select Import License. See Central Office License Requirements for more information on the files needed to import. When the license file is imported, the Configuration module is closed automatically. It must be restarted to set up any additional stores.
If you are using Central Office, once you have all the stores server files, you will need to import them. See Central Office.