General Options
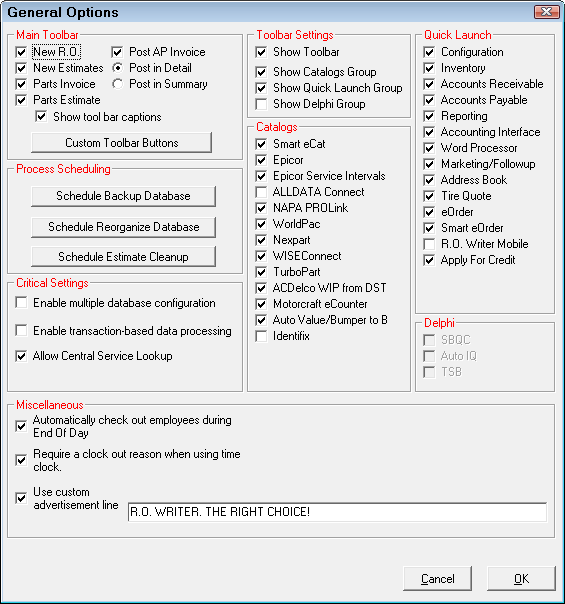
Main Toolbar
Each item represents a toolbar button in the main toolbar. Select an item to make its button appear on the main toolbar.
(If you are using the Accounts Payable module, select Post AP Invoice and choose whether clicking it posts the invoice to AP in Summary or Post in Detail.)
Show Toolbar Captions
This option affects the appearance of the main toolbar. When selected, the text describing the button appears below each button. If not selected, only the picture of each button appears. This option is selected by default and it is best to keep it selected.
To Create Custom Toolbar Buttons
This window allows you to configure up to three toolbar buttons independently. You need to assign each custom toolbar buttons a number to keep track of how many you have:

Complete these steps:
- On the General Options window, click the Custom Toolbar Buttons button.
- Select 1, 2, or 3 in the Custom Toolbar Button dropdown list. The Edit button activates.
- Remember which number you assign to each button so that you can select it when you want to edit its attributes.
-
Click the Edit button. The fields become active.

-
Select the options that apply to the toolbar button you are creating.
- Click Save to save your settings.
- Click Close to return to the General Options window.
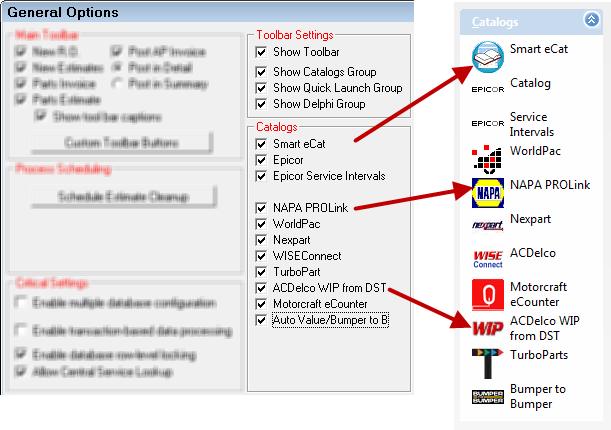
Toolbar Settings
These settings determine what major sections display in the Quick Launch in the left panel. You need to check the group in this section to activate its corresponding section on the window. For example, check Show Quick Launch Group to activate the Quick Launch section. Then, you can check the boxes in the corresponding section.
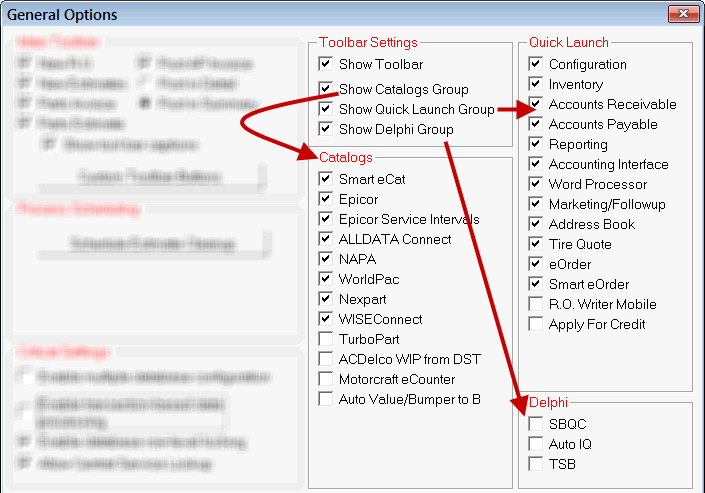
NOTE: If you check a box in this section and don't check options in its corresponding section - check Show Catalogs Group without checking any catalogs, for example - the section will appear in the Quick Launch empty.
| Checkbox | Check to… |
|---|---|
|
Show Toolbar |
Display the Quick Launch in the left panel. |
|
Display the Catalogs section in the Quick Launch and activate the Catalogs section on this window. In the Catalogs section, check the catalogs you want displayed. Check only the catalogs you have permission to access. |
|
|
Show Quick Launch Group |
Display the Quick Launch section in the Quick Launch and activate the Quick Launch section on this window. In the Quick Launch section, check the R.O. Writer modules you want displayed. Check only the modules you are licensed for. |
|
Display the Delphi section in the Quick Launch and activate the Delphi section on this window. In the Delphi section, check the items you want displayed. Check only the items you have access to. |
When you select the options in each corresponding section, they appear on the main window in the Quick Launch.
Process Scheduling
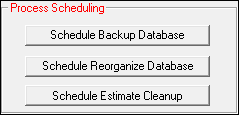
Database Backup and Reorganization
You can schedule database backups and reorganization to occur at regular intervals. Click either button and uncheck the Disable box.
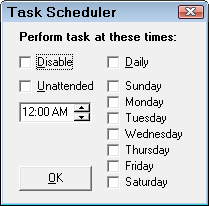
When picking times, keep in mind that to run database backups and reorganizations:
- The R.O. Writer main module must be up and running but all other modules must be closed.
- All other workstations in the network must not be running R.O. Writer.
- When database backups and reorganizations run, R.O. Writer cannot access the database. This means that no one can use R.O. Writer while a database backup or reorganization is running.
As a result, the best thing to do is schedule a time on one workstation when you are not processing any shop activity.
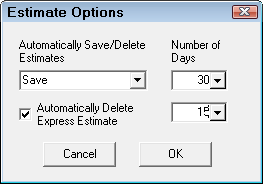
Estimate Cleanup
Estimates are created as part of customer intake. Some are converted to repair orders but some are never converted and just sit in the system, remaining open and clogging up the Estimates in Progress window.
To reduce the number of estimates you have to track, you can use these settings to automatically delete estimates after a certain number of days.
| Setting | Description |
|---|---|
|
Automatically Save or Delete Estimates |
In the dropdown list, select what you want to do with estimates - save or delete - and the number of days. Save: Estimates are saved to History after the selected number of days. Delete: Estimates are deleted from the database after the selected number of days. |
|
Automatically Delete Express Estimates |
Express estimates are those that don't have customer information and are usually used to give estimates over the phone. Select this option to delete express estimates after a selected number of days. |
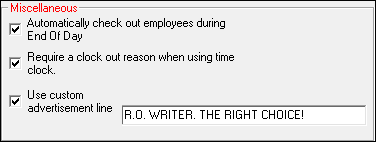
Miscellaneous
| Option | This option… |
|---|---|
|
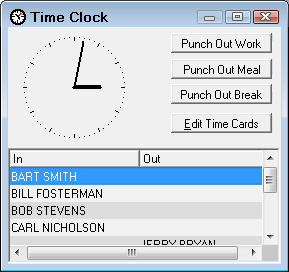
Prompts you to clock out all employees that are still clocked into the Employee Time Clock when End of Day Processingis launched. |
|
|
Displays more reason buttons on the Employee Time Clock window. Employees must select one of these buttons to clock out; there is no plain Punch Out button.
|
|
|
Use Custom Advertising Line |
Replaces the 5th line in the shop header. This line of text prints below the shop name and address on estimates, work orders, repair orders, and reports. |
Critical Settings
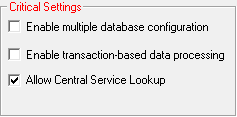
| Option | Select this option… |
|---|---|
| Enable Multiple Database Configuration | To use multiple locations (which means multiple databases)that have already been established. This option is necessary if you are using the Central Office. |
| Enable Transaction-Based Data Processing |
Only if you would like to be able to cancel or undo a detailed invoice when posting to Accounts Payable. When posting detailed invoices, theInvoice Details window has an Undo Inv. button. WARNING: If you turn this option on, DO NOT click Continue on any error messages in R.O. Writer. Always choose to Exit R.O. Writer instead. If you choose Continue on an error message, everything you do afterward will be lost. |
| Enable Database Row-Level Locking | If you have multiple machines on a network (highly recommended). |
| Allow Central Service Lookup | To activate the Central Service Lookup button when searching for customers and vehicles. |
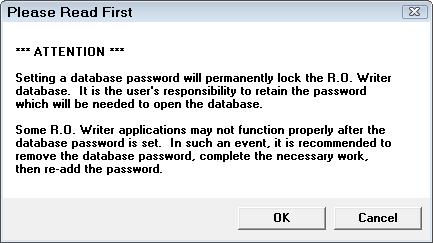
Database Password
You can password-protect your database on the General Options window. However, you need to create a new value in the registry first.
Step 1 - Adding the Registry Key
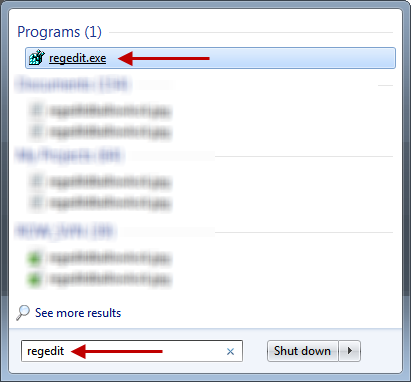
- Click the Start button and type "regedit" in the Search box.
- Double-click on the RegEdit program at the top of the list. The Registry Editor opens.
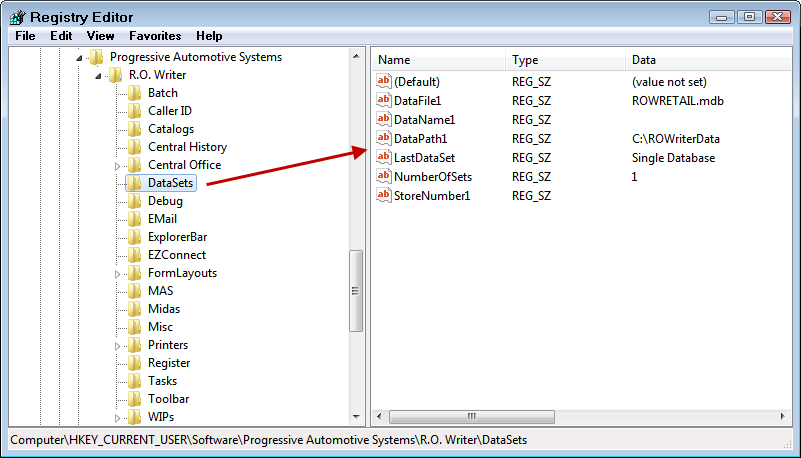
- Navigate to the R.O. Writer: click the plus sign next to HKEY_CURRENT_USER > Software > Progressive Automotive Systems > R.O. Writer.
- Select the folder named "DataSets".
- Right click on a blank spot in the right pane of the window and select New and String Value.
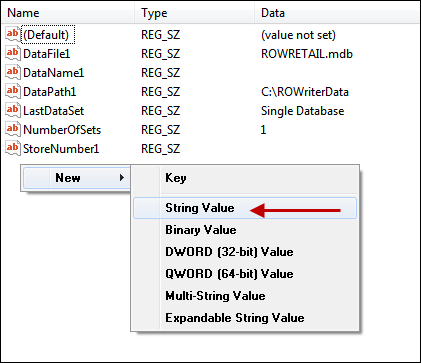
- Enter the name for the string value as "dbAllowLock" and press ENTER.
- Double click on the new key you added to enter the value of Y.
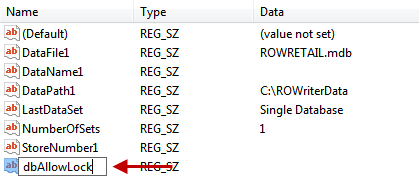
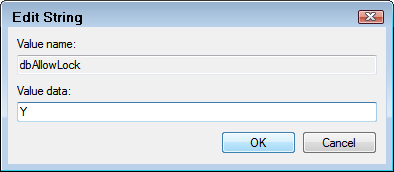
- Click OK.
- Close the Registry Editor.
Step 2 - Set the Database Password in Configuration
- In the Configuration module, select File > General Options.
-
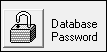
Click the button on the bottom left of the window named Database Password
 . This appears only after the new registry key has been entered in Step 1.
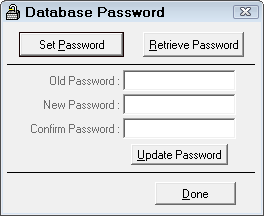
NOTE: In a multi-database configuration, the database shown in the ”Working on” window is the database you are setting the password for.
-
Select Set Password and type in your password without spaces or special characters in the New Password and the Confirm Password fields.
Example: 442W30.
- Select Update Password to continue adding a password or select Done to exit without setting a password.
- Select OK on the following window to finish setting the password.
If you forget your password in the future, call R.O. Writer Support for instructions on retrieving your password.
Step 3 - Using the Database Password
When the database password is set, every time you attempt to open the database in the database utility or Microsoft Access, you are prompted to enter this password but with a dash before each character.
Example: -4-4-2-W-3-0
When removing or changing your password in Configuration, the dashes are not required.