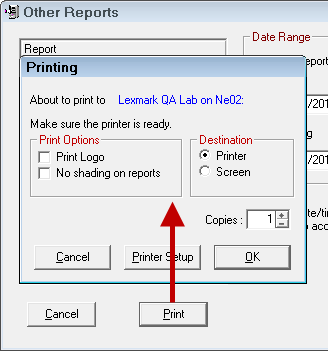
When you click the Print button on the Reports windows, the Printing window opens displaying the options for printing reports.
You can print
- To a physical printer
- To the screen (print preview)
by selecting these options in the Destination section.
Printing Options for All Destinations
For all destinations, you must choose these options.
Print Logo
If you want to print your shop's logo, check the Print Logo box and your logo appears on the document.
No Shading on Reports
By default, R.O. Writer alternates shading for each row. If you don't want that shading, check this box.
With Shading

Without Shading

While shading can make reports easier to read, they are not as clear when faxed. Shading also uses more printer ink when physically printed.
NOTE: Reports samples in this documentation are without shading.
Print Date
The Printing window does not have a date selection tool for reports. The date and time the report was run are printed on the report automatically - usually in the footer.
Shop Header
The shop header from the software license prints at the top of each document automatically. (If you need to change the shop header, call your distributor to request a license change.)
Printing to a Printer
Complete these steps:
- Select Printer as the Destination.
- The About to Print to field displays the name of the default printer
- The default printer is selected in the Printer Locations setting.
- If this is the wrong printer, click the Printer Setup button and select the correct printer.
- Enter the number of Copies to be printed; 1 is the default.
- Click OK to print.
- The document prints to the printer.
Printing to the Screen (Print Preview)
You would print to the screen to
- See the data on the screen.
- Preview the output so you can make corrections and run the report again.
- Use the drilldown feature. A number of reports allow you to drilldown into the data when printed to the screen.
Complete these steps:
- Select Screen as the Destination.
- Click OK to print.
- The Print Preview window opens displaying the type of report this is in the title bar and the toolbar.
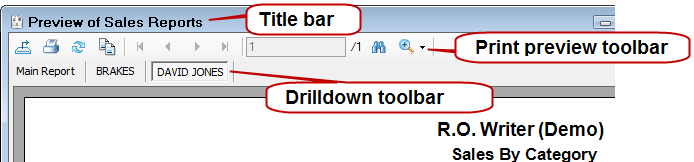
Print Preview Toolbar
This toolbar contains many options you can use to work with the document on the screen.
![]()
| Button | Click to… |
|---|---|
|
|
Export the document to Excel, PDF, .CSV, or .XML. |
|
|
Print the document to a physical printer. You select the printer manually. |
|
|
Refresh the data on the screen. If the document is a report, refreshing runs the report again. Some reports allow you to enter new parameters when you click this button. |
|
|
To copy one line of text you have selected. Click on a line in the document to select it and then click this button to copy the text. You can select only one line of text at a time. If you want to copy multiple lines of text, press and hold the CTRL button while you click on lines of text. You cannot copy graphs or charts using this button. |
|
Navigation |
Navigate through long documents. The arrow buttons are active only if the document is longer than one page.
|
|
|
Click Find Next and the screen jumps to and highlights the matching text. |
|
|
NOTE: This has no effect on the appearance of documents printed from this window. |
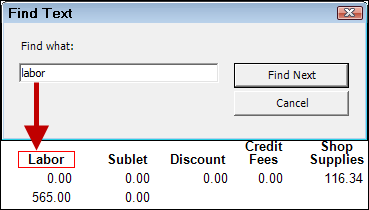 Search the document for specific words, numbers, or characters.
 Drilldown Toolbar
The tab toolbar appears just under the main toolbar. Certain reports allow you to drilldown by double-clicking on report information.
For example, in the Sales by Category report, double-click on a Category to see data for only that category. The drilldown report shows all technicians who performed that job. Then, you can double-click on a technician to see each one of those jobs on another drilldown report.
This toolbar tracks each drilldown level by adding a tab for each.

Every time you drilldown, another tab is added to this toolbar. You can click each tab to move through the drilldown reports.
To close all tabs except the Main Report tab, click Refresh ![]() .
.