Reconciling
The Reconcile process should be run each day after End of Day Processing is complete.
Running the Reconcile Process
When you run Reconcile, the Accounting Interface gathers all relevant information since the last time Reconcile was run.
If you have not run Reconcile for a while, the process may take a while. Depending on the amount of data that needs to be processed, you may experience memory or out-of-time errors.
To Run Reconcile
Complete these steps:
- In the Accounting Interface, click the Reconcile toolbar button
 .
. -
If the Use Date Range for Reconcile options is selected in Cash Drawer/Accounting Configuration, you are prompted to enter a date range.
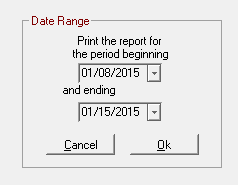
- Enter a Date Range and click OK.
- The reconciliation process begins by posting checks.
- Click the Next button to move to the next step in the process until the Summary tab appears.
- Run the Reconcile Report and create the .iif file.
The Reconcile Steps
The Reconcile steps are as follows:
- Step 1 - Post Checks
- Step 2 - Post Credit Cards
- Step 3 - Post Cash
- Step 4 - Cash Payouts
- Step 5 - Drawer Countdown
- Step 6 - Review Summary
- Step 7 - Run the Reconcile Report
- Step 8 - Review the Reconcile Report and Create the .iif File
To move through the steps,
- Click the Next button to advance to each step.
- Click the <<Previous button to go back one step.
Click the Cancel button to exit.
Step 1 - Post Checks
On the Checks tab, each check appears in a list and the total check count and total amount is displayed on the right.
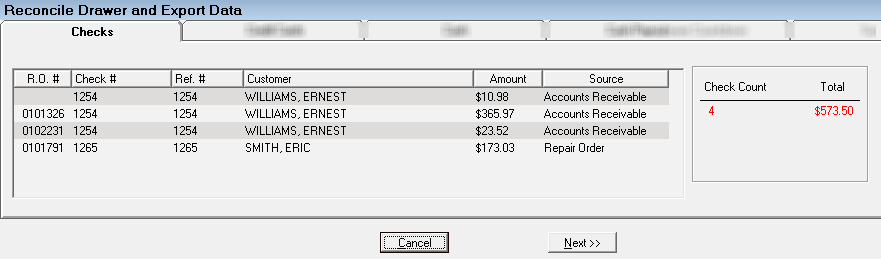
For each check received, the following information displays:
- Check #
- R.O. #
- Ref. #
- Customer
- Amount
- Source
Step 2 - Post Credit Cards
The Credit Cards tab displays the total number and amounts for each card type and credit card total. Click the plus signs to display details for each credit card type.
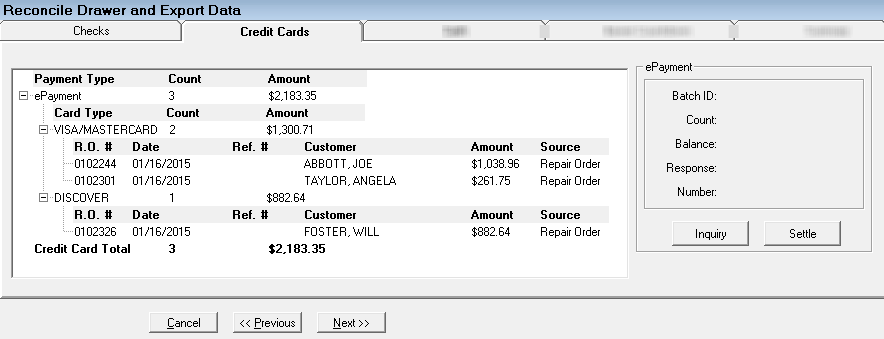
For each credit card payment the following information is displayed:
- Time Stamp
- Card Type
- R.O. #
- Ref. #
- Customer
- Amount
- Source
NOTE: In the ePayment section, click the Inquiry or Settle buttons for ePayment Batch Settlement.
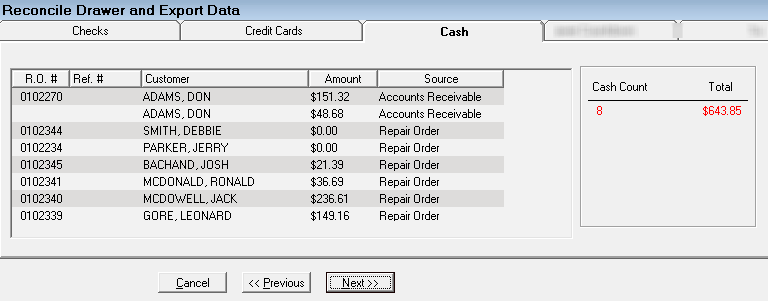
Step 3 - Post Cash
For each cash payment, the following information is displayed on the Cash tab:
- R.O. #
- Ref. #
- Customer
- Amount
- Source
Step 4 - Cash Payouts
The Cash Payments tab displays accounts payable cash invoices.
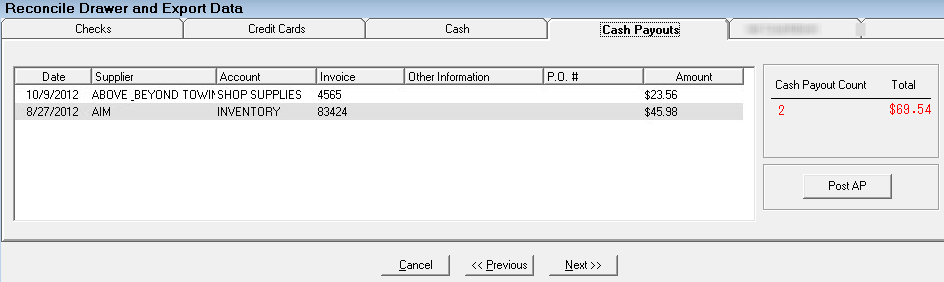
For each cash payout the following information is displayed:
- Date
- Supplier
- Account
- Invoice
- Description
- P.O. #
- Amount
The total number of cash payouts and the cash payout amount displays in the right column.
Click the Post AP button to post accounts payable invoices without leaving the Reconcile window.
Step 5 - Drawer Countdown
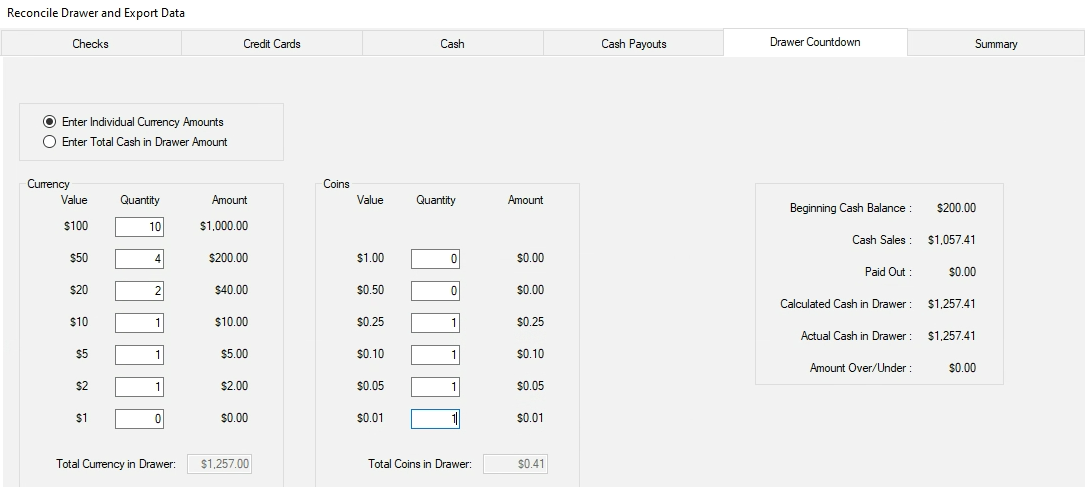
Two settings appear at the top of the window:
- Enter Individual Currency Amounts - Check to enter the amount in each field. When checked, the word "Cash" is replaced by "Currency" on the window.
- Enter Total Cash in Drawer Amount - Check to enter the total cash amount for the entire drawer. When checked, the word "Currency" is replaced by "Cash" on the window.
NOTE: If Force Cash Count is selected in Cash Drawer Configuration, these options do not appear and you must enter each amount, not just the total amount.
The totals appear in a section on the right and cannot be edited
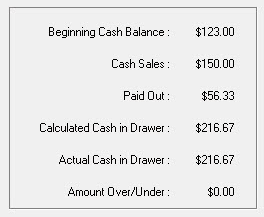
Step 6 - Review Summary
The Review tab display the results of the Reconcile process.
Beginning Cash Balance
| Item | Description |
|---|---|
|
Beginning Cash Balance |
This value cannot be edited in Reconcile. This is the Last Cash Drawer Balance in the Cash Drawer/Accounting configuration setting; it can only be modified there. |
|
Cash Sales |
Cash received from customers. |
|
Paid Out |
|
|
Calculated Cash in Drawer |
The cash amount that should be in the drawer. |
|
Actual Cash in Drawer |
This amount matches the Total Currency/Cash in Drawer amount entered. Edit this number if the cash you counted is different than what was automatically calculated. |
|
Amount Over/Under |
Enter the amount of cash that is more than or less than the actual cash amount you just counted. If there is no difference, enter “0.00”. |
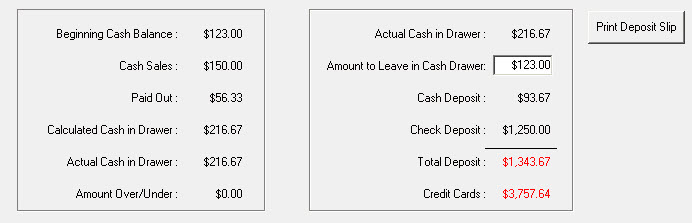
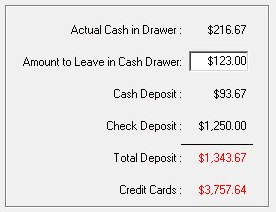
Actual Cash in Drawer
| Item | Description |
|---|---|
|
Actual Cash in Drawer |
The amount counted in the drawer. |
|
Amount to Leave in Cash Drawer |
The amount that is supposed to be in the cash drawer. This is the Use the default configured or enter new amount. |
|
Cash Deposit |
The cash deposit. This is adjusted based on how much you leave in petty cash. |
|
Credit Cards |
The credit card deposit. Credit card deposit is a separate deposit from Cash and Checks above. |
NOTE: Click the Print Deposit Slip button to print a deposit slip.
Step 7 - Run the Reconcile Report
When the Finish button appears, click it to run the Reconcile Report.
The first page of the Reconcile Report includes the following items:
- Accounts Receivable charges
- Advance Payments
- Repair Orders to be transferred, including the
- Repair Order Number
- Date
- Customer Name
- Reference Number
- Amount Paid
- Payment Type
- Advance Payments
- Total
The second page of the Reconcile Report includes total amounts transferred to each account.
Transfers To Column
| Item | Description |
|---|---|
|
Petty Cash AP invoices. |
|
|
Checks Paid Out |
AP invoices paid by check. |
|
The amount the cash drawer amount is adjusted. When a different amount is entered in the actual cash in drawer field during the reconcile. |
|
|
AP Charge Invoices increase the Supplier account. All AP invoices, charge, petty cash, and checks coded to the Inventory account increases the Inventory account. |
|
|
Visa3445 |
Total amount paid on AP charge invoices by a shop credit card. |
|
Accounts Receivable |
Amount charged to Accounts Receivable. |
|
Advance Payments |
Amount received in advanced payments on a repair order. |
|
Total labor charges. |
|
|
Non-Taxable Labor Discounts or Taxable Labor Discounts |
Discounts calculated on labor charges. |
|
Total Sublet Labor charges. |
|
|
Total sales tax amount. |
|
|
Shop Supplies Sales |
Total shop supplies amount. |
|
Parts Sales |
Totals are broken up into parts departments on this report only. All parts departments added up here is total Parts Sales and will transfer to the Parts Sales Taxable or Parts Sales Non-Taxable accounts. |
|
These are the fees added to parts. |
|
|
Taxable Parts Discounts or Non-Taxable Parts Discounts |
Discounts calculated on Parts Sales. |
|
Total cost of parts sold on repair orders. |
|
|
Hold necessary to handle the auto deposit option.
|
Transfers From Column
| Item | Description |
|---|---|
|
Total Checks paid by customers plus cash payments. The amount needed to replenish the drawer (petty cash). |
|
|
Accounts Receivable |
Accounts Receivable payments posted. |
|
Petty Cash |
Amount necessary to balance petty cash account back to 0.00. |
|
Advance Hold |
Advance Payments received from customers necessary to offset sales if the repair order has not yet been finalized.
|
|
Inventory |
Total cost of parts sold on repair orders reduced the Inventory account. |
|
Accounts Payable |
Amount of AP charged invoices coded to Inventory that were paid either by check or by credit card. |
|
Amount of AP charged invoices coded to these accounts that were paid either by check or by credit card; for example, small tools, freight, etc.) |
NOTE: In the accounting world, all transactions must have a debit and an equal credit. In other words, all transactions must balance. If you debit one account, you must credit another account for the same amount.
The Account Transfers page also must balance. The Total Transfers to must equal the Total Transfers from.
Step 8 - Review the Reconcile Report and Create the .iif File
After the Reconcile Report is run, you are prompted to confirm that the results on the report are correct.
- If you click No, you will have the opportunity to correct any errors in R.O. Writer and run Reconcile again.
- If you click Yes, the ROW.iif is created.
WARNING! Only click Yes after you have reviewed the information and are sure everything is correct. You cannot correct any errors after clicking Yes.
To Create the ROW.iif File
Complete these steps:
- Click Yes when prompted to confirm that the Reconcile Report is correct.
- All transactions are marked as transferred and the ROW.iif file is created.
Import the ROW.iif File into QuickBooks
Complete these steps:
- Open QuickBooks for Windows to import the ROW.iif file.
- Click the File button > Import button.
- Select the ROW.iif file and click OK.
- The message notifying you that your data has been imported successfully appears.