Barcode Scanning
You can connect a barcode scanner to your computer and use it to streamline some common tasks. When a barcode is scanned, R.O. Writer converts the barcode to text and inserts that text into the field the cursor is in.
| Scan the barcode: | Into the: | To: |
|---|---|---|
|
Of parts |
UPC Code field of the part record |
Add the part to a ticket when scanned. |
|
Of the VIN |
VIN field on the |
Decode the VIN to enter the vehicle information. |
|
Of loyalty cards or customer IDs |
Bar Code field on the Edit Vehicle window |
Create a repair order by scanning the loyalty card or ID of an existing customer. |
|
Of coupons |
Open ticket |
Add the coupon as a part. |
NOTE: Scanning has been tested with the Symbol LS 2208.
Programming Barcode Scanners
You must program barcode scanners using the manufacturer's software and instructions before using them in R.O. Writer.
Complete these steps:
- Press and hold the ALT + [ keys at the same time.
- Read the remaining data.
- Press and hold the ALT + ] keys at the same time.
To Create Custom Barcodes
You can create custom barcodes for use in R.O. Writer.
Complete these steps:
- Create the barcode in WordPad, NOT in Word.
- Use the Free 3 of 9 font.
- Bar codes have an asterisk (*) both before and after the number. For example, 1234 is really *1234*.
Adding Barcodes to Parts
When you open a part record, you can scan its barcode into the UPC Code field. Then, you can add the part (with the correct pricing) to an open ticket by scanning its barcode.
To Add Barcodes to Parts
You can add the same UPC code to multiple parts.
Complete these steps:
- Open the Inventory module.
- Select Inventory menu > View/Add/Edit.
- Search for and select the part to open its record.
- Click inside the UPC Code field.
- Scan the barcode of the part. The UPC code is entered into the UPC Code field.
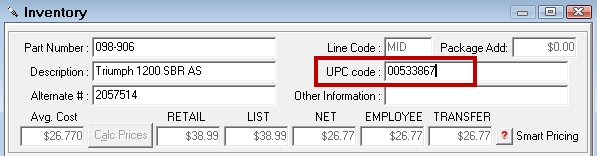
- Click Save. The barcode is associated with the part record.
The next time you scan the part in an open ticket, the part is added to the ticket.
To Search for Parts by Barcode
The UPC Code field is searchable.
Complete these steps:
- Open the Inventory module.
- Select Inventory menu > View/Add/Edit.
- Either
- Type the barcode into the UPC Code field.
- Put the cursor in the UPC Code field and scan the barcode. The UPC code appears in the field.
- Press ENTER. The Parts List appears with the matching parts.
- Double-click the part and it appears on the Inventory window.
Adding Parts to Tickets by Scanning Them
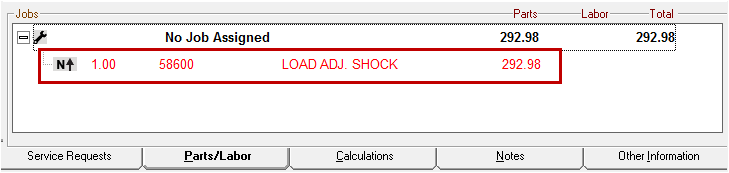
When you have a ticket open to the Parts/Labor tab, you can scan the barcode of a part to add it to the ticket.
If the Part Record Contains a UPC Code
If that parts contains the code in the UPC Code field, scan the barcode, and the part appears on the ticket on its own line.
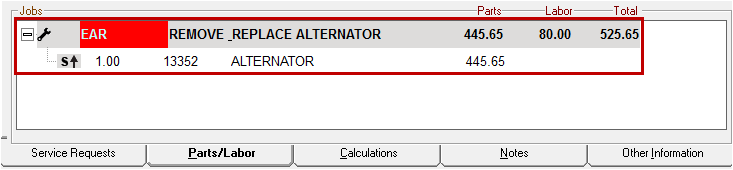
To add the part to a labor, select its labor line. Then, scan the barcode. The part is added to the labor.
To increase the quantity of the part, scan it again.
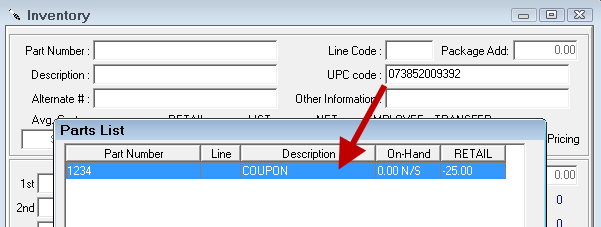
If the Part Record Does Not Contain a UPC Code
If you scan a part with a code that has not been saved to a part record, R.O. Writer reads the code and allows you to search your inventory for a part. The code is added to the part and the part is added to the ticket immediately.
Complete these steps:
-
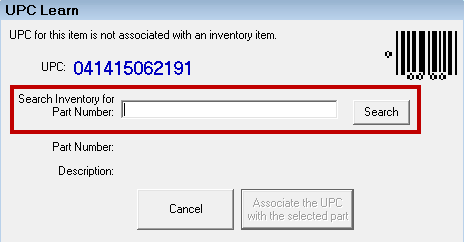
On the open ticket, scan the barcode of the part. The UPC Learn window opens displaying the UPC code.
-
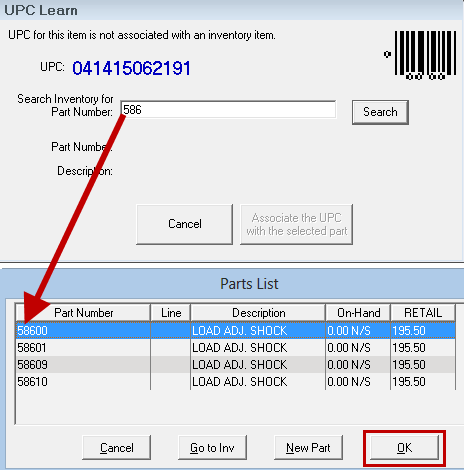
Enter the part number and click the Search button. The Parts List opens displaying matching parts.
-
Select the appropriate part click OK. The part information appears on the UPC Learn window.
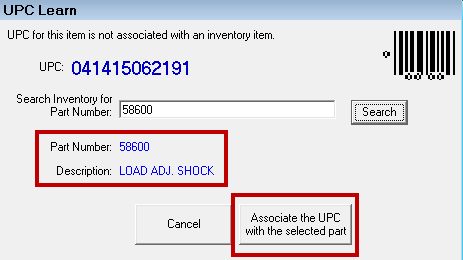
- Click the Associate the UPC with the Selected Part button. The code is saved to the part record (in the UPC Code field). The part is added to the ticket.
NOTE: Barcode scanners have not been programmed to work in the Inventory module to manage inventory levels, transfers, or purchase orders.
Scanning Coupons
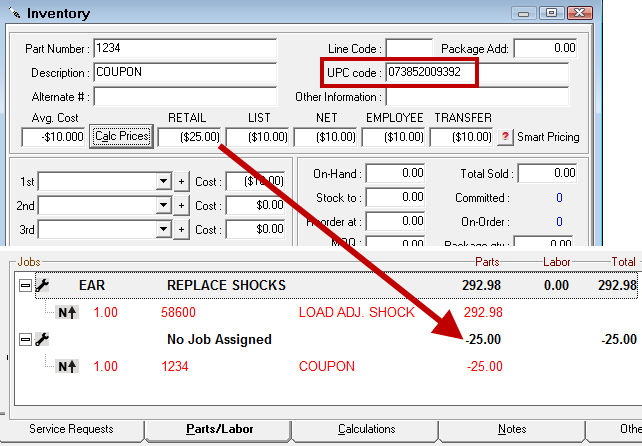
Your shop may want to offer discounts and coupons from time to time. In R.O. Writer, you can do that by creating a part with a negative average cost and associating that part with a barcode. Then, you can add the coupon part to the ticket just by scanning the coupon's barcode while the ticket is open to the Parts/Labor tab.
Complete these steps:
- Create a part for the coupon in the Inventory module.
- Select Inventory menu > View/Add/Edit.
- Enter the part information.
- Place the cursor in the UPC Code field.
- Scan the coupon's barcode.
- In the Avg. Cost field,
- Type in the amount the coupon will remove from the total.
- Press the minus key on the keyboard. The amount becomes negative.
- Click the Calc Prices button. The negative amounts appear in the price level fields according to your pricing matrix.
- Click Save.
- Close the Inventory module.
- In the R.O. Writer main module, open a ticket that has an amount.
- Scan the barcode on the coupon. The coupon part is added to the ticket and the total amount is adjusted accordingly.
Scanning Loyalty Cards or IDs
Your shop may want to create loyalty cards or IDs for returning customers. These cards usually have bar codes. You can enter the barcode of the account in the Bar Code field of the vehicle record. After you save the barcode in the vehicle record, R.O. Writer creates a ticket for the customer and the vehicle whenever you scan that code in the future.
NOTE: The barcode is associated with the vehicle and not the customer because customers can have multiple vehicles, but a vehicle can be associated with only one customer. Saving the barcode to the vehicle makes sure R.O. Writer knows what vehicle to select for the repair order. (Repair orders cannot be created without a vehicle.)
To Add the Barcode to the Vehicle
Complete these steps:
- To access the vehicle record
- Open an existing ticket and click Edit Vehicle.
- Open Configuration and click Customers/Vehicle menu > Edit Vehicle.
- Put the cursor in any field other than the VIN field.
- Scan the loyalty card. It appears in the Bar Code field.
- Click OK to save the loyalty card to the vehicle.
To Create Repair Orders by Scanning Loyalty Cards
Scan the barcode on the customer's loyalty card. A new repair order is created for that customer and vehicle and appears on the screen.
Scanning VINs
You can scan the VIN on a vehicle to add it to the vehicle record.
Complete these steps:
- Open the vehicle record by
- Opening an existing ticket and clicking the vehicle information.
- Opening the vehicle record in Configuration (Click Customers/Vehicle menu > Edit Vehicle)
- The Edit Vehicle window opens to the Vehicle tab.
- Click in the VIN field. The cursor MUST be in the VIN field.
(If you aren’t in the VIN field, the data is entered into the Bar Code field and that field is used for something else.) - Scan the VIN with the barcode reader. The VIN appears in the VIN field.
- Click the VIN button
 to decode the VIN.
 - The Vehicle fields are completed automatically.
To Create Repair Orders by Scanning the VIN
If the VIN exists in your database - for a returning customer, for example - scan the VIN barcode on the vehicle and a new repair order for that customer and vehicle is created automatically.
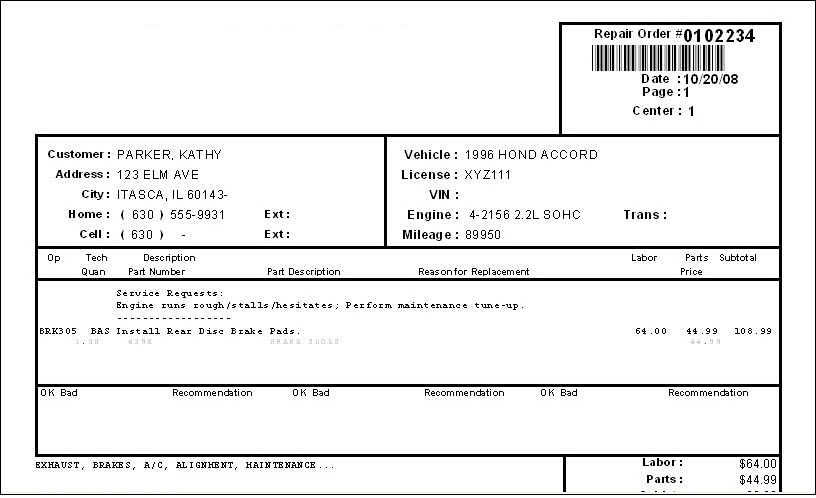
Printing Forms with Bar Codes
R.O. Writer can create a barcode for estimates, work orders, and repair orders. To do so, you must select one of the Form Types that create bar codes on printed estimates, work orders, and repair orders.
In Configuration, click File > Form Types. Select a form type that includes a barcode in the dropdown lists.
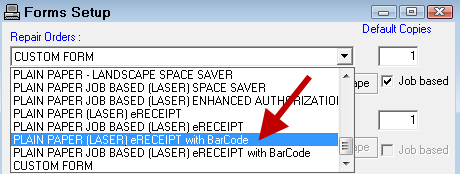
When the ticket prints, a barcode appears in the top, right corner. You can scan it to open the order in the future.
If you are using form types for the Okidata 320 Turbo printer, see Okidata 320 Driver Information to ensure you are using the correct drivers.
To Open a Ticket by Scanning the Barcode
On the main window, scan the barcode at the top of the ticket.