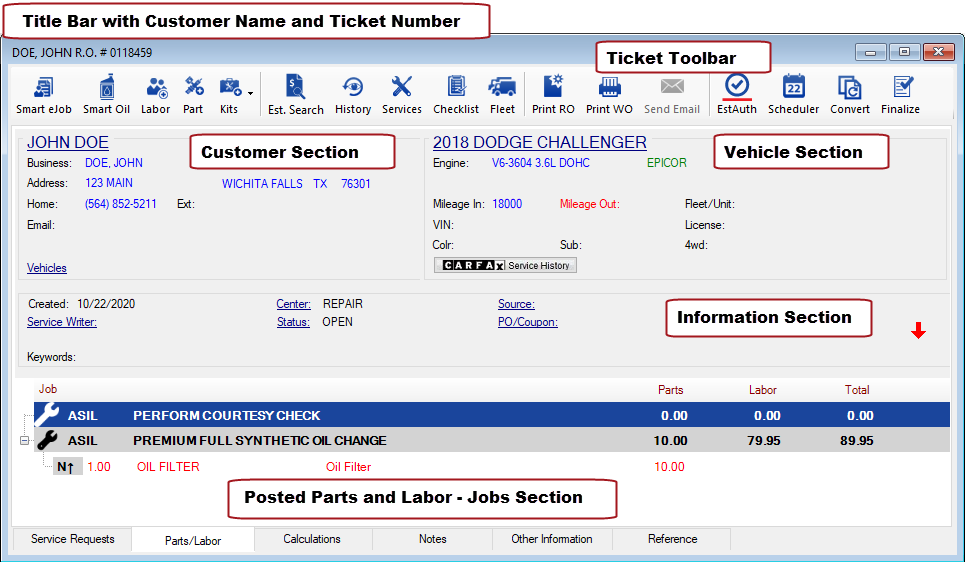
Parts/Labor Tab
When you create a new ticket, the ticket window opens to the Parts/Labor tab.
NOTE: You can choose to open to the Service Requests Tab in Configuration (Configuration menu > Repair Order > R.O. Options > When Opening New R.O. > Start with Service Requests setting).
Sections of the Parts/Labor tab:
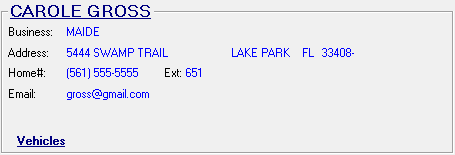
Customer Section
This section displays the customer's information.
- If there are Customer Notes, the words "See Notes" appear in red.
- If the customer has an accounts receivable account, an A.R. Account link appears.
- If a purchase order is required for the customer, the words "P.O. Required" appear in red.
To open the customer window, click the customer’s name. If the wrong customer is selected, you can select a different customer. (You will also have to select a different vehicle.)
Vehicle Link
The Vehicle link at the bottom opens the Vehicle List of all the vehicles associated with the customer.
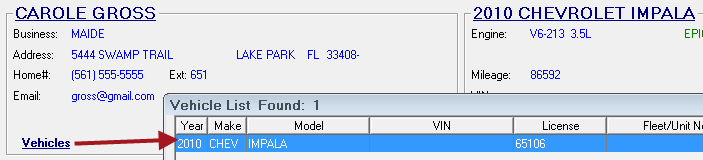
You can
- Select a different vehicle in the list for the open ticket.
- Add a new vehicle for the customer.
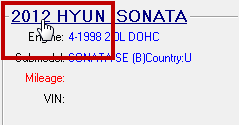
Vehicle Section
This section displays the vehicle information entered for the vehicle.
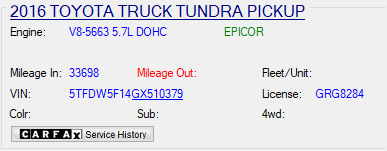
- If the vehicle is valid for Epicor, “EPICOR” appears in green.
- If the vehicle is valid for ACES, “ACES” appears in green.
- If there are Vehicle Notes, "See Notes" appears in this section.
- The last eight digits of the VIN are underlined for emphasis.
- The CARFAX button
 opens the CARFAX Service History Check for the vehicle.
For more information, click the following link: Epicor and ACES Labels.
To Edit Vehicle Information
To edit the information in the vehicle section, open the Edit Vehicle window by clicking the vehicle year in the link at the top of the section.
Information Section

| Information | Description | ||||||||||||||||||
|---|---|---|---|---|---|---|---|---|---|---|---|---|---|---|---|---|---|---|---|
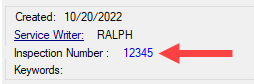
| Created | The date the ticket was created. | ||||||||||||||||||
| Links |
The links enable you to enter or change information without leaving the Parts/Labor tab.
|
||||||||||||||||||
|
Blank/ |
There is a blank space above the Keywords link. If an inspection number is entered on the Other Information tab, an Inspection Number appears in that blank space.
|
||||||||||||||||||
|
Keywords |
These links appear only when a part or labor operation with smart keywords is selected in the Jobs section. Click the link to search for the keyword in Smart eCat. |
||||||||||||||||||
|
Fleet Type |
The Fleet Type information and Fleet Notes links appear when the ticket has been assigned to a fleet. Click the Fleet Notes link to see notes for the ticket. |
||||||||||||||||||
|
|
Appears when the total price for the ticket is below the set profit margin. |

Parts and Labor (Jobs) Section
Parts and labor appear in this section. There are two views: job-based and non-job-based.
If you are using the job-based view, parts and labor are combined into one section named "Jobs":
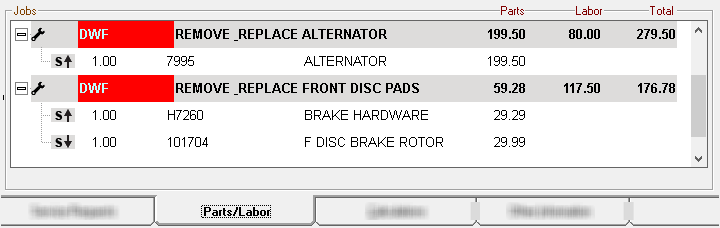
The job-based view is the default view and provides much more functionality than the non-job-based view.
In the non-job-based view, parts and labor are divided and display in their separate sections.
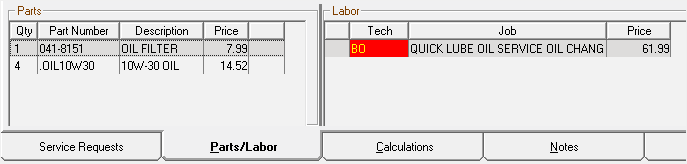
Both job-based and non-job-based views have labor lines and part lines.
Labor Lines
Each labor operation appears as a unique section with the labor line at the top of the section. Labor lines
- Are light gray.
- Display symbols and notations indicating important information about the job.

| # | Name | Description | ||||||||
|---|---|---|---|---|---|---|---|---|---|---|
|
1 |
Icons |
These icons indicate information about the labor.
|
||||||||
|
2 |
Technician |
Displays the technician code of the technician assigned to the job. If no code appears, no technician is assigned. Technicians are assigned by double-clicking the labor line to open the job and selecting a technician at the top of the window. If you use Scheduler, the technician code may be highlighted to indicate if the job is scheduled. This is a setting in Configuration (Configuration menu > Scheduler Setup > Setup Options > Highlight Tech). |
||||||||
|
3 |
Description |
The description of the job. |
||||||||
|
4 |
Parts column |
The price of the parts in the job. This is the parts-only total; it does not include labor. |
||||||||
|
5 |
Labor column |
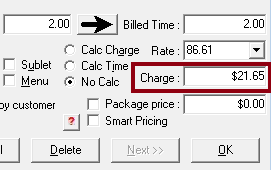
The price for the labor alone. This column displays the number in the Charge field of the Edit Labor window.
If the job calculates charges according to Billed Time, the Billed Time amount displays on the line. |
||||||||
|
6 |
Total column |
The total price of parts and labor only. NOTE: This is NOT the total price! To see the total price - including taxes, fees, and supply charges - check the Total on the Calculations Tab. |


Part Lines
Each part appears on its own line.
- Symbols and notations indicate important information about the part.
- Notations appear on the printed ticket with letters instead of symbols.

| # | Name | Description | ||||||||||||
|---|---|---|---|---|---|---|---|---|---|---|---|---|---|---|
|
1 |
Symbols |
These symbols indicate that this line is a part (as opposed to a labor) as well as its inventory status. The part symbol is a combination of the
For example,
|
||||||||||||
|
2 |
Quantity |
The quantity requested for the job.
|
||||||||||||
|
3 |
Part Number |
The part number. |
||||||||||||
|
4 |
Description |
The part description. |
||||||||||||
|
5 |
Price |
The price to the customer for the quantity. |
 means this is a stock part that is above the minimum profit margin.
