Technicians
To Add a Technician
Complete these steps:
- Click the Add button.
- Enter the technician details, including the technician's name, code, and color (reverse text depending on the color selected).
- Check Include in Employees List.
- Recommended before you click Save. This setting appears only when adding a new technician but not when editing a technician.
- Enter the other information, including the average hourly cost, hours worked per week, name, address, contact information, and flag hours (if you are using the Calendar tool).
- Click Save.
- When the information has been saved, click Cancel to exit.
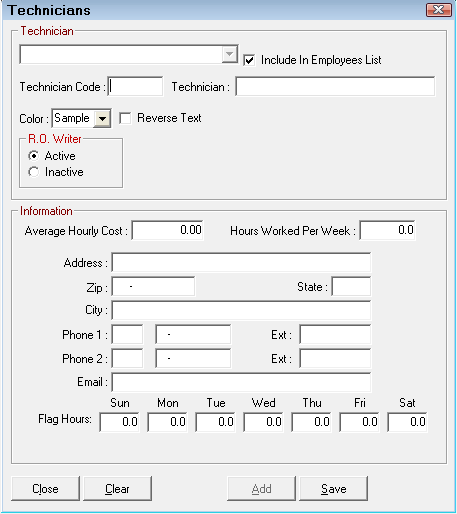
Technician Details
You enter the technician details in the top half of the window.
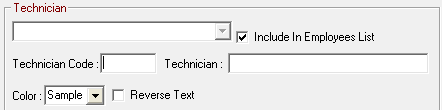
Include in Employees List
This option appears after you click the Add button when entering a new technician. This option does not appear when you edit a saved technician.
If you want the track the technician's time in the Employee Time Clock, you must check Include in Employees List. This also ensures that
- You can edit the technician's time card if needed.
- The technician is included in the Employees Configuration setting.
If you don't select Include in Employees List, you have to enter the technician in R.O. Writer twice: once as a technician and again as an employee. The names for both entries must match exactly or labor reporting will be inaccurate.
Technician Name
Before entering the name in the Technician field, you need to know if want to make the technician an employee by checking Include in Employees List.
- If you check Include in Employees List, the name entered here is the name that appears in the employee list.
- If you do not check Include in Employees List, the name you enter must match exactly the name entered in the employee record to be included in the Labor Summary Report.
Technician Code
Enter a technician code for each technician. The technician is identified by this code throughout R.O. Writer, including printed repair orders and customer invoices.
The code can be alphanumeric and up to six characters long.
TIP: Many technician codes include the technician's initials to help users identify the technician by code when necessary.
Color
Select the color you want to identify the technician in the Scheduler module. When you pick a color for a technician, all items assigned to or associated with that technician are color-coded. This helps you identify who is doing what on the schedule at-a-glance
Reverse Text
Reverse Text determines the color of the technician's name and code in the Scheduler module. By default, the text is black, which is not easy to see on a dark background color. Check Reverse Text to change the text to white.
Information
You enter the technician details in this section.
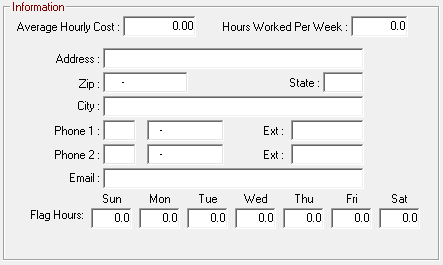
Average Hourly Cost
The average hourly cost is not the hourly rate paid directly to a technician per hour worked. Instead, this rate is what the technician costs the shop per hour.
The average hourly cost is used to calculate gross profit margin.
When determining the average hourly cost for technicians, consider the following:
- Every employer must pay payroll taxes for each employee.
- Other benefits, such as insurance, bonuses, and paid leave.
Hours Worked Per Week
Enter the total number of hours you expect the technician to work each week.
Like parts, labor is something you purchase. Labor hours are purchased from the technicians then resold to customers.
Unlike parts, labor hours can't be stocked. Labor hours have to be used immediately. If not, those hours are gone and you paid for something you didn't use. In general, you wouldn't want to pay for more hours than can be sold to customers.
Personal Information
Enter the technician’s contact information in the area provided.
Flag Hours
Flag hours are the number of hours for each day of the week that the technician is available for work.
Flag hours are used when scheduling vehicles for service in the Calendar tool but ignored in the Scheduler module.
Inactivating a Technician
If a technician is no longer employed or performing another function, open the record, and select the Inactive option.

This removes the person from the list of available technicians on the Editing Labor Window. However, the technician record remains in Configuration.