Job-Based View
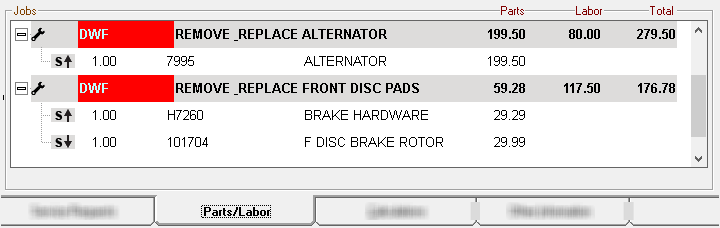
The job-based view is the default view in R.O. Writer. The job-based view formats parts and labor into one section called "Jobs" on the Parts/Labor tab.
In the Jobs section, the parts display under the labor. You can click the + and - buttons to expand and collapse the part list in each labor.
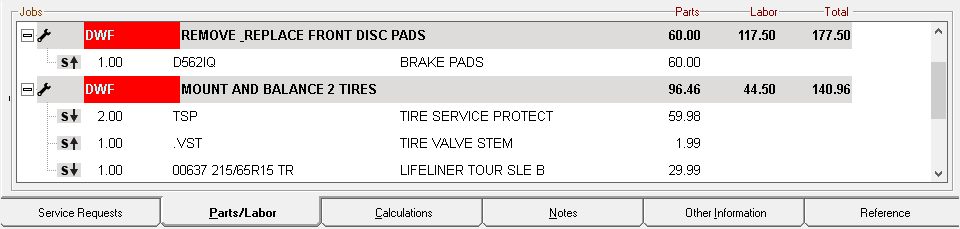
Each labor displays a total for the parts, the labor, and the total amount for the entire job.
Switching to Job-Based View
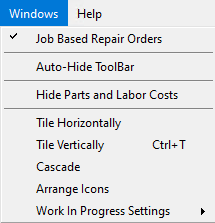
If R.O. Writer is in the non-job-based view, you can switch to the job-based view by clicking the Windows menu > Job Based Repair Orders.
This setting applies to the following ticket types:
- Repair orders
- Estimates
- Quotes
It is best to exit out of all tickets on the window before you change this setting.
If a ticket is open on the window when you click Windows menu > Job Based Repair Orders, the view change is not applied immediately. You need to exit out of the ticket window first. When you re-open the ticket, it appears in the job-based view.
NOTE: The selected view does not determine how the ticket prints. The format of printed documents is always determined by the form type associated with the document.
Jobs Section Format
In the Jobs section, labor operations appear on a dark gray line with all its associated parts grouped beneath it.
Labor Lines
Each labor operation appears as a unique section with the labor line at the top of the section. Labor lines
- Are light gray.
- Display symbols and notations indicating important information about the job.

| # | Name | Description | ||||||||
|---|---|---|---|---|---|---|---|---|---|---|
|
1 |
Icons |
These icons indicate information about the labor.
|
||||||||
|
2 |
Technician |
Displays the technician code of the technician assigned to the job. If no code appears, no technician is assigned. Technicians are assigned by double-clicking the labor line to open the job and selecting a technician at the top of the window. If you use Scheduler, the technician code may be highlighted to indicate if the job is scheduled. This is a setting in Configuration (Configuration menu > Scheduler Setup > Setup Options > Highlight Tech). |
||||||||
|
3 |
Description |
The description of the job. |
||||||||
|
4 |
Parts column |
The price of the parts in the job. This is the parts-only total; it does not include labor. |
||||||||
|
5 |
Labor column |
The price for the labor alone. This column displays the number in the Charge field of the Edit Labor window.
If the job calculates charges according to Billed Time, the Billed Time amount displays on the line. |
||||||||
|
6 |
Total column |
The total price of parts and labor only. NOTE: This is NOT the total price! To see the total price - including taxes, fees, and supply charges - check the Total on the Calculations Tab. |


Part Lines
Each part appears on its own line.
- Symbols and notations indicate important information about the part.
- Notations appear on the printed ticket with letters instead of symbols.

| # | Name | Description | ||||||||||||
|---|---|---|---|---|---|---|---|---|---|---|---|---|---|---|
|
1 |
Symbols |
These symbols indicate that this line is a part (as opposed to a labor) as well as its inventory status. The part symbol is a combination of the
For example,
|
||||||||||||
|
2 |
Quantity |
The quantity requested for the job.
|
||||||||||||
|
3 |
Part Number |
The part number. |
||||||||||||
|
4 |
Description |
The part description. |
||||||||||||
|
5 |
Price |
The price to the customer for the quantity. |
 means this is a stock part that is above the minimum profit margin.
 appears in the
Hiding Parts
The plus and minus signs at the beginning of labor lines let you show or hide the parts associated with it.
- Click
 to show the parts (the default view).
 - Click
 to hide the parts.
Hiding the parts can be helpful when a job has many, many parts and/or there are many jobs with many parts in the Jobs section.
This does not affect the how the repair order prints.
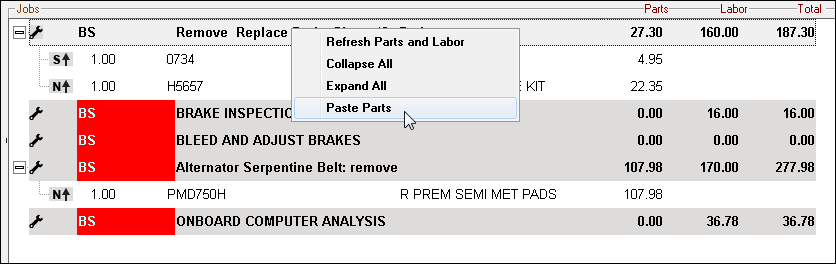
Right-Click Options for Labor
Right-clicking on a labor line brings up the following menu.
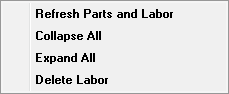
- Select Refresh Parts and Labor or use shortcut keys CTRL + R to refresh if needed.
- Select Collapse All to only show Labor.
- Select Expand All to show parts for all jobs.
Deleting Labor
To delete one job, right-click on it and select Delete Labor.
To delete multiple jobs,
- Press and hold the CTRL key while you click on each job.
- Press and hold the SHIFT key while you click on the first job and then the last job.
Right-click and select Delete Labor on the menu.
If there are parts associated with the job(s), R.O. Writer asks if you want to delete the associated parts.
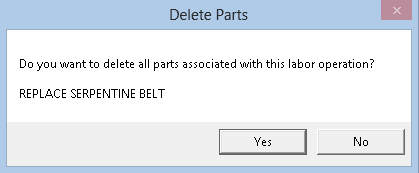
- Click Yes to delete the parts.
- Click No to keep the parts. They remain in the Jobs section under an undefined labor line.
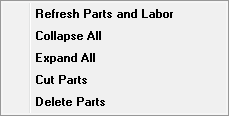
Right-Click Options for Parts
Right-clicking on a part brings up the following menu.
Moving Parts
By moving parts, you can
- Change the sequence of jobs in the list.
- Change the sequence of the parts within a job.
- Move a part from one job to another job in the list.
There are two main methods to move parts:
- Use the right-click menu to cut, copy, and paste.
- Drag-and-drop the job and parts.
To Move Parts Via Right-Click
Complete these steps:
- Right-click on a part.
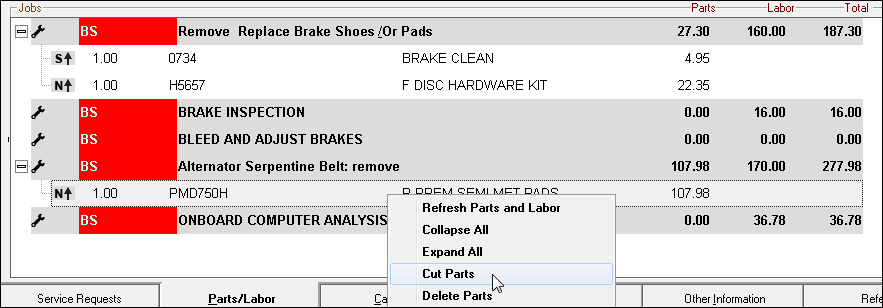
- Select Cut Parts.
- Right-click on the labor operation you want to move the parts to.
- Select Paste Parts.
- The selected parts appear under the new job.
To Move Parts Via Drag and Drop
Click and hold on the part and drag the part higher in the list within a labor operation or to another labor operation.

To select multiple items:
- Press and hold the CTRL key while you click on each part.
- Press and hold the SHIFT key while you click on the first part and then the last part.
Smart Pricing Changes
If you are using a pricing method for parts that prices the parts based on their associated labor, the price can be affected when moving parts between labor.
If you are using Smart Pricing, how the price is impacted is determined by the When Cutting and Pasting Parts from One Job to Another option in Configuration. If set to prompt, a prompt appears when pasting the price asking if you want to update the price of the part based on the new labor operation. Click Yes to recalculate the price based on the new job.
Moving Labor
Click and hold on the labor operation and move it up or down in the list.
- If there are only two labor operations, you can only move the bottom one up.
- If there are three or more labor operations, you can move each labor operation up or down.
To select multiple items:
- Press and hold the CTRL key while you click on each labor operation.
- Press and hold the SHIFT key while you click on the first labor operation and then the last one.
Printing in the Job-Based Format
The format of printed tickets is not affected by the view setting selected on the Windows menu. The printed format depends entirely on the form type selected in Configuration.
- If the form type is formatted in the job-based view, then the repair order prints in the job-based format.
- If the form type is formatted in the non-job-based view, the repair order prints in the non-job-based format.
If the parts and labor on your printed repair order do not match the Jobs section, check the form type selected in Configuration.