Parts Department Groups
Parts department groups provide an additional reporting level above the Parts Departments. In general, the process works like this:
- Create a parts department.
- Put individual parts in it.
-
- Create a parts department group.
- Add parts departments to the group.
- Run Inventory reports based on parts department groups.
Editing Parts Department Groups
Complete these steps:
- Select the group from the dropdown list at the top.
- The options associated with the selected department group appear on the window and the dropdown list is deactivated.
- Make your changes.
- Click Save to save your changes.
- To edit another group,
- Click the Clear button to clear the window of all selections.
- Enter the details for the new group.
- Click Save.
- Close the window by clicking Close.
Buttons at the Bottom of the Window

Creating a Parts Department Group
You can create as many groups as you need. One group can contain multiple parts departments. However, you cannot put one parts department in multiple groups; you must choose one and only one group for each parts department.
Parts department groups provide a quick way to globally attach one or two fees and/or exclude the Shop Supply Fee to all parts in the group.
To Create a Parts Department Group
Complete these steps:
- Open the Configuration module, select Configuration > Parts > Parts Department Groups.
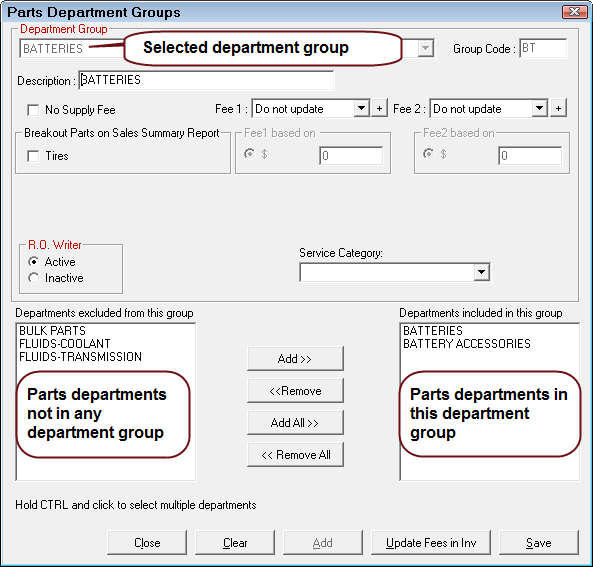
- Click the Add button. The cursor activates in the Group Code field.
- Enter a Group Code of up to three characters. The code is used to determine the sort order of the groups in the dropdown list at the top.
- Type in the name of the group in the Description field. (The code is usually an abbreviation of this name.)
- Check the box in the Breakout Parts on Sales Summary Reports section to group the part sales for the group on the Summary Report.
- Select the appropriate fee options.
Different fees apply to different types of parts. The fees apply to the part records included in this Parts Department Group.
- Select No Supply Fee to exempt the parts included from the supply fee calculations on tickets.
- The Fee1 and Fee2 fields are populated with Core Charges for part items that have an assigned core value.
- For part items that do not have an assigned core value, select the type of fee from the dropdown listing and enter the appropriate amount to be charged. The fee description and amount are included in the ticket whenever this part is added.
- A second fee, such as a disposal fee or environmental fee, may also be established for a part.
- Select the type of fee from the dropdown list and enter the amount. The fee and amount are included in the ticket whenever this part is added.
- If the fee was configured as a percentage of the part price, the field is disabled. R.O. Writer does not allow Fee2 to be defined as a Core Charge.
- If you have not configured fees yet, save the group first, then close the Department Groups window. Select Configuration > Parts > Other Taxes and Fees to set up parts fees. When the fees are configured, they appear in the dropdown lists.
- Choose the parts departments to include in the group at the bottom of the window:
- Parts departments on the left side have not been added to any group yet. You can add a parts department to only one group.
- Select the parts department on the left side and click the Add>> button. The parts department moves to the right side.
- After a department has been selected for one group, it cannot be selected for any other group and will no longer appear in the Departments Excluded box.
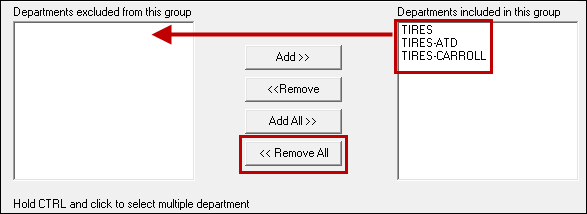
- Use the <<Remove button to remove departments from the group.
- Click the Save button to save the department group.
- To add another group,
- Click the Clear button to clear the window of all selections.
- Enter the details for the new group.
- Click Save.
- Close the window by clicking Close.
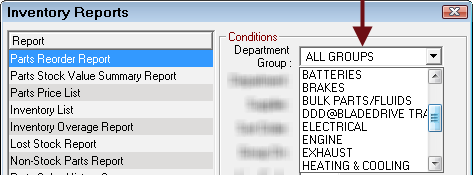
To See Which Parts are Included in a Group
Inventory reports can be run for each group to help you track which specific parts are in department groups.
Updating Fees in Part Records Globally
If certain fees are included in the group, you can apply those fees globally to all parts in the group at once by clicking the Update Fees In Inv button. A message appears repeating your selections and asking you to confirm.
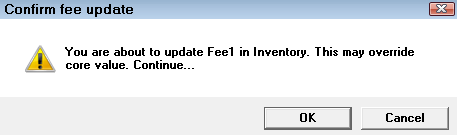
You can do this at any time. To edit a fee, open the group on this window, change the fee, click Save, and then click the Update Fees in Inv button.
Deleting Parts Department Groups
You cannot delete a parts department group, but can make it inactive.

Inactive parts department groups:
- No longer appear in R.O. Writer dropdown lists.
- Are NOT included in the Department Group dropdown list in Inventory Reports.
- Do appear in the dropdown list on this window so they can be edited or reactivated.
Removing the Parts Departments
When you inactivate a parts department group, it does NOT remove the parts departments in it. This means that the parts departments in the inactive group cannot be added to another parts department group.
You need to manually open the inactive parts department group, remove the parts departments, and click Save.
Parts in Inactive Department Groups
Parts in department groups are not impacted when the parts department is made inactive. For instance, if you create a tire group, use it to apply fees to all the parts in it, and then inactivate the tire group, the parts in the tire group still have the fee structure applied by the tire group.
You need to change the parts individually in Inventory or create a new tire group and change the fee structure there.
Oil Group
R.O. Writer enables you to create one oil group to manage all departments with oil parts as a group. The oil group contains additional options that apply only to oil such as oil label information.
- Only one group may be defined as the oil group.
- The Oil Group option appears only if no oil group exists.
For instructions, click the following link: The Oil Group
Tire Group
R.O. Writer enables you to create one tire group to manage all departments with tire parts as a group. The tire group contains additional options that apply only to tires such as DOT and F.E.T.
- Only one group may be defined as the tire group.
- The Tire Group option appears only if no tire group exists.
- If you don’t see the Tire Group option, one of the parts department groups is already designated as the tire group.
For instructions, click the following link: Tire Group for Tire Parts
The topics in this section include: