Texting Customers
You can text customers from the main window in two ways:
- From an open estimate or repair order
- From a list of all customers
You initiate a text by clicking the text message toolbar button in the main toolbar or the ticket toolbar.

NOTE: Texting is not available for phone quotes because phone quotes do not require a customer, which means there is no phone number associated with the quote.
Prerequisites
The Text Message toolbar buttons are active if your shop is licensed for R.O. Writer texting. If you have not met all prerequisites for texting in R.O. Writer, when you click one of the Text Message toolbar buttons, you will be prompted
Customer Consent to Text
After your shop is enrolled, registered, and configured for texting, you cannot text a customer until you obtain that customer’s consent to receive texts from your shop.
According to United States texting regulations, you must obtain express written consent from each customer before sending the first text message to that customer. Failure to obtain customer consent before texting can result in fines.
Texting a Customer from a Ticket
You can text customers updates about the services currently being performed or needed. For example, if the car is in the shop for an oil change and you discover that the air filter needs replacing, you can text the customer and ask them to call you about additional services.
In texting configuration, you must designate the customer phone field R.O. Writer should use for texting. Make sure that you have the customer’s texting number in that field.
To Text a Customer from an Open Ticket
The first text you send a customer must be from an open estimate or repair order. After that first text, you can send the customer a text from the list.
Complete these steps:
- On an open estimate or repair order, click the Text Message button in the ticket toolbar
 .
. - The text messaging window for the customer opens. The ticket number appears in the title bar.
- The entire text history between your shop and the customer appears on the right, above the text box.
-
Type the message text in the text box.

Text is spell-checked as you type. Right-click to see and select the correct spelling.
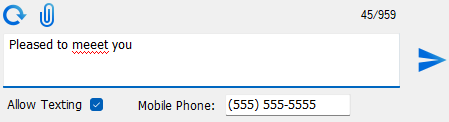
You can save the misspelled word to a local dictionary.
- Verify the phone number in the Mobile Phone field.
- This field contains the phone number set as the texting number for the customer.
- You can type in a different number. If you send the text, the phone field for the customer is updated with the new number.
-
Allow Texting must be checked to send the message.
-
Click the Send button
 . The sent message appears in the texting history above the message box.
Click the more information link to read the texting agreement.
If Allow Texting is unchecked, the message cannot be sent. You must obtain consent from customers before you can text them.
For more information, click the following link: Ticket Text Message Window.
Texting a Customer from All Text Messages
The first text you send a customer must be from an open estimate or repair order. You cannot text a customer for the first time from the list of customer text messages.
To Text a Customer From the List
Use this method to text a customer you have texted in the past who does not have an open estimate or repair order.
Complete these steps:
- On the main window, click the Text Messages button in the main toolbar
 .
. -
Click the All Messages tab and type the customer’s name into the search box. The list narrows to customers matching that name.

- If you cannot find the customer in the list, the customer has never been texted before. Only customers that have been texted before are included in the list.
- Click the customer name. The shop’s texting history with the customer appears on the right.
-
Type the message text in the text box.

- Verify the phone number in the Mobile Phone field.
- This field contains the phone number set as the texting number for the customer.
- You can type in a different number. If you send the text, the phone field for the customer is updated with the new number.
-
If Allow Texting is unchecked, the message cannot be sent. You must obtain consent from customers before you can text them.
NOTE: If Allow Texting was checked when texting from a ticket, then it will be checked when you select the customer in the list.
-
Click the Send button
. The sent message appears in the texting history above the message box.
Twilio is a registered trademark of Twilio Inc. and/or its affiliates. Other names may be trademarks of their respective owners.