Texting Configuration
You can configure texting in R.O. Writer Configuration after your shop is enrolled and registered for texting. After the registration process is completed, the Texting Configuration window opens automatically when you click one of the Text Message toolbar buttons  .
.
Prerequisites
Before you can configure texting in R.O. Writer:
- Symmetric must be configured and transmitting successfully. Symmetric is installed as part of the R.O. Writer Server installation.
- Central Service must be configured and transmitting successfully.
-
Your R.O. Writer license must include R.O. Writer texting.
If the text message toolbar buttons are active, you are licensed for R.O. Writer texting. - Your shop must be enrolled in the R.O. Writer texting program. Enrollment includes obtaining the shop’s texting number from Twilio®.
- Your shop’s texting number must be registered with Twilio.
NOTE: If you do not see these toolbar buttons and would like to add this feature, please contact the R.O. Writer Sales team to upgrade your license.
Configure Texting
After the registration process is completed, the Texting Configuration window opens automatically when you click one of the Text Message toolbar buttons .
To Configure Texting
You can open the Texting Configuration window directly in R.O. Writer Configuration.
Complete these steps:
- Open Configuration.
-
Click Configuration menu > Text Messaging Configuration. The Texting Configuration window opens.

-
Select the SMS Phone Number.
- Select the Phone Field for Text Messages in the dropdown list.
- Configure the additional settings on the window as needed or desired.
- Click Save. The next time you click one of the text message toolbar buttons, the texting message window opens.
NOTE: According to United States texting regulations, you must obtain express written consent from each customer before sending the first text message to that customer. Failure to obtain customer consent before texting could result in fines.
Texting Configuration Settings
The texting settings on the Texting Configuration window (Configuration menu > Text Messaging Configuration). The Texting Configuration window opens.

| Setting | Description |
|---|---|
|
The number in this dropdown list is the one added to your R.O. Writer software license and registered with Twilio.
This is the number your shop uses to send and receive texts. When customers receive texts from your shop, this is the number they will see and reply to. |
|
|
Refresh Phone Numbers |
Click to refresh the SMS Phone Number list. If you have added new phone numbers, the new numbers appear in the dropdown list. |
|
Select the phone field to use for all customers. When you text a customer, R.O. Writer selects the phone number in the phone field selected here.
Make sure that you select a phone field that contains cell phone numbers. NOTE: You can type in a different number on the text messaging window before you send the text message. If you send the text, the phone field for the customer is updated with the new number. The Phone Field for Text Messages dropdown list contains the first five phone fields configured for the Edit Customer window.
The format of the entries in the dropdown list is “[Phone Position #]/[Phone Label]”. The phone label is set in the phone field Configuration setting.
|
|
|
Text Message Subject |
If you type a message in this field, that message is inserted as the first line of every text message, the Subject line. If you leave this field blank, messages are sent without a Subject line. To see what messages look like, see Message Examples below. |
|
Opt Out Message |
Leave this field blank to send the following text as the last line of every message: “Reply STOP to cancel msgs.” If you type in a message, you must provide users with a way to opt out of receiving future messages from your shop. To see what messages look like, see Message Examples below. |
|
Msg When Texting Estimates |
If you enter text here, this text is inserted into the message when you attach a PDF to a message sent from an estimate.
If you leave this field blank, no text is inserted into the message when you attach a PDF. You must enter text to be able to send the message. To see what messages look like, see Message Examples below. |
|
Msg When Texting Repair Orders |
If you enter text here, this text is inserted into the message when you attach a PDF to a message sent from a repair order.
If you leave this field blank, no text is inserted into the message when you attach a PDF. You must enter text to be able to send the message. To see what messages look like, see Message Examples below. |


Message Examples
TIP: You cannot see or change the automatic messages before sending a text. You may want to send a few test messages before settling on the text in each message field.
Let’s say, Texting Configuration is saved as follows:

A standard message would include
- The Subject line
- The text entered in the text box of the message window
- The Opt Out Message

A message from a repair order with a PDF attached would include:
- The Subject line
- The text entered in the text box of the message window
- The texting repair order message
- The Opt Out Message
- An image of a PDF

A message from an estimate with a PDF attached would include:
- The Subject line
- The text entered in the text box of the message window
- The texting estimate message
- The Opt Out Message
- An image of a PDF

Counter on the Message Window
Four fields on the texting configuration window insert text when the message is sent:
- Text Message Subject
- Opt Out Message
- Msg When Texting Estimates
- Msg When Texting Repair Orders
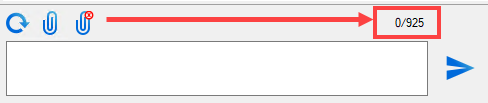
You cannot see the message on the text messaging window before you send the text; however, the counter on the messaging window subtracts the number of characters entered in these fields from the total remaining.
In the image below, you can see that 75 characters will be inserted when the text is sent because the counter is “0/925” instead of “0/1000”.
Verify Your Time Zone
The default time zone for Central Service in the R.O. Writer cloud is Eastern Standard Time (EST). If your shop is in a time zone other than EST, you should set your time zone in R.O. Writer so that text messages are sent and received in the appropriate time zone. If the time zone is not set properly, text messages could be an hour or more behind.
The Time Zone setting was added to R.O. Writer Configuration so that you can verify and/or reset your local time zone in your database. When you set the time zone in R.O. Writer, the time zone setting is saved in Central Service in the R.O. Writer cloud.
To Verify Your Time Zone
When you install R.O. Writer 3.1 or higher, the installation program reads the time zone set on the computer and enters that time zone as the R.O. Writer time zone automatically.
The verify that the R.O. Writer time zone is set correctly, open R.O. Writer Configuration and click File menu > Time Zone Settings. Your Time Zone should be selected and Support Daylight Savings checked.

If you need to make a change, do so and click Save to save the change.
Advanced Text Settings
On the Texting Configuration window, click the Advanced button to see the Advanced settings.

The SMS Server Address field appears. The field is populated with the correct address by default.
When you text a PDF, the customer receives a link to the PDF file on this server and clicks the link to download the PDF file to the phone.
WARNING! This is a production server, which is required for texting to function properly. Do not change this value without guidance from R.O. Writer.
Twilio is a registered trademark of Twilio Inc. and/or its affiliates. Other names may be trademarks of their respective owners.