Click the Setup toolbar button  on the Marketing Toolbar to access Marketing Setup.
Converting Old Documents to the Advanced Word Processor
Complete these steps:
- Click the Convert Old Documents button to convert documents created with the Basic Word Processor to use with the Advanced Word Processor.
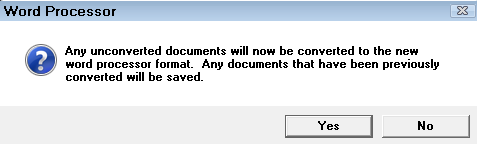
- Click Yes to begin converting old documents. (Your old letters will be saved in their original format if you choose to go back to the Basic Word Processor.)
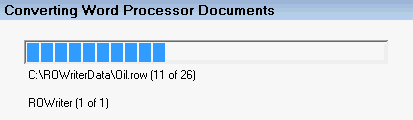
- When all the old processor documents are converted, the message ”Conversion complete” displays.
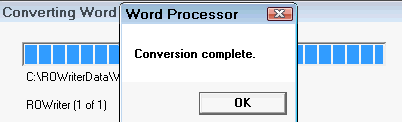
Image Files
If you have inserted an image into a document that is not located on the computer, you are prompted during conversion that the image file is missing.
- If you know where the image is located, click Yes to browse for the file.
- If you want to skip converting this letter, click Cancel.
- If you still want to convert the letter but do not know where the image is located, click No.
In most cases, the letter will convert and the image will also. In those cases where the image does not convert, you can edit the document to insert a different image or delete it.
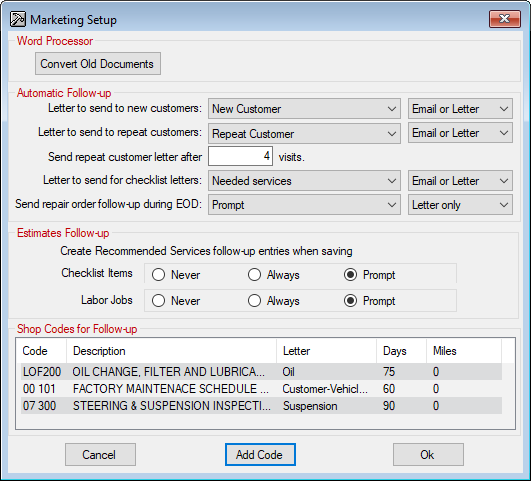
Automatic Follow-up
The automatic follow-up settings allow you to show your customers your appreciation for their business. You can also keep them informed of services that may be required based on the inspection of their vehicle in the shop.
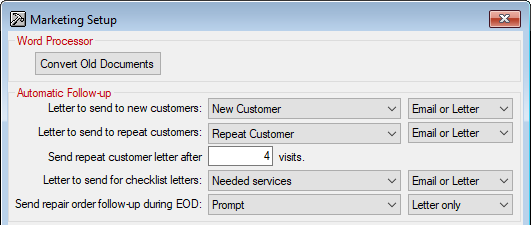
Letter to Send to New Customers
Select the letter to send as the default, and the default method of notification (Letter only, Email and Letter, Email only, Email or Letter).
Letter to Send to Repeat Customers
Select the letter to send as the default, the default method of notification (Letter only, Email and Letter, Email only, Email or Letter), and the number of visits to constitute a repeat customer.
Letter to Send for Checklist Items
Select the letter to send as the default, and the default method of notification (Letter only, Email and Letter, Email only, Email or Letter). This letter selected should have the Needed Services data field added.
if you are using the Advanced Word Processor, click Advanced Word Processor > Insert menu.
Send Repair Order Follow-up During EOD
This option determines if follow up letters and/or emails are sent during the End of Day process.
- The send options are Always, Prompt, and Never.
- The follow-up format options are Letter Only, Email or Letter, Email Only, Email and Letter.
Always
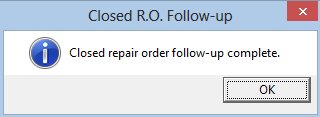
If you set the send option to Always, R.O. Writer always sends follow-up communication to customers during the end of day process. R.O. Writer emails or prints letter to customers who have had repair orders finalized since the last time follow-up letters were sent successfully - either during End of Day processing or after running Closed RO Follow-up.
The format of that communication (emails and/or letters) is based on your format selection.
- If the format is set to Email or Letter, R.O. Writer tries email first. If the customer does not have a valid email address, letters are printed.
- If the format is set to Email Only, emails are sent only to customers with valid email addresses. If the email address is not present or not valid, no email is sent.
-
When communication has been sent successfully, a prompt appears to notify you.
Prompt
If you set the send option to Prompt, R.O. Writer prompts you to send follow-up communication to customers during the end of day process. The format of that communication (emails and/or letters) is based on your format selection.
- If you click Yes on those prompts, R.O. Writer emails or prints letter to customers who have had repair orders finalized since the last time follow-up letters were sent successfully - either during End of Day or after running Closed RO Follow-up.
- If the format is set to Email or Letter, R.O. Writer tries email first. If the customer does not have a valid email address, letters are printed.
- If the format is set to Email Only, emails are sent only to customers with valid email addresses. If the email address is not present or not valid, no email is sent.
- When communication has been sent successfully, a prompt appears to notify you.
- If you click No on the prompts during End of Day, the emails and letters do not send.
- These customers will be included the next time the follow-up process is run.
Never
If you set the send option to Never, follow-up is never sent during the End of Day process.
NOTE: The End of Day process and Closed R.O. Followup process do not give you the opportunity to edit the content of the e-mails or letters before sending them to customers. Therefore, check and edit the Repair Order Follow-up template before running either process.
Estimates Follow-up
You can create follow-ups for recommended services, checklist items and labor operations from estimates. When saving an estimate, select the desired option.
Shop Codes for Follow-up
The shop codes that are included for follow-up should be those labor operations that are for routine, periodic maintenance - for example, oil changes, air conditioner services, service interval work, tire rotations, alignments, and other periodic maintenance or inspection items.
When these shop codes, or labor operations are added to a repair order, and the repair order is finalized, the shop code and the due date are added to service recommendations.
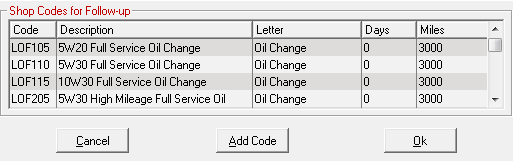
To Add Shop Codes
Click the Add Code button.
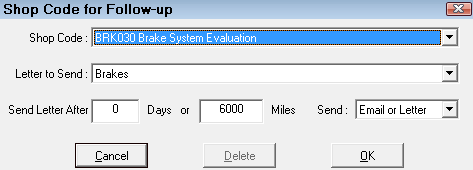
- Select the Shop Code - This dropdown list contains labor operations.
- Select the Letter to Send
-
Select the number of days or miles between the performance of the service.
TIP: If the idea is to have customers return just before the item needs to be performed, build in some lead-time. For example, if the idea is to have customers return every 90 days for an oil change, set the time interval to 80 days. This gives the customer time to be notified and schedule an appointment.
- Select the communication method in the Send dropdown list:
- Letter only
- Email only
- Letter and Email
- Email or Letter (An email is sent if the customer has a valid email address. A letter is sent if there is no valid email address entered.)
To Edit a Shop Code
Double-click on the code in the list to open it. You can change the options or delete the shop code.