Printing Work Orders
The printed format for work orders is selected in the Form Types Configuration setting. The form type determines how work orders look when printed.
Complete these steps:
- Open a quote, estimate, or repair order.
- Click the Print WO button in the ticket toolbar
 .
. - The standard print window opens.
- Select the printer.
- Click OK.
- The work order prints to the selected printer.
- The format and layout are determined by the form selected for work orders in the Form Types Configuration setting.
Oil Sticker Prompt
If Prompt is selected in the Prompting setting in oil sticker configuration, the Print Oil Sticker prompt appears when you print the work order. You can choose to print the oil sticker or cancel.
- If you print a work order but cancel the sticker print, the prompt appears when you finalize.
- If you print the sticker from the prompt, the prompt does not appear when you finalize.
- The labor description of the job is updated with the fact that an oil sticker was printed.
Whenever the prompt appears, you can modify some of the oil sticker information before printing the sticker.
If you need to print the sticker again, you can click the Print Sticker button on the Other Information tab of the ticket.
Oil Sticker Print
If Always is selected in the Prompting setting in oil sticker configuration, the oil sticker prints automatically when you print the work order. You are not prompted; the sticker prints as configured.
If you need to print the sticker again, you can click the Print Sticker button on the Other Information tab of the ticket.
What Prints on Work Orders
Work orders are intended to be a list of work for the technician. Printed work orders include all parts, labor, and service checklist items included in the ticket.
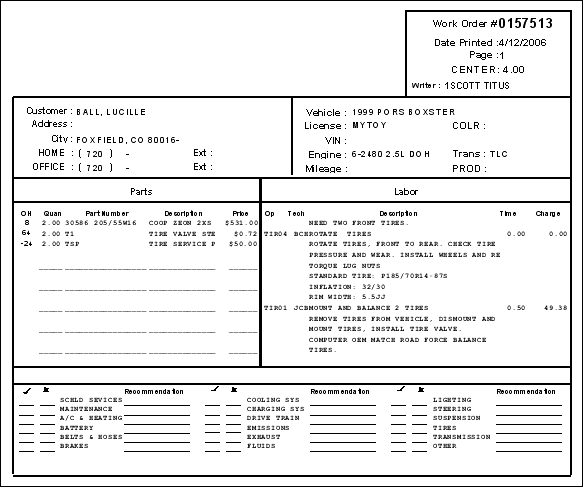
Work orders print in the non-job-based view, which means:
- All parts are listed in the Parts section.
- If a part is in local inventory and has a bin location entered, that bin location appears on the printed work order.
- All labor is listed in the Labor section.
All Service Checklist items are printed across the bottom of the work order so that the technician can perform the inspections and list the results, including any recommendations.
If the technician has to add any parts or labor during service, he or she can write them on the work order. The service writer can then add those items to the ticket in R.O. Writer.