New Oil Sticker Configuration
R.O. Writer 3.0 and higher offer a simplified oil sticker configuration window with more powerful features. This topic describes how to configure oil sticker printing in the new window.
Configuration Overview
After you configure the oil sticker printer and select the new configuration method, you must complete the following steps:
Step 1 - Configure the Sticker
- Step 1a - Select the Information That Prints
- Step 1b - Set the Font Size for Each Field
- Step 1c - Set Oil Sticker Prompting
- Step 1d - Enter the Next Service Due Calculations (if Selected)
- Step 1e - Test Print a Sticker
Step 2 - Configure the Printer Properties of the Oil Sticker Printer
- Step 2a - Set the Printer Properties in the Windows Control Panel
- Step 2b - Test the Printer Properties in R.O. Writer Configuration
- Step 2c - Add a Shortcut to the Oil Sticker Printer to the Desktop (Optional)
Step 3 - Configure Labor to Print Oil Stickers
Step 4 - Configure Bar Code Printing on Oil Stickers (Requires DVI Suite)
Step 1 - Configure the Sticker
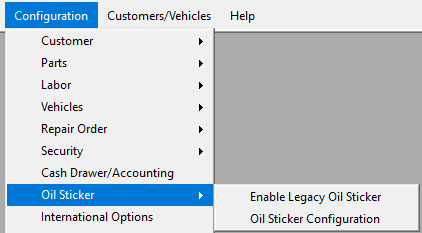
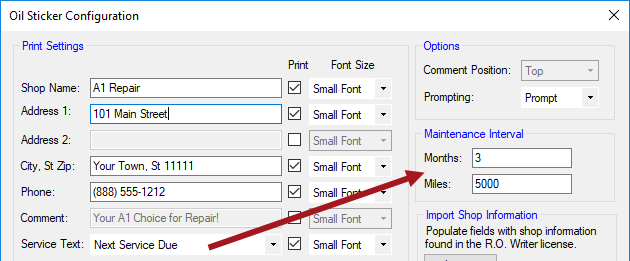
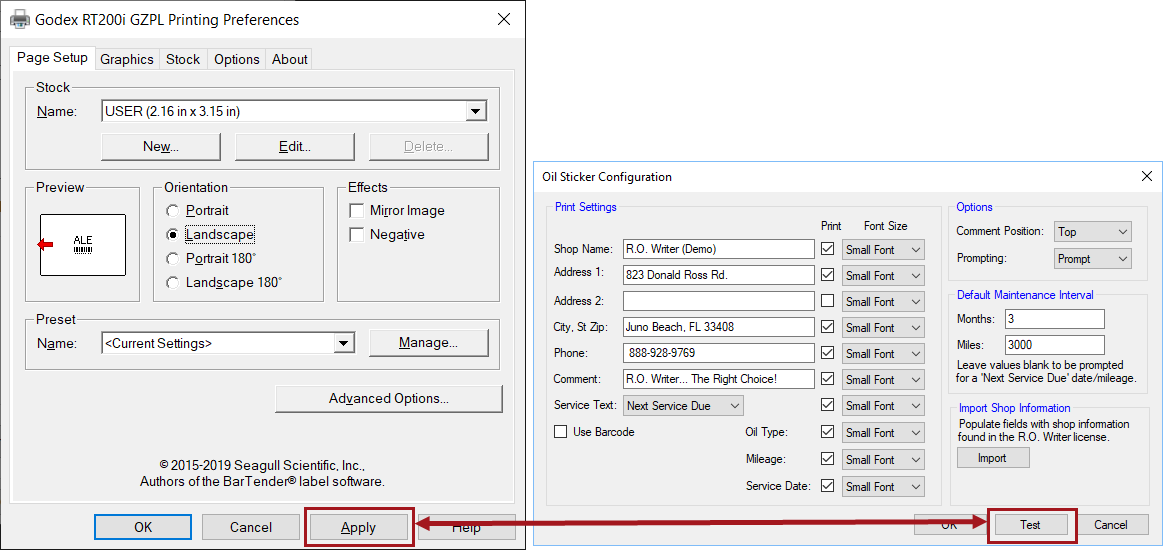
Click the Configuration menu and verify that Enable Legacy Oil Sticker is unchecked. Then, click Oil Sticker Configuration.
The Oil Sticker Configuration window opens.
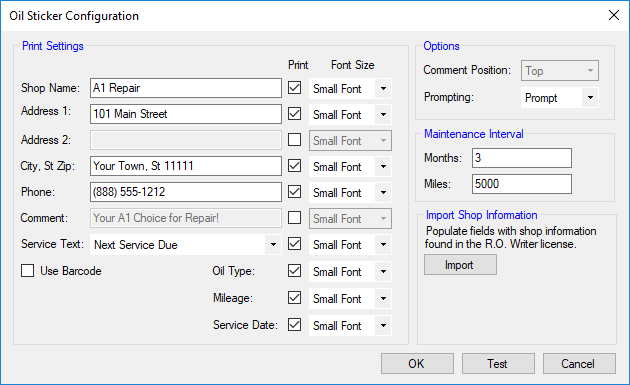
The fields remain inactive until the Print box is checked.
- You cannot enter or modify the content of an inactive field.
- Inactive fields do not print even if there is content in them.
Step 1a - Select the Information That Prints
You choose the content in the Print Settings section. The way the information is typed in the fields is how the information prints on stickers.
When the Print box is checked, you can enter information in the fields.
| Field | Description |
|---|---|
|
Shop Information |
Shop information includes Shop Name, Address 1, Address 2, City, State, Zip, and Phone. You can enter this information or import it from your software license. To import the information from your license, click the Import button.
|
|
Comment |
The Comment field is where you can enter any text you want to print on the sticker. This is usually your shop's slogan or something like, "Thank you for your business!" If you check Use Barcode, the Comment field is disabled. The barcode prints instead of the comment. |
|
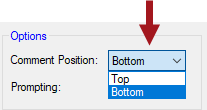
Comment Position |
You choose where the Comment line prints on the sticker. There are two options: Top or Bottom.
If you check Use Barcode, the barcode prints in the position selected in the Comment Position dropdown list. |
|
Service Text |
The Service Text dropdown list is where you choose the visit information that prints on the sticker. There are two options:
|
|
Use Barcode |
Use Barcode appears only if you are licensed for R.O. Writer DVI Suite. Check Use Barcode to print a barcode on the oil sticker. The Comment field is disabled because the barcode prints instead of the comment. |
|
Oil Type |
Oil Type is the oil type entered in the labor. Oil Type appears on the Print Oil Sticker prompt even if you do not check the Print box here; however, Oil Type does not print unless you check the Print box. |
|
Mileage |
This is the Mileage field on the Print Oil Sticker prompt. Check Mileage to print the vehicle's mileage on the sticker. If the Mileage box is unchecked, a line with a "Mileage" label prints on the sticker, but the vehicle's mileage does not on that line. |
|
Service Date |
Service Date is the Date field on the Print Oil Sticker prompt. If the Service Date box is unchecked, a line for the date prints on the sticker, but the actual service date does not print on that line. |
Step 1b - Set the Font Size for Each Field
You select the fields that print and how they appear in the Print and Font Size columns.

For each item with the Print box checked and content entered, select the font size in the Font Size column.
There are two options: Small Font and Large Font. You can select the font size for each field.
- Small Font is selected for all fields by default.
- Large Font is for the information you want to emphasize on the label.
TIP: Use the Test button to test print your selections and verify that the selected information fits on the label.
Step 1c - Set Oil Sticker Prompting
You set the oil sticker prompt behavior in the Prompting dropdown list in the Options section.
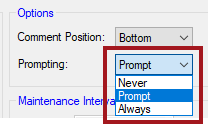
The Prompting setting determines if R.O. Writer prints or prompts you to print an oil sticker from an open ticket if that ticket includes labor that is configured to print oil stickers.
|
Setting |
Description |
|---|---|
|
Never |
When Never is selected, oil stickers never print automatically. You can only print oil stickers on-demand from open tickets. |
|
Prompt |
When Prompt is selected, the Print Oil Sticker prompt appears when you print the work order or finalize the repair order. The prompt appears only once.
Whenever the prompt appears, you can modify some of the oil sticker information before printing the sticker. |
|
Always |
When Always is selected, the oil sticker prints when you print the work order. No prompt appears. You cannot review or edit the information on the sticker before printing. The sticker prints as configured. The oil sticker prints only once; it does not print again when you finalize. If you do not print a work order, the sticker prints when you finalize. |
NOTE: The Prompting setting does not affect printing oil stickers on demand. When you print oil stickers from an open ticket, the Print Oil Sticker Prompt always appears.
Step 1d - Enter the Next Service Due Calculations (if Selected)
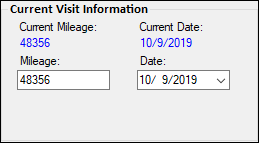
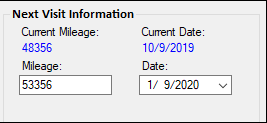
If you choose Next Service Due as the Service Text, you can use the Default Maintenance Wizard to calculate the Next Visit Information for you.
When you choose Next Service Due, the Next Visit Information appears on the Oil Sticker prompt. You can review the calculated information and modify it before printing the oil sticker.
| Item | Description |
|---|---|
|
Months |
Enter the number of months that should be used to calculate the date of the next visit. The number entered here is added to the current month. The result of that calculation displays in the Date field on the Print Oil Sticker prompt. |
|
Mileage |
Enter the number of miles that should be used to calculate the mileage of the next visit. The number entered here is added to the current mileage of the vehicle. The result of that calculation appears in the Mileage field on the Print Oil Sticker prompt. |
Step 1e - Test Print a Sticker
The Test button at the bottom of the window prints a test oil sticker to the oil sticker printer selected in Printer Locations. Only the information with the Print box checked prints on the sticker.
Test your configuration before printing a sticker for a customer. You should
- Verify the information you want to print.
- See how much information will print on your sticker size.
- Adjust the layout in the printer properties as needed.
Step 2 - Configure the Printer Properties of the Oil Sticker Printer
The layout settings are in the Printer Properties Windows setting for the oil sticker printer itself. For example, you can set the following on the printer:
- Portrait or Landscape orientation
- Margins
- Size
- Darkness level
R.O. Writer supports most label sizes, including 2 in. x 1.5 in.
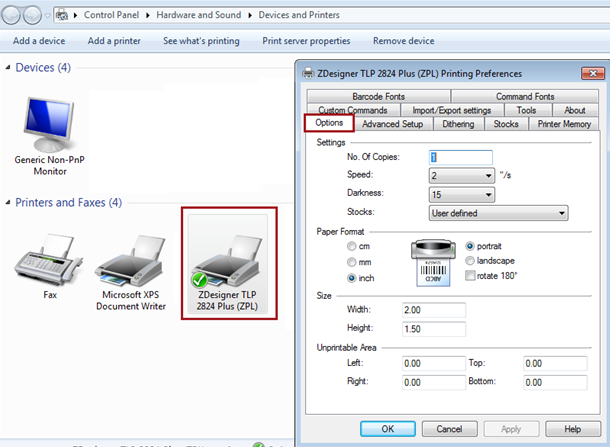
Step 2a - Set the Printer Properties in the Windows Control Panel
You need to open the Printer Properties for your printer in the Windows Control Panel. You format the oil sticker label within the Printer Properties tab windows.
Every oil sticker printer is different. You should consult the material that came with the printer you purchased when modifying the settings in the Printer Properties in Windows.
Complete these steps:
- Click the Start button and open the Windows Control Panel.
- To find the Devices and Printers setting, you can:
Type "Printers" in the Search box in the upper right corner of the Windows Control Panel. Click the View Devices and Printers in the search results.

OR
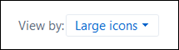
- In the upper right corner, change the View to Large Icons
 .
.
Then, click Devices and Printers .
. - The Devices and Printers window opens displaying all devices and printers on your local machine.
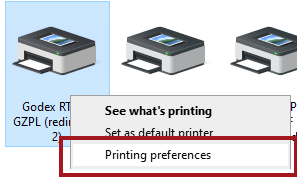
- Right-click on your oil sticker printer and select Printer Properties.
- Click the Preferences button. What you do next depends on whether you have a Zebra or a Godex printer installed.
If you have a Zebra printer, click the Options tab on the Printing Preferences window. The Options tab opens and displays the layout settings for the oil sticker printer.
If you have a Godex printer, click the Page Setup tab on the Printing Preferences window.
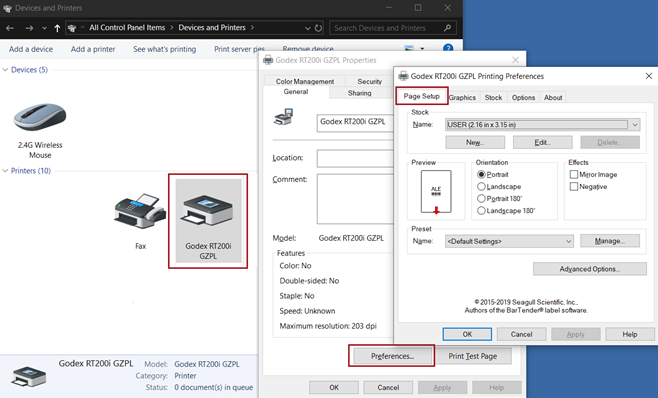
- Adjust the margins for Portrait or Landscape until the oil sticker prints with the correct spacing.
- Click the Test button on the Oil Sticker Configuration window to test these settings.
- Review the printed oil sticker and edit these settings as needed.
NOTE: There are more settings for each type of printer than documented here. Please consult the materials you received from the manufacturer regarding the printer settings.
Step 2b - Test the Printer Properties in R.O. Writer Configuration
R.O. Writer designed the Oil Sticker Configuration window to accept changes from the Printer Properties settings in Windows immediately.
You do not need to reboot R.O. Writer Configuration to test changes to the Printer Properties. You can adjust and test the oil sticker label as much as you need to until the label prints and appears the way you want it to.
Complete these steps:
- Make a change to the Preferences in the Printer Properties of the printer.
- Click the Apply button.
- Switch over to the Oil Sticker Configuration window in R.O. Writer Configuration.
- Click the Test button to print a sticker and see the effect of the layout changes immediately.
Step 2c - Add a Shortcut to the Oil Sticker Printer to the Desktop (Optional)
You may want to create a shortcut to the Devices and Printers setting. This way, you can click the shortcut to open Devices and Printers from the desktop. Then, you can right-click on the oil sticker printer to access the printer properties.
Complete these steps:
- Open the Windows Control Panel.
- Right-click on Devices and Printers.
- Select Create Shortcut on the right-click menu. A message pops up saying that the shortcut must be created on the Desktop.
-
Click Yes.
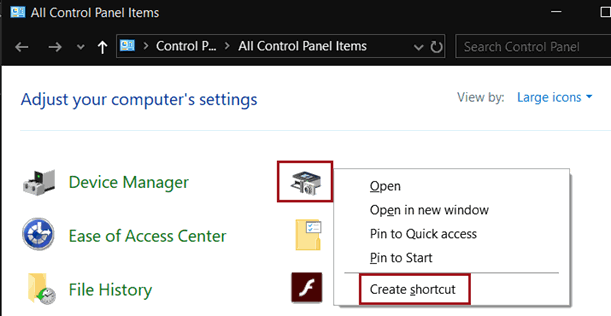
- The Devices and Printer shortcut appears on your Desktop
 .
. - Click the Devices and Printers shortcut to open the window in the Windows Control Panel where you can see the oil sticker.
Right-click on the oil sticker printer and select Printer Properties on the menu to open the printer properties for the printer.
Step 3 - Configure Labor to Print Oil Stickers
You need to configure labor to print oil stickers to
- Apply the Prompting setting in oil sticker configuration.
- Update the labor description when the labor is posted to tickets and printed on tickets.
For details and instructions, click the following link: Configuring Labor to Print Oil Stickers
Step 4 - Configure Bar Code Printing on Oil Stickers (Requires DVI Suite)
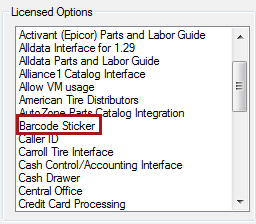
If you use R.O. Writer DVI Suite, you can purchase an additional license that allows you to print bar codes on all oil stickers.
To find out if you are licensed for this feature, check your Licensed Options. If you see the "Barcode Sticker" in the Licensed Options list, you are licensed to print barcodes on oil stickers.
When the customer arrives for their next visit, you can create a new repair order for the current visit just by scanning the barcode on the oil sticker.
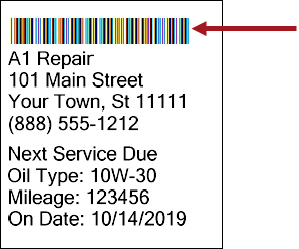
The new repair order contains the oil change labor from the previous visit automatically.
To Configure Oil Stickers to Print Barcodes
If you are licensed to print barcodes on oil stickers, a Use Barcode checkbox appears on the Oil Sticker Configuration window.

Complete these steps:
- Check Use Barcode. The Comment field is disabled.
- The barcode replaces the comment area on the sticker.
- The Comment field is also disabled on the Oil Sticker Print prompt.
- In the Comment Position dropdown list, decide where you want the barcode to print on the sticker: Top or Bottom.
- Click the Test button to print a sample sticker.
- When the sticker prints the way you want it to, click OK to save your changes.