Labor Operations
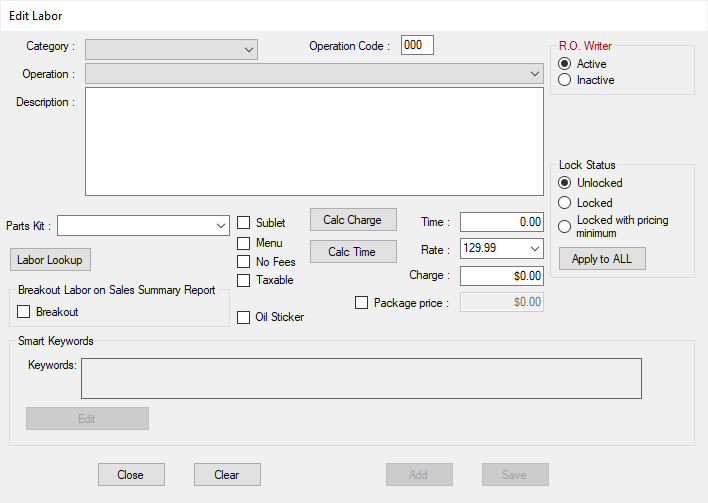
Labor operations are specific jobs inside Labor Categories. The Category dropdown list contains the categories in the Labor Categories setting.
For example, a specific kind of oil change (labor operation) would be inside of the oil change category. Therefore, you would select the oil change category and then create/modify the oil change labor operations within that category.
R.O. Writer comes with some labor operations already configured. You can create your own labor operations or modify the ones already configured in R.O. Writer.
For example, you can change the
- Description to fit specific requirements
- Billed time to suit the particular occasion
- Labor rate and charge
Creating Labor Operations
You create a labor operation by entering the setting you want for the labor.
Complete these steps:
- Select the labor category in the Category dropdown list and click Add.
- Enter an Operation Code if one is not assigned by R.O. Writer.
- R.O. Writer usually assigns the code after you click Add or Save.
- You cannot save a labor operation with a blank Operation Code.
- Type a description in the Description box.
-
Enter the remaining settings.
-
Click Save. The labor operation is saved and added to the Operation dropdown list.
-
The operation appears in all dropdown lists as follows: "[Operation Code] [First line of the Description field]".
-
- To add another labor
- Click the Clear button, then the Add button.
- Repeat Steps 2–5.
- Click the Close button to close the window.
Description Box
When typing in the description, keep the following in mind:
- The contents of the description entered here is posted to the Description box of the labor when it's posted to a ticket.
- The posted description can be modified; however, the content you enter here always posts.
- The entire description of the posted labor prints on the final customer invoice.
- Choose this first line carefully. The first line of the description appears after the Operation Code in dropdown lists throughout R.O. Writer.
- The first line should be something simple; for example, "OIL CHANGE 5W" and no more.
- You can add additional information to the lines after the first line.
- Press the ENTER key on the keyboard to move to the next line and enter as much description as you need.
- If the description is very long, use the up and down arrows on the keyboard to navigate.
Lock Status
The Lock Status setting provides options to lock the price of the labor when posted to tickets.
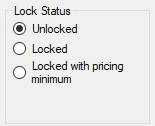
The Apply to All button appears only when no operation is selected.
For more information, click the following link: Price Locks on Labor Operations.
Labor Operation Settings
This section describes the settings below the Description field.
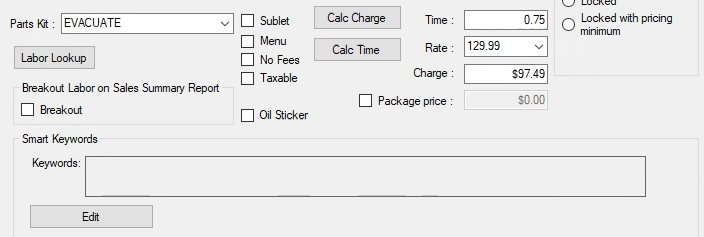
NOTE: The main components of labor operations are time and money.
Time
Is this operation to be charged at a specific number of hours, or is the price to be set, and the labor hours adjusted accordingly? If there is a specific amount of time that should be billed for this operation, maybe from a labor guide, enter that amount in the Time field.
If the labor operation needs to be for a specific amount of billable time:
- Enter a specific time in the Time field, then enter a specific cost in the Charge field, and do NOT press the Calc Charge button or the Calc Time button.
- Press the Save button and the specified time and charge are saved instead of the calculated time and charge. This is useful for fixed-price jobs where parts and labor are included and the technician gets credit for a certain amount of time for doing the job.
Rate and Charge
The Calc Charge and Calc Time buttons are a one-time calculation on this window. These buttons do not determine the default setting when the labor operation is posted to tickets. The default option is set in the Labor Calculations setting (Configuration menu > Repair Order > R.O. Options).
| Button | Description |
|---|---|
|
Calc Charge |
Enter the time in the Time field, select the appropriate Labor Rate, and press the Calc Charge button. The appropriate cost is calculated and appears in the Charge field. |
|
Calc Time |
Enter the amount in the Charge field, select the appropriate Labor Rate, and press the Calc Time button. The correct billable hours are calculated and appear in the Time field. |
Setting a Fixed Price
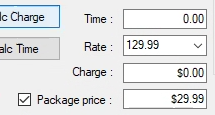
If the charge needs to be a fixed price, like an oil change, where the technician gets credit for a specified amount of billable time, the oil and filter used is included, and a fixed price is charged for the complete job. There are a couple of ways you can set this up:
- Check Menu for the associated parts. This means the price to the customer is 0.00 and the entire job is charged through the labor. This labor operation appears on the Itemized Sales Report in the Menu Sales section.
-
Use Package Pricing, which ensures that the parts are taxed accordingly.
Sublet
Sublet means labor performed by someone other than a technician or employee in your system. If another shop, such as a wrecker service or transmission shop, usually does this job for your shop, check the Sublet box.
Sublet labor is billed and tracked differently.
No Fees
If supply charges are routinely billed on labor but are not to be charged on this labor operation, specify that by checking the No Fees box.
For more details, click the following link: Taxes and Fees
Taxable
Is this operation taxable? This is governed by individual state laws. Tax is calculated when the taxable box is checked. Be sure that the appropriate tax rate has been configured.
For more details, click the following link: Taxes and Fees
GST and PST
GST and PST checkboxes appear only if the GST/PST Taxes option is selected in International Options. PST and GST are Canadian taxes.
Oil Sticker
If the Oil Sticker option is checked, an oil sticker is printed along with the repair order automatically.
Parts Kit
If it is known that certain parts will always be used when performing a labor operation, these parts can be configured in a Parts Kit and the parts kit added to the repair order each time the labor operation is performed. Selecting the appropriate kit in the Parts Kit box does this.
Labor Lookup
Click the Labor Lookup button to add catalog labor from Epicor. After catalog labor has been added, the labor description from Epicor appears to the right of the Labor Lookup button.

When catalog labor is added to a labor operation, the Labor Guide button appears on the Editing Labor window when you open the labor from the Jobs section of the Parts/Labor tab.
For details, click the following link: Using the Labor Guide on a Job Posted to a Ticket.
Breakout Labor on Sales Summary Report
The Summary Report allows you to break out sales for specific labor operations and parts department groups.
The Breakout Labor section contains a checkbox and a label. When you check the box of a labor operation, you are telling R.O. Writer to include this labor operation in the Breakout Labor section on the Sales Summary Report.
The Label (and therefore the breakout) is determined by the label entered in the Sales Report Options.
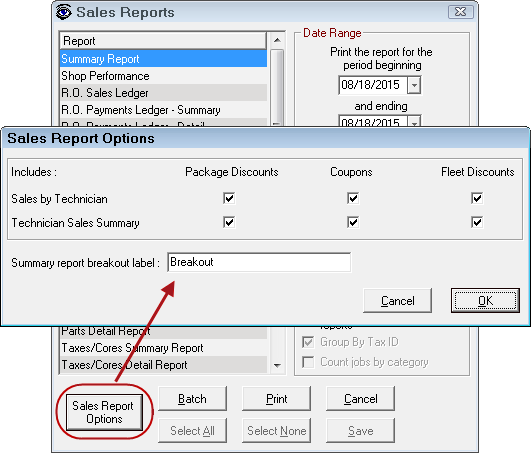
TIP: The breakout section is often used to breakout sales for major repair categories like oil changes and tire sales.
Smart Keywords
This area allows you to add keywords to this labor operation. For more details, click the following link: Smart Keywords on Labor Operations.
Deleting Labor Operations
You cannot delete labor operations; instead, you make them inactive for R. O. Writer by selecting the Inactive option.

Inactive labor operations
- Cannot be selected anywhere in R.O. Writer, except when editing labor categories on this window.
- Are included in reports to retain historical accuracy.
The topics in this section include: