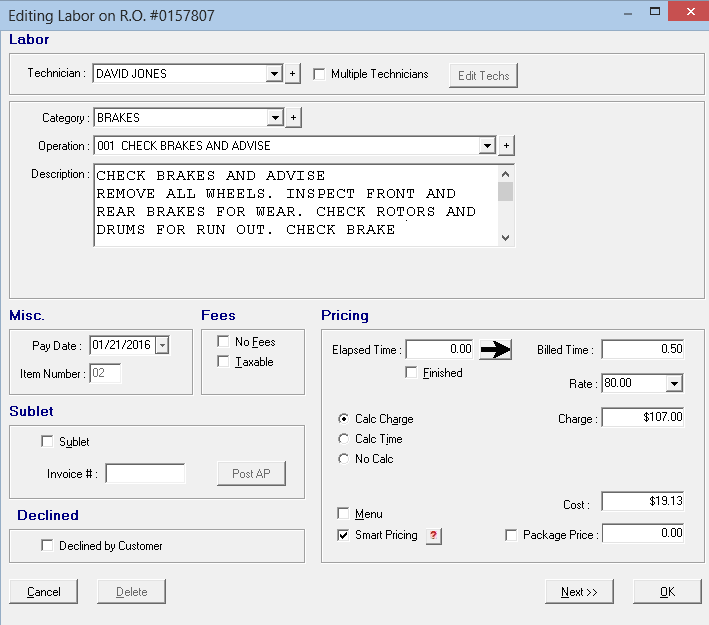
Editing Labor Window
The Editing Labor window opens whenever you open labor posted to the ticket by double-clicking the labor line in the Jobs section of the Parts/Labor tab.
Entering Information on the Editing Labor Window
On the keyboard, press the TAB key to move between fields. You can also click in any field, option, or box.
When entering prices or labor times, the numbers are entered starting with the right end of the field. For example, entering "1" results in ".01" in the field.
You can type in all numbers or use the decimal point (.) to enter the number you want.
- To enter one dollar ($1), you can type "100" or "1." in the field.
- To enter one (1) hour, you can type "100" or "1." in the field.
Labor Section
This section describes the Editing Labor window.
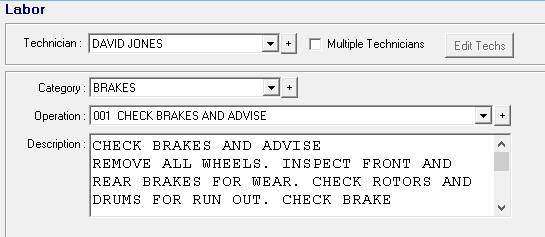
Technician
Select the technician doing the job from the dropdown list. If the technician is not in the list, click the plus button  to add the technician in Configuration.
You can assign multiple technicians to one labor operation.
NOTE: You do not have to select a technician, but it is recommended if you want to track accountability.
Category
Select the labor category from the dropdown list. If the category is not in the list, click the plus button to add the category in Configuration.
Operation
Select the labor operation in the dropdown list, which includes only the operations in the selected labor category. If the labor is not in the list, click the plus button to add the operation in Configuration.
NOTE: You do not have to add labor categories and operations, but it is recommended for reporting. Sales reports are more meaningful and easier to understand when the specific labor is added.
Description
This is the description of the labor. The content comes from
- The content configured for the labor operation, Smart Job, or Smart eJob.
- The labor added from Smart eCat.
- This information is often from Epicor.
- The labor option selected on the Posted Parts and Labor tab in Smart eCat determines what content is added to the posted labor description.
You can also edit the text at any time.
- The first five lines of the description are visible. Scroll down to see the full description.
- The first line is the name of the labor that displays in the Operation dropdown list.
- The full content of the description prints on tickets and customer invoices.
When labor configured to print oil stickers is added to a ticket, an Oil Sticker Printed indicator appears just below the Description field.
Spell Check
Misc. Section
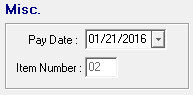
Pay Date
When labor is added to a ticket, the current date is entered as the Pay Date. When the Finished box is checked, the Pay Date does not change. If you need to change the date, type in the correct date.
The assigned technician receives credit for performing the work on the Labor Summary and Labor Detail by Pay Date reports.
NOTE: Finished must be checked for the Pay Date to appear on reports.
Item Number
This is the number that R.O. Writer assigns to a labor item when it is added to the ticket. The item number increases by one each time a labor is added.
The Item Number determines the order of labor items
- In the Jobs section of the Parts/Labor tab
- On the printed customer invoice
NOTE: You can change the order by typing a new number in the Item Number field. Be careful not to duplicate item numbers.
Fees Section
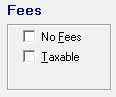
No Fees
Select No Fees to not calculate supply charges of this labor. Supply charges appear on the Calculations tab. For more information about how supply charges are calculated, click Taxes and Fees.
Taxable
Check Taxable to make the labor taxable. Taxable labor appears on sales reports under Taxable Labor. R.O. Writer calculates the sales tax based on the percentage entered for labor in Configuration.
Sublet Section
Check Sublet if the labor is a sublet job (labor performed by a third-party). For example, towing services are often considered sublet labor.
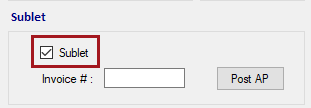
The amount in the Cost field is the amount posted to the invoice.
Sublet labor appears as sublet charges on the following reports:
Post AP for Sublet Labor
Click the Post AP button to enter a summary accounts payable invoice for sublet labor.
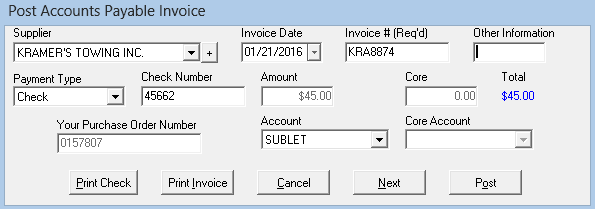
- The cost of the sublet labor is entered automatically.
- The ticket number is entered as Your Purchase Order Number.
- Select the supplier, date, invoice, payment type, account, etc.
- Click the Post button.
After an invoice has been posted, the invoice number appears in the Invoice # field. You cannot change the Invoice # unless Edit Inv# on Add Labor is selected in Configuration.
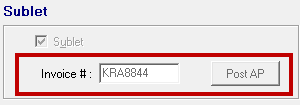
After posting to AP, you cannot delete the labor or edit any fields that tie the job to the Accounts Payable invoice. If you need to delete or edit the sublet labor, you must delete the invoice in Accounts Payable under Edit Invoice.
Declined Section
Check Declined by Customer if the labor was recommended to the customer but the customer declined the service. The full description appears on the repair order, but no charges are included in the Calculations tab or displayed on the final invoice.
Declined labor and parts are automatically entered into the list of Service Recommendations that open the next time you start a ticket for the customer.
To undecline a labor operation, uncheck Declined By Customer. You are prompted to decline any parts associated with it.
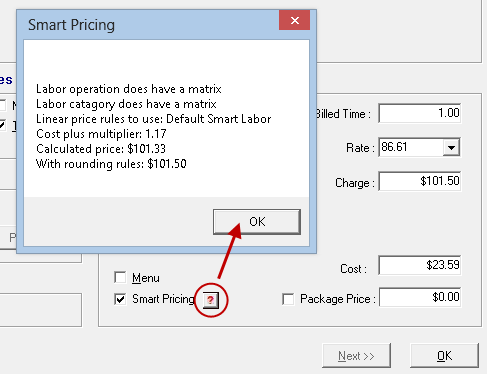
Pricing Section
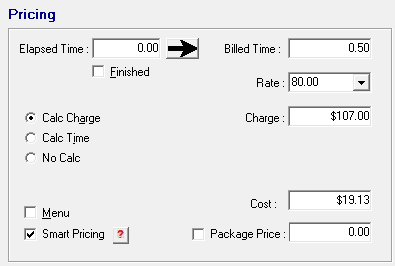
Elapsed Time
Elapsed time is the time worked by the assigned technician. The time is recorded by the labor time clock. After the labor time clock is stopped, the Elapsed Time field displays the amount of time that passed while it was running.
You can also type the time in this field.
To bill the customer for Elapsed Time, click the right arrow button  to move the Elapsed Time to the Billed Time field before finishing the job.
Elapsed Time is used in the following sales reports:
Billed Time
Billed Time is the time that can be billed for the labor. This time is credited to the technician.
- If Calc Time is selected, Billed Time is calculated as the Charge divided by the Rate.
- If Calc Charge is selected, the Charge is calculated as the Billed Time X Rate.
To change the Billed Time,
- Click the right arrow button to replace the Billed Time with the Elapsed Time.
- Type in a new value.
If Calc Charge is selected, the Charge is updated.
Billed Time appears on the following reports:
Finished
Check Finished to finish the job.
- The Labor Time Clock is stopped. If the Labor Time Clock is running, you cannot finalize the repair order until you check Finished.
- The Elapsed Time displays the time recorded since the labor time clock was started.
- The date in the Pay Date field does not change.
- If the finished date is different from the pay date, you can type in the correct date in the Pay Date field.
- Finished must be checked for the Pay Date to appear on reports.
- The number of hours for the job is subtracted from the Hours column and the title bar on the
NOTE: If multiple technicians are assigned to the same job, you must check Finished on each sub-labor job to finish the whole job. Checking Finished on the top labor line does not check Finished on all sub-labor lines automatically.
Rate
This is the hourly rate used to calculate the cost of the job to the customer. The labor rate is usually selected automatically when the labor is added to the ticket based on
- The labor rate in the labor operation in Configuration. This the labor rate of the Smart eJob in Configuration.
- The labor rate on the Labor tab in Smart eCat when the job was posted to the ticket.
You can change the labor rate manually by selecting one of the four predefined Labor Rates.
- If the labor is locked, you need to click the Override button to change the Rate.
- If the Time, Rate, and Charge of the labor is locked, you cannot change the Rate - even if you click the Override button.
Charge
This is how much the customer is charged for the service.The charge can be marked up automatically based on different types of labor using Smart Labor Pricing.
If the Calc Charge option is selected, the Charge is calculated as the Billed Time multiplied by (X) the Rate. If the Billed Time or Rate is changed, the Charge is recalculated.
If the Calc Time or No Calc option is selected, the Charge is not calculated and remains the same until you type in a new value.
If the labor is locked, you need to click the Override button to change the Charge.
If the Time, Rate, and Charge of the labor is locked, you cannot change the Charge- even if you click the Override button.
Calc Charge
When Calc Charge is selected, Charge = Billed Time X the Rate. (If the Billed Time or Rate is changed, the Charge is recalculated.)
Calc Charge is selected when the labor operation is first added if the Calculate Charge option is selected in Configuration.
R.O. Writer checks the calculation of the Charge when labor is added to a ticket:
- If the calculation is correct, the Calc Charge option is selected.
- If the calculation is incorrect, No Calc is selected.
If Calc Charge is not selected and you select it, the Charge is recalculated as the Billed Time multiplied by (X) the Rate.
Calc Time
When Calc Time is selected, Billed Time = Charge divided by the Rate. (If the Charge or the Rate is changed, the Billed Time is recalculated.)
Calc Time is selected when the labor is first added if the Calculate Time option is selected in Configuration.
R.O. Writer checks the calculation of the Billed Time when labor is added to a ticket:
- If the calculation is correct, the Calc Time option is selected.
- If the calculation is incorrect, No Calc is selected.
If Calc Time is not selected and you select it, the Billed Time is recalculated as the Charge divided by the Rate.
No Calc
Because either Calculate Charge or Calculate Time must be selected in Configuration, R.O. Writer always checks the Charge or the Billed Time when you add labor to a ticket. If the calculation is incorrect, R.O. Writer selects No Calc.
- If No Calc is selected, the Charge and Billed Time are not calculated.
- If No Calc is not selected and you select it, the Charge and Billed Time are not recalculated when changes are made.
TIP: No Calc can be useful when splitting labor among Multiple Technicians.
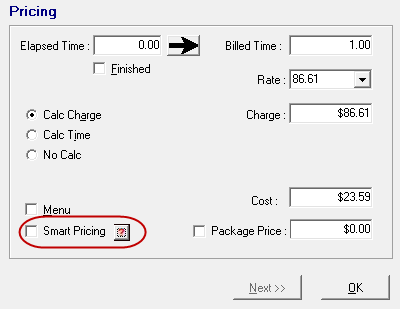
Cost
The cost is calculated according to the R.O. Options - Labor settings in Configuration:
If Based on Billed Time is selected, the cost is the Billed Time multiplied by (X) the hourly rate of the selected technician.
If Based on Elapsed Time is selected,
- While the labor time clock is running, the cost is the Billed Time multiplied by (X) the hourly rate of the selected technician.
- After Finished is checked, the cost is the Elapsed Time multiplied by the hourly rate of the selected technician.
If multiple technicians are assigned to the same job, the hourly rate of the technician is calculated as follows:
- The hourly rate of each technician is multiplied by (X) the percentage of the time assigned to the job.
- The total for each technician is added together to produce one hourly rate to calculate the cost.
You can override the calculation by typing a new value in the Cost field. In addition, if Calc Time is selected, the cost may be recalculated if the Time is changed.
The cost is used to calculate the gross profit margin for the labor. The calculation for gross labor margin is the sales margin (the labor charge minus (-) the cost) divided by (/) the labor charge.
Package Price
Package price is another method of having a fixed price for all parts and labor associated with a particular job. It ensures that sales tax is properly calculated for the parts sold on a job.
To use package pricing, select Package Price, and enter the price of the package, which includes the price of all parts included in the package.

The price charged for the labor is based on the package price minus (-) the total cost of all parts. The Billed Time is not affected by this calculation.
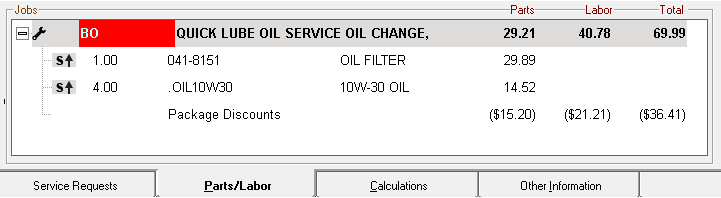
If the total labor and parts add up to more than the package price, the labor is discounted first. Parts are discounted only if the total of the parts is more than the package price.
Minimum Package Price
If the job has a minimum price, there is a Min Pkg Price field instead of a Package Price field.
See Minimum Price for Smart Jobs
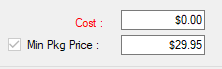
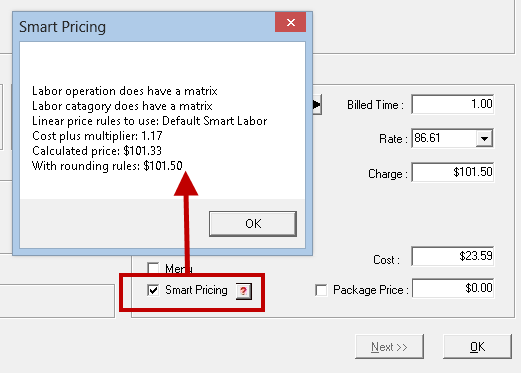
Smart Pricing
If Smart Labor Pricing is turned off in Configuration, the Smart Pricing box is grayed-out.
If Smart Labor Pricing is turned on and the Smart Pricing box is checked, the Charge is calculated based on the smart labor matrix.
If no Category or Operation is selected or if the selected Category or Operation does not have its own matrix and the Smart Pricing box is checked, the Charge is calculated using the default smart labor matrix.
If the Category and/or Operation has its own smart labor matrix, the Charge is calculated using that matrix. The Smart Pricing box is checked. You can click the  button to see how the price was calculated.
If you choose not to use smart pricing, uncheck the Smart Pricing box and the Charge is recalculated without smart pricing.
To recalculate using the smart labor pricing, select the Smart Pricing box and click the button.
Menu
Check Menu to make this a menu job. This labor will appear in Menu sales on the Itemized Sales Report.
PST Tax and GST Tax
These settings appear only if the GST/PST Taxes option is selected in the International Options Configuration setting. GST and PST are Canadian taxes.
For more information, click the following link: GST/PST on the Editing Labour Window.
Override Button
Labor operations can be price-locked in Configuration. If the labor is locked or locked with minimum price,
- Most items are locked and cannot be edited.
- An Override button appears at the bottom. Click the Override button to override the price lock.
- Override functionality is often password-protected, so you may be prompted to enter a password.
NOTE: Pricing changes made due to an override are tracked on the Pricing Exception Report.
Labor Guide
The Labor Guide button appears at the bottom of the Edit Labor window if the labor is configured with catalog labor from Epicor. Click the Labor Guide button to add Epicor specifications - including the recommended labor time - to the labor.
For full details, click the following link: Using the Labor Guide on a Job Posted to a Ticket.
Saving Changes to the Labor Operation Permanently
By default, R.O. Writer saves any changes you make on the Edit Labor window to the labor operation on the ticket when you click OK. Those changes do not affect the labor operation on other tickets or the labor operation in Configuration.
If Allow On-the-Fly Changes to Parts and Labor Files is selected in Configuration, you are prompted to save the change to the labor operation when you click OK after making a change.
- Click Yes to save the change to the labor operation in Configuration.
- Click No to save the change to the current labor operation only.