Adding Labor Operations to Tickets
You can add labor operations directly to an open ticket.
Adding Labor Operations to an Open Ticket
Complete these steps:
- Click the Labor toolbar button
 . The Editing Labor window opens.
 -
Select the Category and Operation in the dropdown lists.
- These dropdown lists include the labor categories and labor operations created in Configuration.
- Click the plus button
 to create new categories and labor operations.
-
The Editing Labor window populates with information from the selected labor.
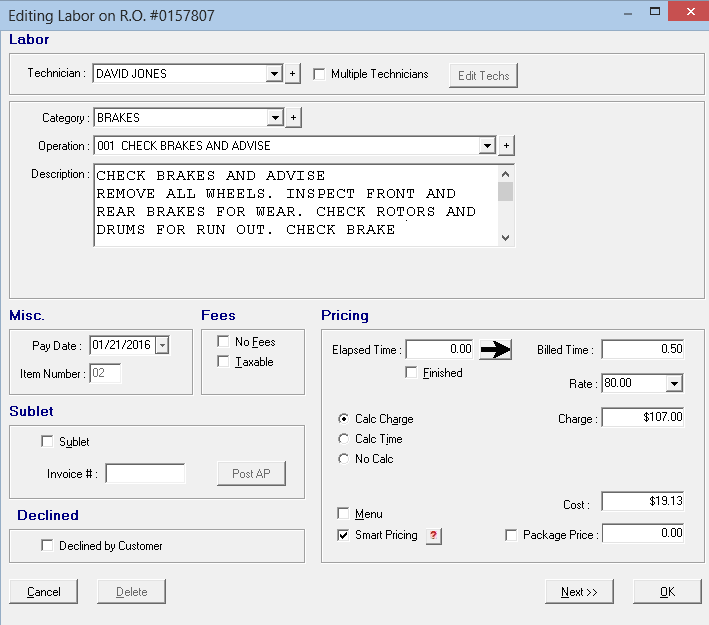
- Modify or enter the labor settings as necessary.
- If the labor operation is locked or locked with price minimum, most items cannot be edited.
- When all items have been edited or entered, you can:
- Click OK.
- The labor is added to the ticket, including any parts kits. The Editing Labor window closes.
- Click Next.
- The labor is added to the ticket, including any parts kits. The Editing Labor window stays open.
- All the fields are cleared so you can add more labor. Repeat Steps 1—4.
- Click OK.
NOTE: The OK and Next buttons remain inactive until you enter an Operation or a Description.
Entering Information on the Editing Labor Window
On the keyboard, press the TAB key to move between fields. You can also click in any field, option, or box.
When entering prices or labor times, the numbers are entered starting with the right end of the field. For example, entering "1" results in ".01" in the field.
You can type in all numbers or use the decimal point (.) to enter the number you want.
- To enter one dollar ($1), you can type "100" or "1." in the field.
- To enter one (1) hour, you can type "100" or "1." in the field.
Saving Changes to the Labor Operation in Configuration
By default, R.O. Writer saves any changes you make on the Edit Labor window to the labor operation on the ticket when you click OK. Those changes do not affect the labor operation on other tickets or the labor operation in Configuration.
If Allow On-the-Fly Changes to Parts and Labor Files is selected in Configuration, you are prompted to save the change to the labor operation when you click OK after making a change.
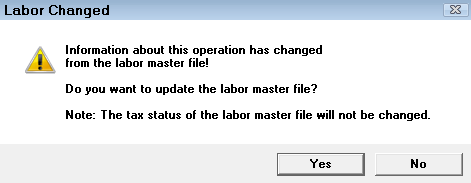
- Click Yes to save the change to the labor operation in Configuration.
- Click No to save the change to the current labor operation only.