Smart eJobs
In order to use Smart eJobs in Smart eCat, Smart eJobs must be enabled in the Configuration module (Configuration menu > Repair Order > Catalog Options > Use Smart eJob option).
When enabled, you can access Smart eJobs
-
 and clicking on the Smart eJob tab .
 - From an open estimate or repair order by clicking Smart eJobs in the toolbar
 .
.
The Smart eJob tab appears.
Watch the video below to see an overview of this functionality.
Configuring Smart Jobs
Watch the video below to see an overview of this functionality.
Building Repair Orders with Smart eCat and Smart Jobs
Watch the video below to see an overview of this functionality.
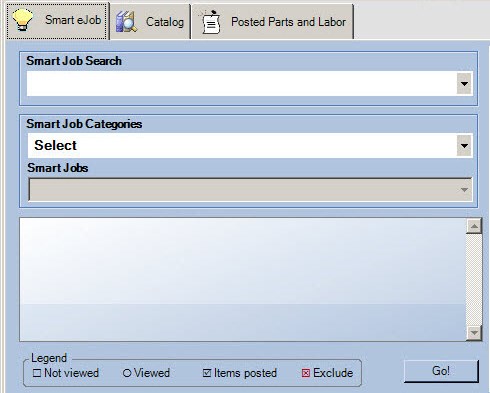
Selecting a Smart Job
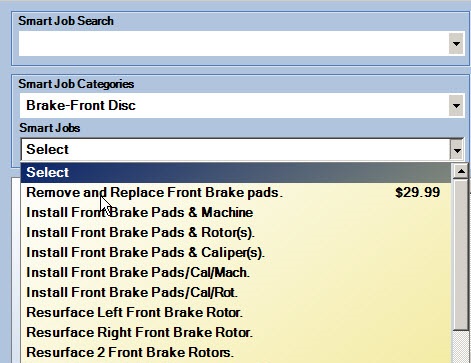
Use the dropdown lists. You can search all smart jobs at once or narrow them by category and select from within a category.
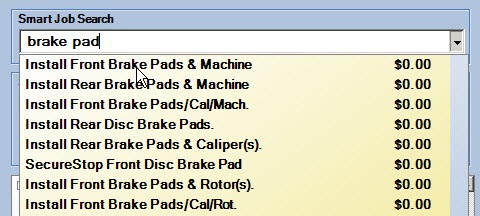
Smart Job Search - Enter the keywords to search all smart jobs.
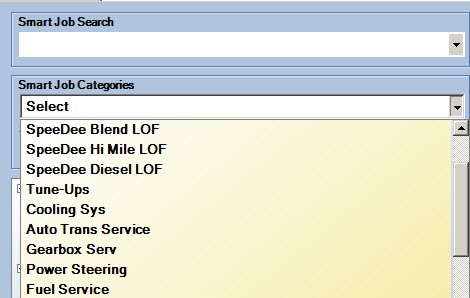
Smart Job Categories - Select the smart job category. This populates the Smart Jobs dropdown list directly under it.
Smart Jobs - Review the smart jobs in the selected category and select the one you want by clicking on it. When the Package Price checkbox is unchecked in the Package Price of Smart Job Configuration, it displays in the Smart Jobs dropdown list without a price.
When you select the smart job, all the components included in the smart job appear below the dropdown lists. These can include: Catalog Parts, Catalog Labor, Other Parts, and Other Labor.
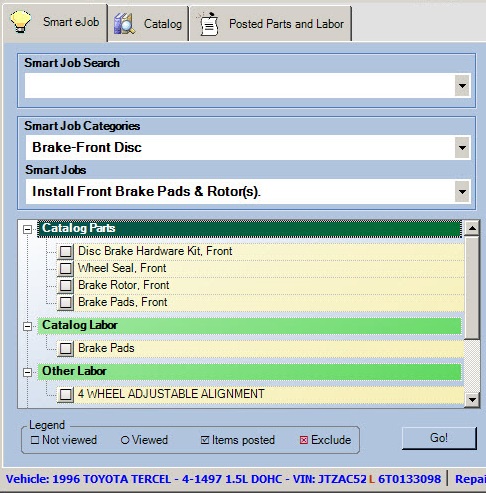
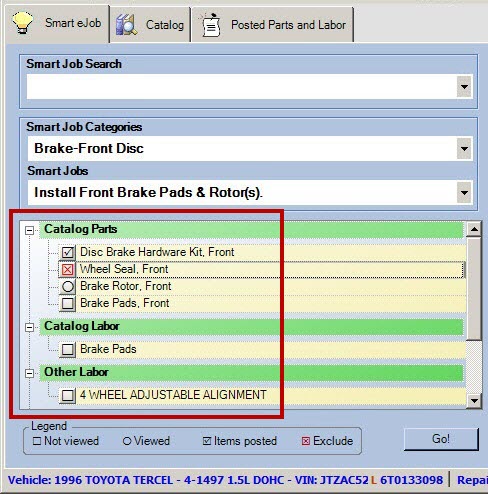
The legend at the bottom explains what the symbols to the left of each item mean. The symbol determines what happens when you click Go!.

| This | Means You… | When you click Go!, Smart eCat… |
|---|---|---|
|
|
Have not searched for this item. This is the default for all items. |
Searches your local inventory and integrated catalogs for the item. |
|
|
Have searched for this item but have not selected it yet. You can click the circle to change it back to a square. |
Searches your local inventory and integrated catalogs for the item. When the item appears in the search results, it is already selected. |
|
|
Have already posted this item to the Posted Parts and Labor tab. |
Searches your local inventory and integrated catalogs for the item. When the item appears in the search results, it is already selected. |
|
|
Have excluded this item. |
Excludes this item from the search. |
Click the Go! button to search for the parts and labor with a ![]() or
or ![]() . The Catalog window opens and the system dials out to the catalogs you have integrated with Smart eCat.
. The Catalog window opens and the system dials out to the catalogs you have integrated with Smart eCat.

As you view each item, you can go back to previously viewed items or skip ahead to items not yet viewed by using the ![]() and
and ![]() buttons.
buttons.
By clicking on the downward-facing arrow on the button, you can select the items to go back to or skip ahead to.

After selecting items you want to post, you can click the ![]() button or the
button or the ![]() button to post selected items and continue to the next item.
button to post selected items and continue to the next item.
You can also click the Catalog tab or enter a keyword to search for additional parts and return to the smart job screen at any time.
Clearing Previously Selected Smart Jobs
If there smart jobs are already posted when you select a smart job, the system prompts you to clear the shopping cart and start a new job.
- Click Yes if you want to clear the shopping cart and start over.
- Click No if you want to keep items you've already posted. To avoid this, you can post the current smart job using the Post button to transfer items to the estimate or repair order and clear the posted parts and labor tab.
You need to clear the Posted Parts and Labor tab to begin a new smart job because all parts and labor post to the estimate or repair order as one job.
If you need to add parts and labor to the existing job, you don't need to select another smart job. Instead, you can click the Catalog tab and the Categories button to add individual parts or labor to the existing smart job. When posted, these additional parts and labor are included in the existing smart job.
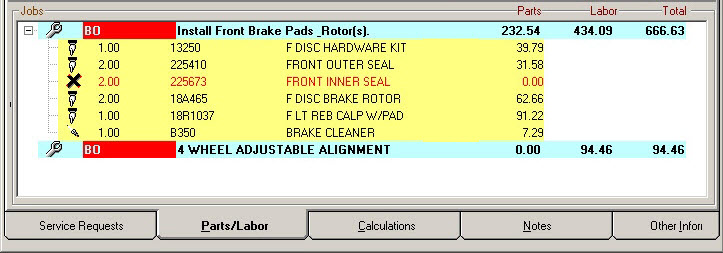
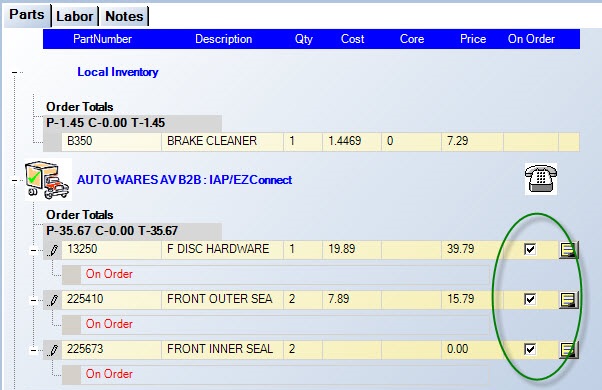
Posted Parts and Labor Tab
This tab displays the parts and labor that have been posted. After a part has posted, you can order them online. When you exit Smart eCat, the smart job with parts and labor are posted to the repair order.
There are three tabs:
- Parts - Where you order parts.
- Labor - Where you review and edit posted labor.
- Notes - Where you add notes to the smart job for this repair order.
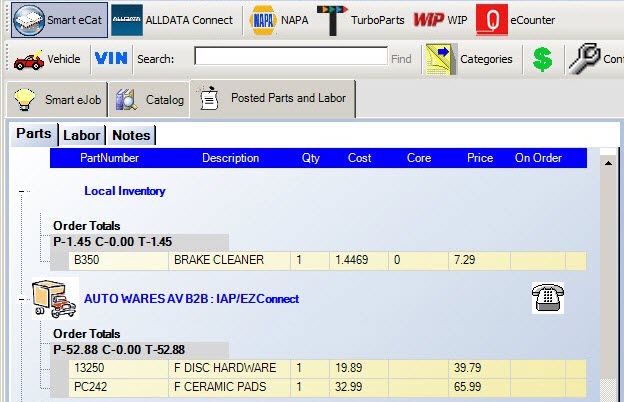
Parts
Items that are available to order online display a Truck button. Click the Truck button to order parts online. When parts have been ordered the On Order box is checked.
Deleting Parts
Select the part line by clicking on the gray area at the beginning of the part and press the Delete key. A prompt appears notifying you how many lines have been selected for deletion. Click Yes.
To select multiple parts,
- Press and hold the SHIFT key while selecting multiple parts that are right next to each other in the list.
- Press and hold the CTRL key while selecting multiple parts that are apart from each other in the list.
Posting Accounts Payable Invoices
Clicking the Truck button also posts an accounts payable invoice if the following has been selected in Configuration:
- The Create A.P. Transaction When Posting P.O. option is set to Always in ConfigurationPO Transfer and Other Parts Options.
- The supplier you are ordering from has the Post to Accounts Payable Option selected as part of its electronic ordering setup.
The Post Accounts Payable Invoice window opens after you click the Truck button:
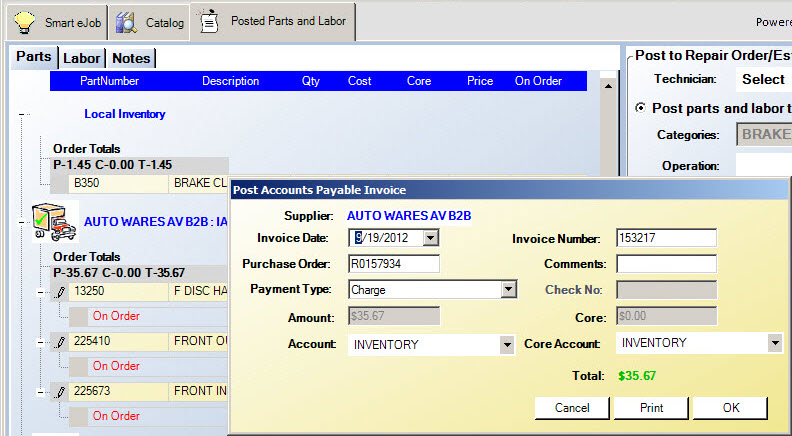
If Prompt is selected as the Create A.P. Transaction When Posting P.O. option, a prompt appears asking you if you want to post these parts to Accounts Payable.
If you are not using the R.O. Writer Accounts Payable module and the supplier you are ordering from has the Post to Accounts Payable Option selected as part of its electronic ordering setup:
- No invoice is posted.
- A confirmation number is posted to the ticket in the Invoice field of the Edit Parts window.
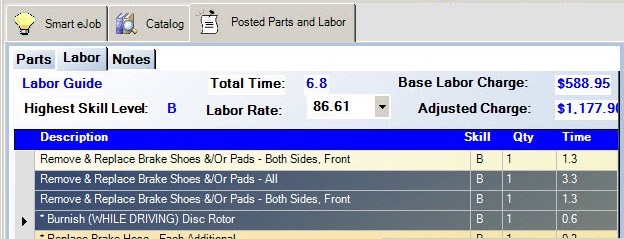
Labor
All labor jobs post as one job selected om the right side of the window. Since smart jobs are configured as one job, you do not have the other two posting options.
Other Labor is additional R.O. Writer labor operations added to the smart job. It is posted to the repair order as a separate labor job. If the smart job has a package price, other labor jobs are not included in that price.
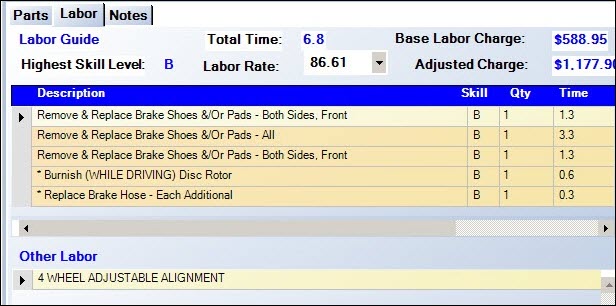
Labor Rates
When posting labor, the highest skill level is used to determine the labor rate; however, you can change it by selecting another one in the Labor Rates dropdown list.
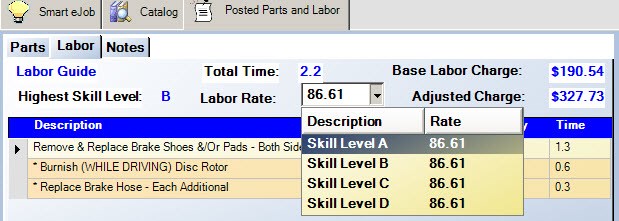
The Total Time of all posted labor jobs, the Base Labor Charge, and the Adjusted Charge is also shown. These labor rates are set up in the Configuration module (see Labor Rates).
You can select a technician for the job in the Technician dropdown list at the top of the right side of the window.
Labor Options When Posting
These apply only to the Smart Job and not to the Other Labor that might be included in the Smart Job.

NOTE: You make one of these options the default in Smart eJobs Default Labor Options.
Deleting Labor
Select the labor line by clicking the gray area at the beginning of the labor and press the Delete key. A prompt appears notifying you how many lines have been selected for deletion. Click Yes.
To delete multiple labor lines,
- Press and hold the SHIFT key while selecting multiple labor lines that are right next to each other in the list.
- Press and hold the CTRL key while selecting multiple labor lines that are apart from each other in the list.
Posting the Smart Job to the Repair Order
The Post to Repair Order/Estimate section appears on the right side of the window.
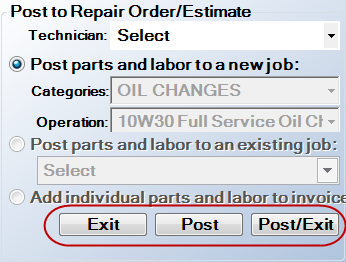
- Click Post to post the smart job to the repair order without exiting Smart eCat.
- Click Post/Exit to post the smart job and exit Smart eCat. The posted parts and labor appears on the Parts/Labor tab in the Jobs section.