There are a number of steps to Smart eCat configuration.
In R.O. Writer Configuration:
- Step 1 - Put the Smart eCat Button in the Quick Launch
- Step 2 - Configure Smart eJobs
- Step 3 - Configure an Electronic Ordering Interface for Each Supplier
In Smart eCat Configuration:
- Step 4 - Create and Select Coverages for Suppliers
- Step 5 - Add Your Local Inventory Coverage to the Smart Buy List
Step 1 - Put the Smart eCat Button in the Quick Launch
You need to
- Activate Smart eCat and Smart eJob so these tools are available in the main R.O. Writer
- Smart eCat appears in the Catalogs section in the Quick Launch
 .
. - Smart eJobs appears as an button in the estimate and repair order toolbar
 .
.
- Smart eCat appears in the Catalogs section in the Quick Launch
- Configure how labor and smart jobs operate in Smart eCat.
Put Smart eCat on the Quick Launch
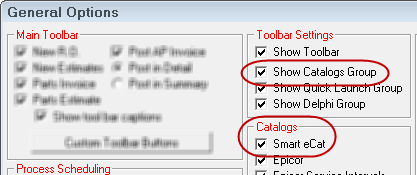
This makes the Smart eCat button appear in the Quick Launch in R.O. Writer.
Put Smart eJob on the Estimate and Repair Order Toolbar
In the Configuration module, click Configuration menu > Repair Order > Catalog Options > Epicor Options section > Use Smart eJob checkbox.
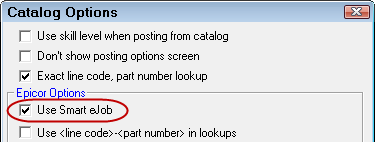
This makes the Smart eJobs button appear on the estimates and repair order toolbar ![]() . When clicked, estimates and repair orders open Smart eCat with the vehicle from the open ticket already entered and the Smart Jobs tab showing.
. When clicked, estimates and repair orders open Smart eCat with the vehicle from the open ticket already entered and the Smart Jobs tab showing.
Step 2 - Configure Smart eJobs
R.O. Writer contains the basic Smart Job for the services many shops provide. You can modify them with your information - including prices and rates - in Configuration; see Smart Jobs.
These are the jobs that appear in the dropdown lists on the Smart Jobs tab.
Step 3 - Configure an Electronic Ordering Interface for Each Supplier
In the Configuration module, you need to
- Enter the Suppliers.
- Enter the credentials required to access the supplier’s online catalog (see Configuring Electronic Ordering Interfaces for Suppliers).
This includes Configuring the Coverage File Download for Suppliers.
R.O. Writer has built custom electronic interfaces for the following suppliers in Smart eCat:
Watch the video below to see an overview of this functionality.
Step 4 - Create and Select Coverages for Suppliers
To search online supplier databases, you need to create a coverage for the supplier and select that coverage in the Smart Buy list.
Complete these steps:
- In the R.O. Writer module, click the Smart eCat button in the Quick Launch
 .
. - Click the Configure button
 .
. - The Catalog tab opens displaying the Smart eCat configuration tab windows. The Smart Buy Tab appears first.
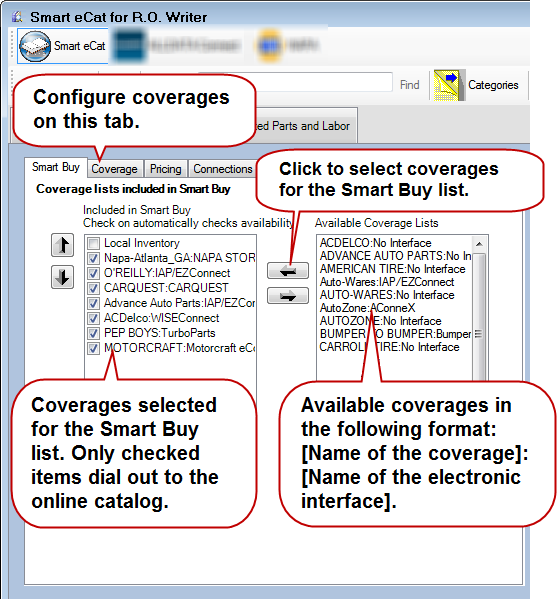
- Click the Coverages Tab to configure a coverage for each supplier.
Those coverages appear on the Smart Buy tab, in the Available Coverages List. - On the Smart Buy Tab, select the coverage and click the left arrow
 to select it for the Smart Buy list.
Make sure the box is checked so that Smart eCat dials out to the online catalog. - Close Smart eCat.
Step 5 - Add Your Local Inventory Coverage to the Smart Buy List
If you are using local inventory, you want to make sure that you configure Smart eCat to search for parts in your local inventory first. After all, it's a waste of money to order parts that you already have in stock.
After you have configured your suppliers and parts in local inventory you need to
- Create at least one coverage named "Local Inventory"
- Put that coverage at the top of the Smart Buy list

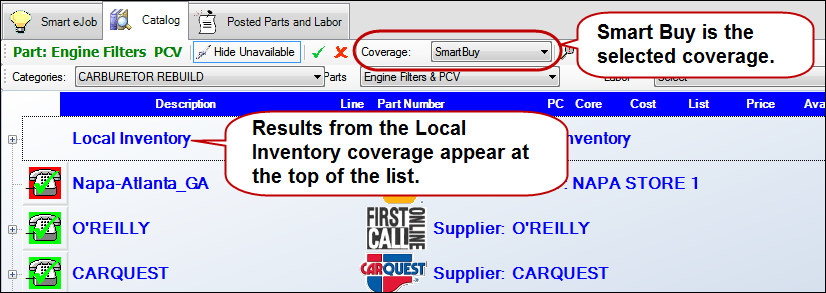
When Smart eCat is configured this way, searches return as follows:
Create a Coverage for Local Inventory
Your local inventory coverage:
- Is a consolidated coverage list for the part lines and manufacturers you are stocking.
- Should include lines of parts that you keep on the shelf so that Smart eCat can find the associated parts (Step 9 below).
- Should be listed first in the Smart Buy list and not checked.
Complete these steps:
- Click the Add/Edit Coverages button. The Select Supplier window opens.
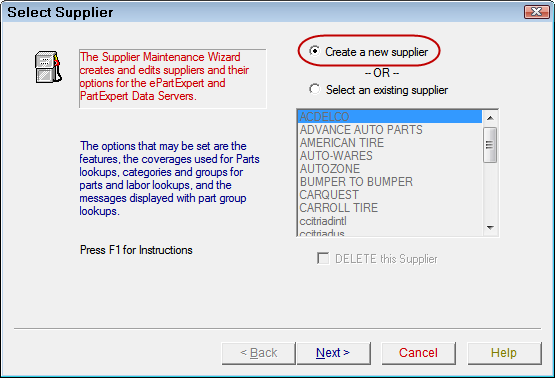
This is the beginning of the coverages wizard.
- Click Back and Next to move through the wizard.
- Click the Help button for assistance with each window.
-
Select Create a New Supplier to create a new coverage. You need to do this for your local inventory because it does not show up as a supplier.
- Select Create a New Supplier and click Next . The Select Features window opens.

- Type "Local Inventory" in the Supplier Name field and select the Features that apply to your local inventory; click Help for details.
- Click Next . The Select Coverages window opens.
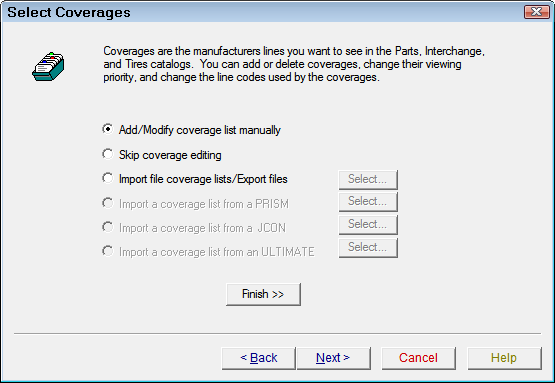
- Select Add/ Modify Coverage List Manually to select part lines that you stock on your shelf and click Next.
- The Setup Coverages window opens displaying your inventory in the Manufacturers box.
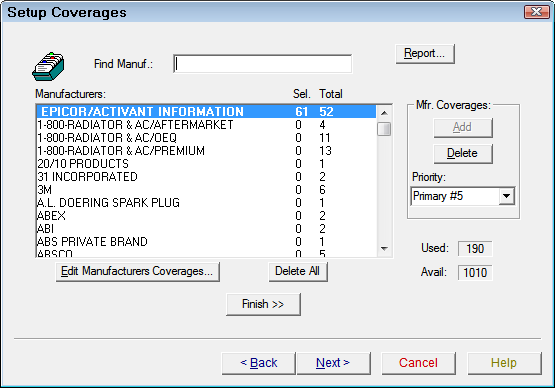
- Select EPICOR/ACTIVANT INFORMATION for the Local Inventory coverage so that information isn't repeated for each coverage.
- To add items to the coverage, you can
- Add all items from a manufacturer by selecting the manufacturer and clicking the Add button.
- Add each item manually by either double-clicking on the manufacturer or selecting the it then clicking the Edit Manufacturers Coverages button.
This is where you turn on the lines that you carry so that Smart eCat finds the parts when searching. Click the Help button for more information.
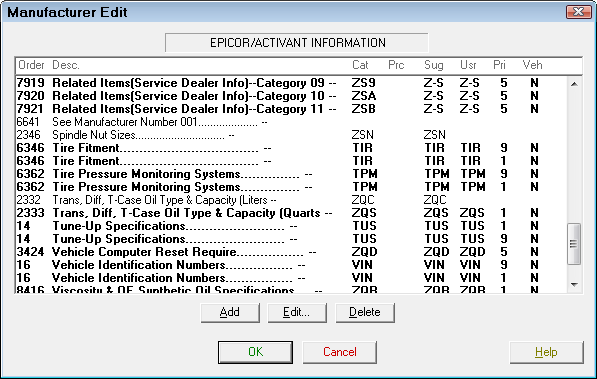
- Select all the items you want and click the Add button. Click the OK button when you are finished adding items to the coverage.
- Click Next. The Category/Group Select window opens.
On this window, you can add or modify categories, groups and group messages as appropriate to your business.
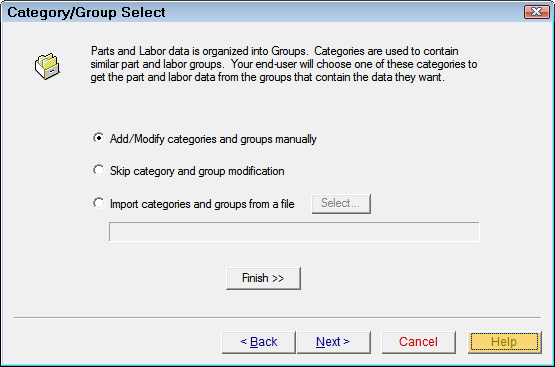
- Click Finish. The Finish Supplier window opens.
- Review the tasks in the top section of the screen.
If something doesn't look right, click the Back button to move back through the wizard screens and change your selections.
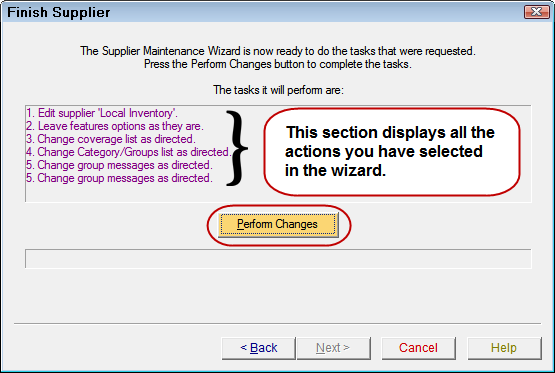
- When you're ready, click the Perform Changes button. The tasks are processed. When complete the bottom section says, "Supplier was successfully created".
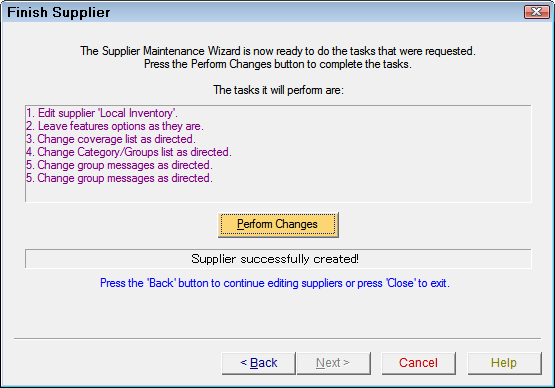
- Click the Close button to exit.
- Your Local Inventory coverage now appears in the Available Coverages List on the Smart Buy tab.
Add the Local Inventory Coverage to Smart Buy
Complete these steps:
- On the Smart Buy tab, use the arrow buttons to move the Local Inventory coverage to the top of the Included box.
- Leave it unchecked so that Smart eCat checks your local inventory and does not search online. (Remember, this is your local inventory, so Smart eCat should not dial out to search it.)
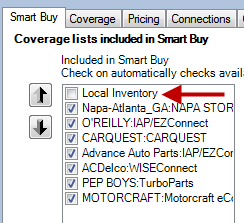
When Smart eCat is configured this way, searches return as follows:

- Smart eCat searches according to what is selected in the Coverage dropdown list. SmartBuy is a list you configure of the part lines from all the suppliers and manufacturers you want Smart eCat to search by default, including your own inventory.
- The Coverage dropdown list includes all coverages, whether they are configured or not. To avoid confusion, keep the SmartBuy list selected and configure it as appropriate for your business.
Expand the Local Inventory coverage to see which parts you have in stock.

NOTE: Keep in mind that - even after configuring Smart eCat to search your local inventory - it does not search your entire local inventory. Instead, it searches only the part lines you set up in the Local Inventory coverage.
Smart eCat Configuration Tab Windows
There are Smart eCat configuration settings on each of the following tabs:
- Smart Buy Tab
- Coverages Tab
- Pricing Tab
- Connections Tab
- Options Tab
- Labor Mapping Tab
- Purchase History Tab
Smart Buy Tab
Smart Buy is a list of coverages you create that includes part lines from the suppliers and manufacturers you interface with.
The Smart Buy list allows Smart eCat to search multiple suppliers at once - including your local inventory. Otherwise, you would have to search your local inventory and each supplier separately, which is time-consuming and inefficient. In addition, seeing all parts from your local inventory and your online suppliers on one screen helps you find the best deal.

- Coverages from your online suppliers need to be in the Smart Buy list and checked to search the supplier's online catalog during Smart eCat searches.
- "No Interface" means no online connection has been configured between R.O. Writer and this supplier. Do not select these for Smart Buy.
- One coverage for your local inventory needs to be at the top of the list and unchecked so that
- Your local inventory is searched during Smart eCat searches; R.O. Writer shouldn't dial out for local inventory searches.
- The results from your local inventory appear at top of the search results, above the online suppliers.
Parts of the Smart Buy Tab
- The Available Coverage section displays all the coverages you have configured.
- The Includes in Smart buy section displays the coverages that Smart eCat uses when searching.
- Use the left
 and right
  arrows to move coverages between the Available and Includes boxes.
 - Use the up
 and down
  arrows to the left of the box to determine priority.
Coverages Tab
A coverage is a grouping of part lines from the suppliers and the and manufacturers they work with. You need to configure your suppliers for electronic ordering and then create a coverage file for each supplier in Smart eCat.
Coverage files - created or downloaded - are stored in the C:\NetCatSupplier folder on the hard drive. If you have multiple workstations in your shop, each workstation must have the same supplier coverages loaded on its hard drive in the C:\NetCatSupplier folder.
On the Coverage tab, you
- Assign coverage lists to the suppliers that are configured for electronic ordering
- Import coverages
- Add new coverages
- Edit existing coverages
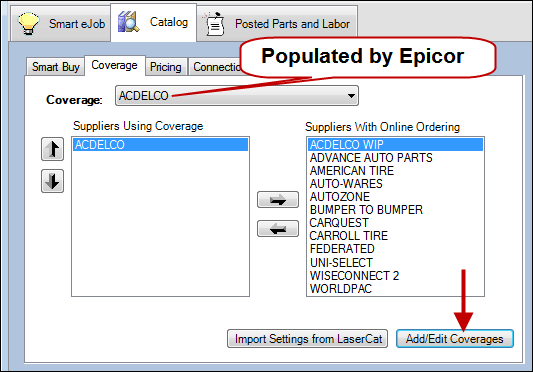
- Suppliers With Online Ordering — This section contains all suppliers that have electronic interface configured.
- Add/Edit Coverages button — Click to open the Supplier Maintenance Wizard where you create, edit, and delete coverages for Smart eCat.
NOTE: When adding and editing coverages, please refer to the Help button on each window in the wizard. It opens information from Epicor that describes each screen in detail.
To Import a Coverage from a Supplier
In this scenario, either the supplier has sent you or you have obtained the supplier's MCL file and stored on a hard drive the current computer has access to.
Complete these steps:
- On the Coverages tab, click the Add/Edit Coverages button to open the Supplier Maintenance Wizard.
- On the Select Coverages screen, select the Import a Coverage List/Export Files option.
- Click the Select button.

- On the Import/Export Coverages popup window, navigate to the MCL file and select it.

- Click OK to import the file.
To Create a Coverage for a Supplier
You need to configure coverages for the suppliers when you do not have their MCL file.
Complete these steps:
- On the Coverages tab, click the Add/Edit Coverages button to open the Supplier Maintenance Wizard.
- On the Select Coverages screen, select the Add/ Modify Coverage List Manually option and click Next.
- On the Select Supplier, select the Existing Supplier option and the supplier in the list.

- Click Next and the coverage wizard takes you through the steps of creating a coverage.
- You need to choose the features and, most importantly, the part lines for each supplier.
- On the Finish screen, click Perform Changes and the supplier is configured.
To Edit a Supplier Coverage
You can edit only one supplier at a time.
Complete these steps:
- On the Coverages tab, click the Add/Edit Coverages button to open the Supplier Maintenance Wizard.
- On the Select Coverages screen, select the Add/ Modify Coverage List Manually option and click Next.
- On the Select Supplier, select the Existing Supplier option and the supplier in the list.

- The wizard moves you through the windows.
- Make changes where you need to.
- Click Finish on any window or after you complete each window, the final window of the wizard opens listing your edits.
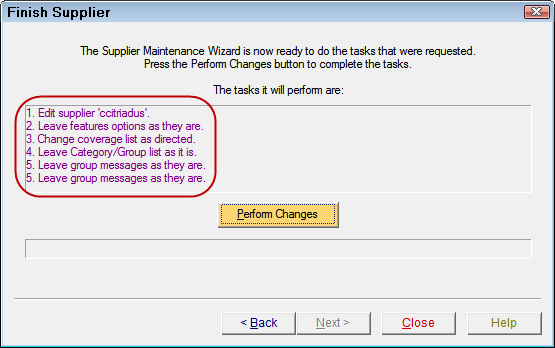
- Click Perform Changes and the supplier is edited.
- When the process in complete, the bottom section says, "Supplier successfully modified!"
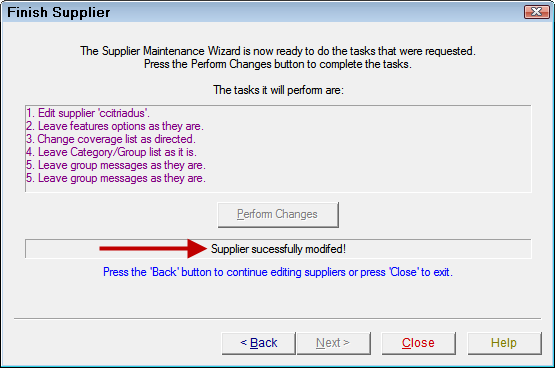
To Delete a Coverage
Complete these steps:
- On the Coverages tab, click the Add/Edit Coverages button to open the Supplier Maintenance Wizard.
- On the Select Coverages screen, select the Add/ Modify Coverage List Manually option and click Next.
- On the Select Supplier, select the Existing Supplier option and the supplier in the list.

- Check DELETE This Supplier.
- Click Next. The Finish Supplier screen opens displaying that the supplier is to be deleted in the top section of the screen.

- Click the Perform Changes button and the system deletes the supplier. The bottom section of the window says, "Supplier successfully deleted!"

To Assign Suppliers to Your Coverage Lists
You need to assign suppliers that are configured for electronic ordering to a coverage list in Smart eCat.
Complete these steps:
- Select the Coverage in the dropdown list.
- In the Suppliers with Online Ordering section, select the supplier.
- Click the left arrow to associate it with the selected Coverage.
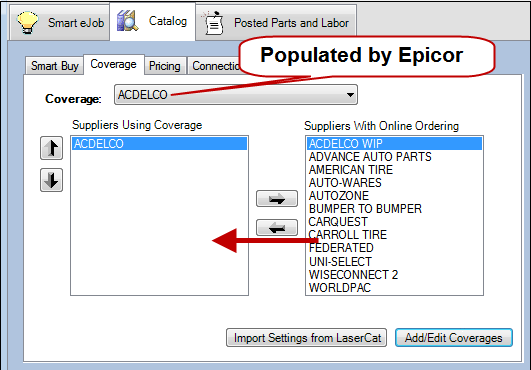
NOTE: Each supplier can be assigned to only one coverage. If you assign a supplier to a second coverage, the supplier is removed from the first coverage.
To Update Coverages in Smart eCat
Coverages need to be updated to stay current with parts and pricing.
- You can set the Coverage File Download Options to update coverages automatically as part of the Configuring Electronic Ordering Interfaces for Suppliers for the supplier.
- You update NAPA's coverages when you load the Epicor disks each month; see To Set up the NAPA Distribution Center Supplier.
- You can also update coverages manually in Smart eCat as needed.
Complete these steps:
- Open Smart eCat.
- Click the Update Coverages button in the main toolbar in Smart eCat. The coverages for your suppliers appear in a list on the Catalog tab.

- Select the supplier you wish to update and click the Download New Coverage File for the Selected Coverage button.
- If the supplier has MCL download support, you receive the prompt that the coverage has been updated. Click OK.
- If the supplier does not have MCL download support, you receive the prompt that the selected coverage cannot be updated. Click OK.
- When the coverage has been successfully updated, the Last Updated column displays the current date and time.
Import Settings From LaserCat
Smart eCat does not use the coverages set up in LaserCat so you are able to import them by clicking the Import Settings from LaserCat button. If you have already set up coverages and assigned suppliers in Smart eCat, this deletes those settings. However, coverage lists that are in Smart eCat but not in Epicor are not overwritten.
Changes made to coverages in Smart eCat cannot be exported back to Epicor. When you’ve imported the LaserCat settings, you need to reassign suppliers to the imported coverages.

Pricing Tab
On the Pricing tab, you
- Mark up the catalog list price for each coverage list.
- Determine how the retail price is calculated for each supplier.

Catalog Pricing
Catalog pricing is applied to the suggested List price in Epicor when there is no electronic connection available or a part comes back from a vendor unavailable.
To mark up list price for a selected coverage list, select the coverage list using the dropdown list, then enter the percentage you wish to increase the list price by.
- Save button — Click to choose this method for the selected coverage.
- Set All Suppliers To This Pricing Method — Saves this percentage for all coverage lists.
Supplier Pricing with Online Ordering
Supplier pricing is applied after a vendor has been queried and returned a cost and suggested List price.
Select the supplier using the dropdown list and select the option that determines the retail price that is posted to the estimate or repair order.
Options include:
- Use List Price plus X% — The retail price posted add the percentage entered to the list price.
- Use the default matrix you set up in the Configuration module for outside purchases (see Set Pricing Method for more information).
Click Save to save the selected pricing option for the supplier selected in the dropdown list.
Click Set All Suppliers To This Pricing Method to save the selected pricing option for all suppliers with online ordering.
Other Price Options
Use List Price if Higher Than Calculated Price — Check to make the list price is higher than the calculated price; the list price is posted to the ticket.
Modify Labor Estimate Time — To increase labor times posted to the ticket, enter the percentage you wish to use. Leaving this field blank leaves labor at book time; a 10 increases labor by 10%. If paying technicians on a flat rate, increasing labor time increases the technicians pay.
Connections Tab
This screen includes options when using Smart eOrder.
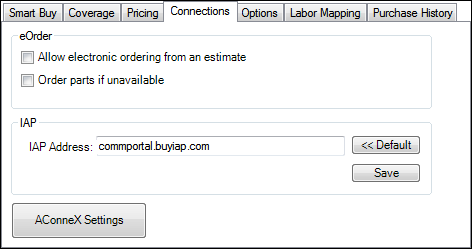
Allow Electronic Ordering from an Estimate
If this option is selected, you can use Smart eOrder to order parts for an estimate. If not selected, you can only order parts for a repair order.
Order Parts if Unavailable
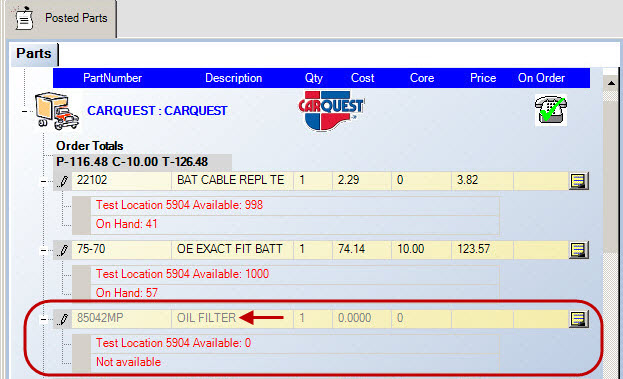
This option determines how Smart eCat handles parts that are unavailable after you click the Check Price and Availability button on the Parts tab.
When selected, unavailable parts are highlighted in bold. The parts are ordered when the truck button is selected.

When not selected, unavailable parts are grayed out. Parts are not ordered when the truck button is selected.
IAP
Configure the Using IAP/EZConnect in eOrder COM portal address from either Smart eCat or eOrder. Click the Default button to change the URL back to the default and click the Save button to save changes.
AConneX Settings Button
AConneX setup is part of Smart eCat configuration. It is also available from the eOrder module by selecting Options.
Options Tab
The settings on the Options tab determines the default behavior in Smart eCat. Click the Save button to save changes.
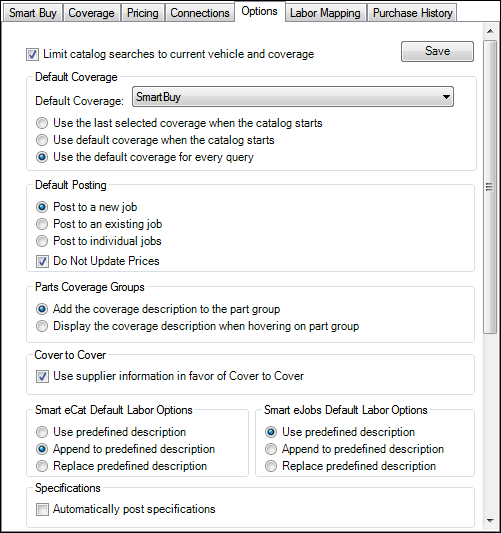
Limit Catalog Searches to Current Vehicle and Coverage
Select this checkbox to limit catalog searches to only parts and labor that match the selected vehicle and coverage list.
Default Coverage
This option allows you to select smart buy or a specific coverage to default to when the catalog starts or for every query. Use the dropdown list to select the default coverage.

Select one of three options for the default coverage you selected:
- Use the Last Selected Coverage When the Catalog Starts – The last coverage used is automatically selected the next time you access the catalog.
- Use Default Coverage When the Catalog Starts – The default coverage is selected every time you access the catalog.
- Use the Default Coverage for Every Query – The default coverage is used every time a query is made, even if a different coverage was selected originally.
Default Posting
These options determine the default labor posting options in Smart eCat on the Posted Parts and Labor tab.

| Option | Select this option to… |
|---|---|
|
Post Parts and Labor to a New Job |
Post the parts and labor to a new job that is not currently on the ticket. The dropdown list contains all labor categories and operations. Select the labor Category (required) and Operation (optional). |
|
Post Parts and Labor to an Existing Job |
Post the parts and labor to a job that is currently on the ticket. The dropdown lists contains only jobs on the open ticket. Select the job in the dropdown list. |
|
Add Individual Parts and Labor to Invoice |
Add the parts and labor as separate lines. Use this option if the jobs listed are not included in the same labor operation. Each part is added as a separate item. All labor jobs are grouped together. |
Do Not Update Prices — Check if the prices have changed since the parts have been posted to the repair order, existing prices are not updated.
Smart eCat Default Labor Options
There are three options when posting a regular labor operation (and not a Smart eJob) from Smart eCat:
Smart eJobs Default Labor Options
There are three options when posting labor from Smart eCat using Smart eJobs:
Parts Coverage Groups
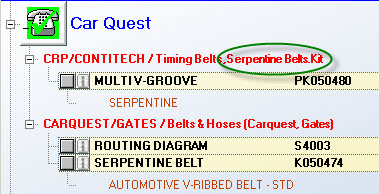
Add the Coverage Description to the Part Group — Display the description for each group as in the example below.
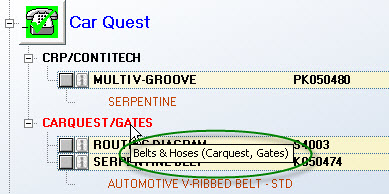
Display the Coverage Description When Hovering on Part Group — Does not display the description unless you hover your cursor over the group name as in the example below.
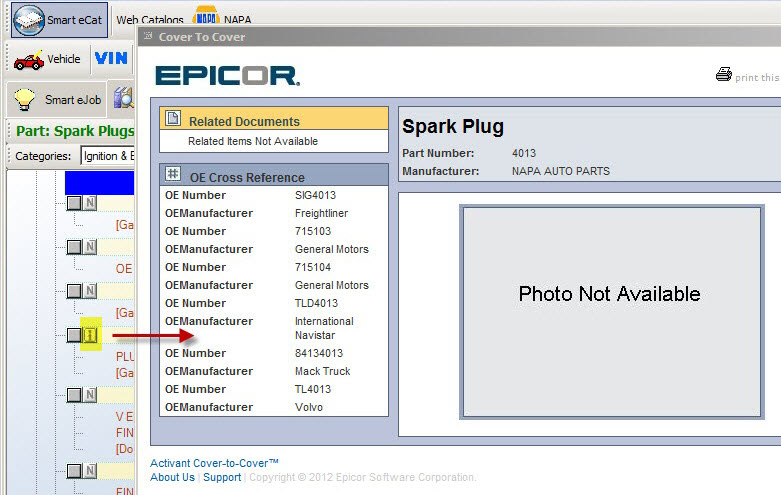
Use Supplier Information in Favor of Cover to Cover
Supplier information displays (when available) instead of Cover to Cover information.
With this option selected, the supplier information displays:

Without the option selected, the Cover to Cover information displays:
Specifications - Automatically Post Specifications
Whenever you've selected part specifications in a smart job or Epicor Parts Specifications are shown when performing a category search, all specifications are selected automatically if this option is checked and will not be selected if this option is not checked. Specifications, when selected will appear on the Notes tab when viewing the Posted Parts and Labor tab. They will then be appended to the labor operation when transferred to R.O. Writer.
You are still able to manually select or deselect specifications regardless of whether this option is selected or not.
Labor Mapping Tab
When posting Epicor labor to an estimate or repair order, you can automatically assign R.O. Writer categories and/or operations to each job. This is useful for better tracking of sales by labor category and marketing. In most cases, a category alone should be selected and in some cases, you can also assign a labor operation.
For each Epicor Labor Guide Group, select the R.O. Writer Labor Category and or Operation using the dropdown lists.

Select Save when finished.
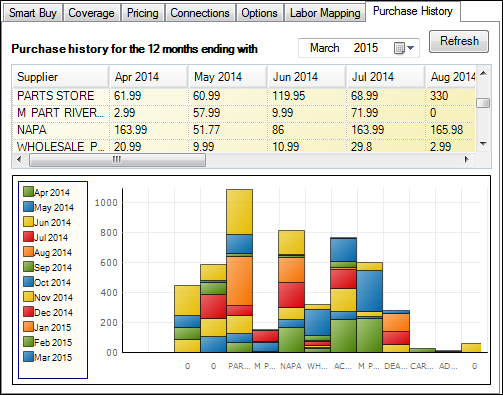
Purchase History Tab
Purchase History displays the dollar amount purchased online through Smart eCat from each supplier for a 12 month period. Select the ending month and year and click the Refresh button. The dollar amount per month displays as well as a graph.
