Default Outside Purchase Pricing
The Default Outside Purchase Pricing Configuration setting determines pricing in R.O. Writer for all parts that have no inventory record in the Inventory module of R.O. Writer.
The window that opens when you select Default Outside Purchase Pricing depends on the option selected in the Outside Purchases section of the Set Pricing Method Configuration setting.

The pricing methods for Outside Purchases are as follows:
- Cost Plus Multiplier (CPM)
- Matrix Pricing by Supplier
- Matrix Pricing by Department
- Matrix Pricing by Associated Labor
- Smart Matrix Pricing by Supplier
- Smart Matrix Pricing by Department
- Smart Matrix Pricing by Associated Labor
If Use Cost Plus Multiplier (CPM) is selected, the Default Parts Pricing window opens displaying the settings for Cost Plus Multiplier (CPM).
If one of the matrix pricing options is selected, the Parts Price Matrix Wizard opens for that matrix type.
- The Parts Price Matrix Wizard is one window that contains a series of tabs you move through to set up the matrix or matrices.
- When the Parts Price Matrix Wizard opens, you create or edit matrices for the following matrix types:
If one of the smart matrix options is selected, the Linear Pricing Progression Wizard opens for that matrix.
- The Linear Pricing Progression Wizard is one window that contains a series of tab windows you move through to set up the smart matrix or smart matrices.
- When the Linear Pricing Progression Wizard opens, you create or edit matrices for the following matrix types:
Cost Plus Multiplier (CPM) for Outside Purchases
If the Use Cost Plus Multiplier (CPM) pricing method is selected in the Outside Purchases section of the Set Pricing Method Configuration setting, the Default Parts Prices window opens when you click Configuration menu > Parts > Default Outside Purchase Pricing.

There is only one CPM for all of R.O. Writer. The Default Parts Price window - no matter where you open it from - always displays the default values in the global CPM. You can access the default, global CPM by clicking Configuration menu > Parts > Price Levels > Default Pricing.
If you make changes here for outside purchases, those changes are saved to the one, global CPM and applied wherever CPM is used as the pricing method.
For full details about how to enter values on the Default Parts Pricing window, click the following link: Default Pricing.
Matrix Pricing by Supplier for Outside Purchases
If the Matrix Pricing by Supplier pricing method is selected in the Outside Purchases section of the Set Pricing Method Configuration setting, the Parts Price Matrix Wizard window opens when you click Configuration menu > Parts > Default Outside Purchase Pricing.
Setting up a matrix for the Matrix Pricing by Supplier method includes the following steps:
- Step 1 - Name the New Matrix for Matrix Pricing by Supplier
- Step 2 - Set the Price Ranges for Matrix Pricing by Supplier
- Step 3 - Select the Suppliers for Matrix Pricing by Supplier
- Step 4 - Run the Sales History for Supplier Sales (Recommended)
- Step 5 - Set the Margins for Matrix Pricing by Supplier
- Step 6 - Enter the Global Settings for All Matrices
- Step 7 - Save the Matrix for Matrix Pricing by Supplier
Step 1 - Name the New Matrix for Matrix Pricing by Supplier
To create a new matrix, click the New button and enter a name in the Matrix Name field.
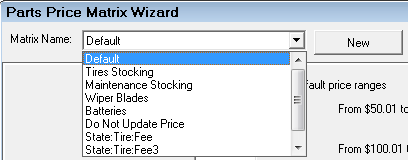
Use a descriptive enough name so you can identify the correct matrix easily when editing.
For example, “CARQUEST Outside Purchase”.
TIP: You may want to click the Save Changes button to save the new name to the Matrix Name dropdown list.
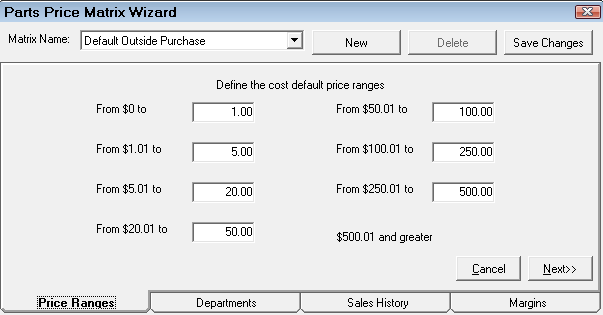
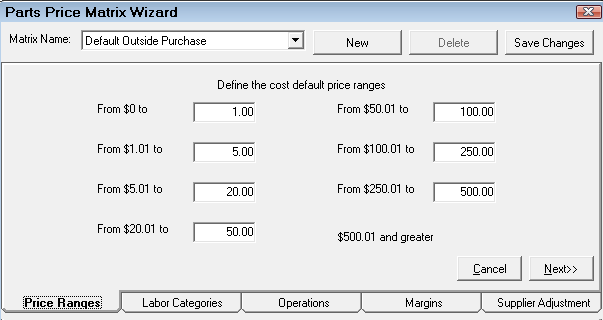
Step 2 - Set the Price Ranges for Matrix Pricing by Supplier
Click the Price Ranges tab to set the cost ranges. Enter the dollar values in each box to set the cost ranges. The cost ranges are the pricing levels for the margins you set on the Margins tab.
When all the ranges have been entered, click the Next button to move to the next tab in the process or just click the tab you want to complete next.
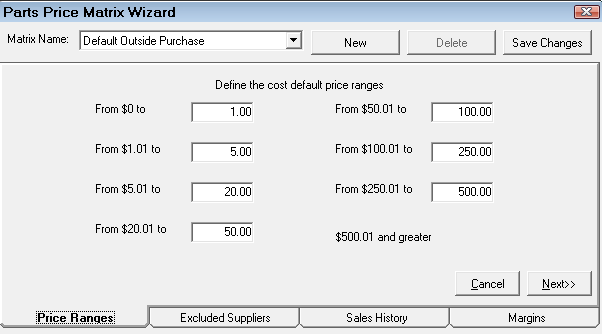
The cost ranges are the pricing levels for margins you set on the Margins tab.
Step 3 - Select the Suppliers for Matrix Pricing by Supplier
On the Excluded Suppliers tab, use the arrow buttons to select the suppliers for the pricing matrix.
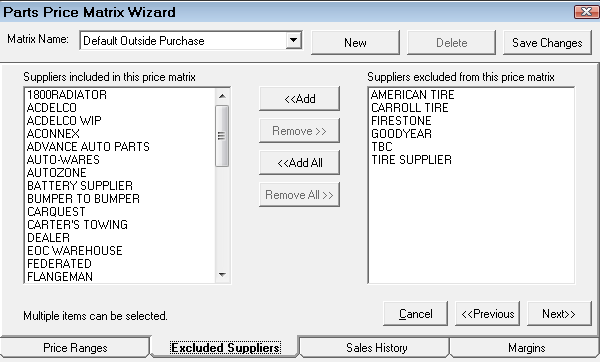
NOTE: You can create a matrix for one supplier. This is useful if that supplier has their own pricing matrix.
Step 4 - Run the Sales History for Supplier Sales (Recommended)
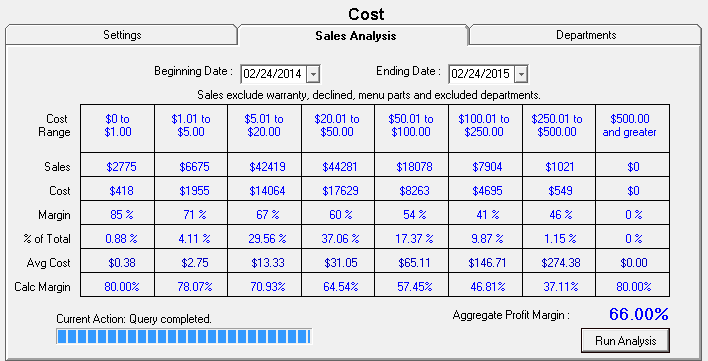
If you have been using R.O. Writer for a while or you have sales history information in your database, historical sales information should be available. You can run a sales history analysis on the Sales History tab to see what the margins have been in the recent past. This will help you set the new pricing matrix margins on the Margins tab in the next step.
The Sales History tab is always blank when you first open it. The data appears only after the analysis has been run.
Complete these steps:
- By default, R.O. Writer selects the last 12 rolling months as the date range. You can select your own beginning and end date.
- Click the Run Analysis button and R.O. Writer runs an analysis of your actual purchases for the date range.
- The progress bar shows the progress of the analysis while it is running.
- The results appear in the table when the analysis is complete.
The analysis is based on the
- Cost ranges entered on the Price Ranges tab.
- Suppliers selected on the Excluded Suppliers tab.
Click the Cancel button to clear the analysis on the Sales History tab. You can change the dates and click the Run Analysis button again.
NOTE: If historical data is not available, you can skip running the analysis and go right to the next step.
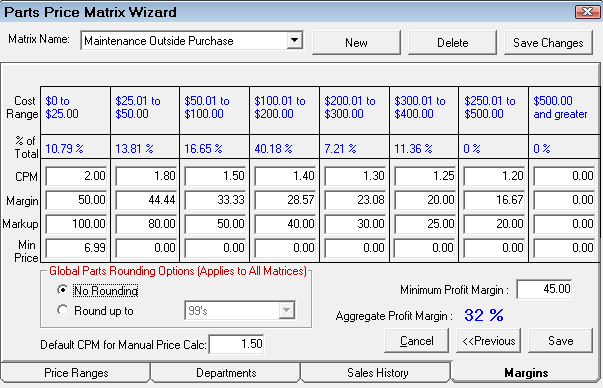
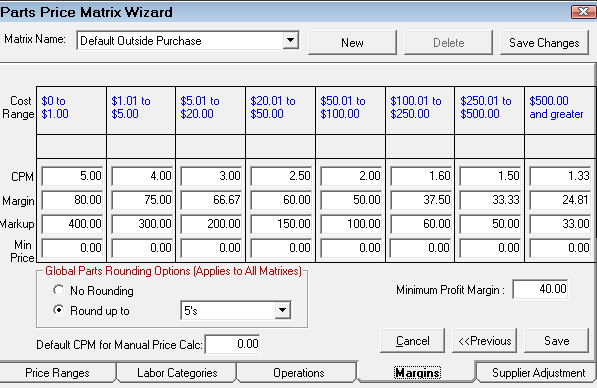
Step 5 - Set the Margins for Matrix Pricing by Supplier
On the Margins tab, you set the margins for the cost ranges entered on the Price Ranges tab.
|
Value |
Description |
|---|---|
|
The Cost Range set on the Price Ranges tab appear as columns on the Margins tab. |
|
|
This row displays the values from the Sales History if it was run. The percent of total parts sales for each price range appears. If the Sales History was not run, this area says “No Calc”. |
|
|
There are three categories for each cost range: CPM, Margin, and Markup. When you change one of these categories, R.O. Writer calculates the other two values. For instance, if you type in the CPM number, the Margin and Markup values change to match that number. As a result, |
|
|
Min Price |
This is the minimum price for parts in this cost range. If the calculated price is less than the minimum price, then that price is used. |
|
Aggregate Profit Margin |
This number is a result of the Sales Analysis run in the previous step. Pay careful attention to this percentage because it provides powerful information regarding total parts sales profitability. |
Step 6 - Enter the Global Settings for All Matrices
The global settings appear below the table.

Global Parts Rounding Options
The Global Parts Rounding option selected applies to all matrices.
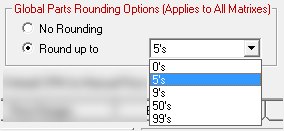
- No Rounding - Does not round the values up or down.
- Round Up To - Select the number you wish to round prices up to.
Minimum Profit Margin
The minimum margin is the percentage of profit that no sale should fall below. A minimum margin must be set for Smart Matrix Pricing methods.
The minimum margin is a percentage even though a percent symbol (%) does not appear in the box or the field label.
To set the minimum profit margin, type the percentage into the box.
As a starting guideline, set the minimum about 1.5 to 2.0 percentage points lower than the aggregate profit margin. To see the aggregate profit margin percentage, run an analysis on the Sales Analysis tab.
NOTE: The minimum profit margin is a global setting and applies to all matrices.
R.O. Writer calculates the margin for
- Each part posted to a ticket.
If the margin for the part falls below the minimum margin, you are prompted to change the price on the part.The Margin entry in the Pricing Section of the Editing Parts window displays the margin percentage.

- Each ticket overall.
If the price for the entire ticket falls below the minimum margin:- A red down arrow appears in the Information Section of the Parts/Labor Tab of the ticket.
- You are prompted to change the price.
Default CPM for Manual Price Calc
In the Default CPM for Manual Price Calc field, enter the multiplier used when the Price Calc button is clicked in the Pricing Section of the Editing Part Window.
To Save the Values on the Margins Tab
To save the margin values, you can do one of the following:
- Click Save Changes in the upper right corner to save the changes and remain on the Margins tab.
- Click Save in the lower right corner to save the entire matrix and close the window.
NOTE: Click Cancel to cancel your changes and also to close the entire window.
Step 7 - Save the Matrix for Matrix Pricing by Supplier
Click the Save Changes button in upper right corner.
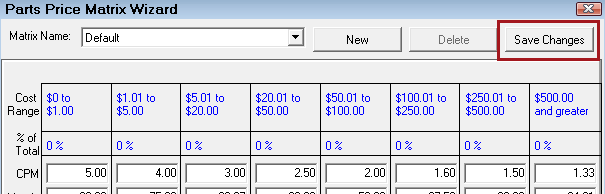
All changes are saved and the matrix remains on the Parts Price Matrix Wizard.
You can click the Save Changes button
- From any tab on the Parts Price Matrix Wizard to save changes.
- At any time to save the changes you just made.
NOTE: You can also save the matrix by clicking the Save button on the Margins tab. However, this saves the matrix and closes the Parts Price Matrix Wizard.
Matrix Pricing by Department for Outside Purchases
If the Matrix Pricing by Department pricing method is selected in the Outside Purchases section of the Set Pricing Method Configuration setting, the Parts Price Matrix Wizard window opens when you click Configuration menu > Parts > Default Outside Purchase Pricing.
Setting up a matrix for the Matrix Pricing by Department method includes the following steps:
- Step 1 - Name the New Matrix for Matrix Pricing by Department
- Step 2 - Set the Cost Ranges for Matrix Pricing by Department
- Step 3 - Select the Departments for Matrix Pricing by Department
- Step 4 - Run a Sales Analysis for Matrix Pricing by Department (Recommended)
- Step 5 - Set the Margins for Matrix Pricing by Department
- Step 6 - Enter the Global Settings for All Matrices
- Step 7 - Save the Matrix for Matrix Pricing by Department
Step 1 - Name the New Matrix for Matrix Pricing by Department
To create a new matrix, click the New button and enter a name in the Matrix Name field.
Use a descriptive enough name so you can identify the correct matrix easily when editing.
For example, “Brakes Outside Purchase”.
TIP: You may want to click the Save Changes button to save the new name to the Matrix Name dropdown list.
Step 2 - Set the Cost Ranges for Matrix Pricing by Department
Click the Price Ranges tab to set the cost ranges. Enter the dollar values in each box to set the cost ranges. The cost ranges are the pricing levels for the margins you set on the Margins tab.
When all the ranges have been entered, click the Next button to move to the next tab in the process or just click the tab you want to complete next.
The cost ranges are the pricing levels for margins you set on the Margins tab.
Step 3 - Select the Departments for Matrix Pricing by Department
On the Departments tab, use the arrow buttons to select the parts departments for the pricing matrix.
If certain parts departments have different pricing, decide what those departments are and create separate matrices for those departments.
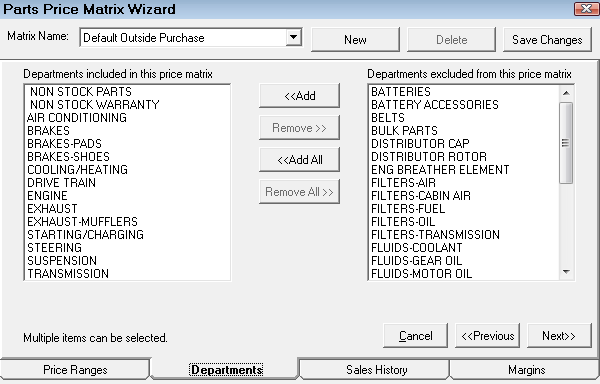
You can create an entire matrix for one department.
Step 4 - Run a Sales Analysis for Matrix Pricing by Department (Recommended)
If you have been using R.O. Writer for a while or you have sales history information in your database, historical sales information should be available. You can run a sales history analysis on the Sales History tab to see what the margins have been in the recent past. This will help you set the new pricing matrix margins on the Margins tab in the next step.
The Sales History tab is always blank when you first open it. The data appears only after the analysis has been run.
Complete these steps:
- By default, R.O. Writer selects the last 12 rolling months as the date range. You can select your own beginning and end date.
- Click the Run Analysis button and R.O. Writer runs an analysis of your actual purchases for the date range.
- The progress bar shows the progress of the analysis while it is running.
- The results appear in the table when the analysis is complete.

The analysis is based on the
- Cost ranges entered on the Price Ranges tab.
- Departments selected on the Departments tab.
Click the Cancel button to clear the analysis on the Sales History tab. You can change the dates and click the Run Analysis button again.
NOTE: If historical data is not available, you can skip running the analysis and go right to the next step.
Step 5 - Set the Margins for Matrix Pricing by Department
On the Margins tab, you set the margins for the cost ranges entered on the Price Ranges tab.
|
Value |
Description |
|---|---|
|
The Cost Range set on the Price Ranges tab appear as columns on the Margins tab. |
|
|
This row displays the values from the Sales History if it was run. The percent of total parts sales for each price range appears. If the Sales History was not run, this area says “No Calc”. |
|
|
There are three categories for each cost range: CPM, Margin, and Markup. When you change one of these categories, R.O. Writer calculates the other two values. For instance, if you type in the CPM number, the Margin and Markup values change to match that number. As a result, |
|
|
Min Price |
This is the minimum price for parts in this cost range. If the calculated price is less than the minimum price, then that price is used. |
|
Aggregate Profit Margin |
This number is a result of the Sales Analysis run in the previous step. Pay careful attention to this percentage because it provides powerful information regarding total parts sales profitability. |
Step 6 - Enter the Global Settings for All Matrices
The global settings appear below the table.
Global Parts Rounding Options
The Global Parts Rounding option selected applies to all matrices.
- No Rounding - Does not round the values up or down.
- Round Up To - Select the number you wish to round prices up to.
Minimum Profit Margin
The minimum margin is the percentage of profit that no sale should fall below. A minimum margin must be set for Smart Matrix Pricing methods.
The minimum margin is a percentage even though a percent symbol (%) does not appear in the box or the field label.
To set the minimum profit margin, type the percentage into the box.
As a starting guideline, set the minimum about 1.5 to 2.0 percentage points lower than the aggregate profit margin. To see the aggregate profit margin percentage, run an analysis on the Sales Analysis tab.
NOTE: The minimum profit margin is a global setting and applies to all matrices.
R.O. Writer calculates the margin for
- Each part posted to a ticket.
If the margin for the part falls below the minimum margin, you are prompted to change the price on the part.The Margin entry in the Pricing Section of the Editing Parts window displays the margin percentage.
- Each ticket overall.
If the price for the entire ticket falls below the minimum margin:- A red down arrow appears in the Information Section of the Parts/Labor Tab of the ticket.
- You are prompted to change the price.
Default CPM for Manual Price Calc
In the Default CPM for Manual Price Calc field, enter the multiplier used when the Price Calc button is clicked in the Pricing Section of the Editing Part Window.
To Save the Values on the Margins Tab
To save the margin values, you can do one of the following:
- Click Save Changes in the upper right corner to save the changes and remain on the Margins tab.
- Click Save in the lower right corner to save the entire matrix and close the window.
NOTE: Click Cancel to cancel your changes and also to close the entire window.
Step 7 - Save the Matrix for Matrix Pricing by Department
Click the Save Changes button in upper right corner.
All changes are saved and the matrix remains on the Parts Price Matrix Wizard.
You can click the Save Changes button
- From any tab on the Parts Price Matrix Wizard to save changes.
- At any time to save the changes you just made.
NOTE: You can also save the matrix by clicking the Save button on the Margins tab. However, this saves the matrix and closes the Parts Price Matrix Wizard.
Matrix Pricing by Associated Labor for Outside Purchases
If the Matrix Pricing by Associated Labor pricing method is selected in the Outside Purchases section of the Set Pricing Method Configuration setting, the Parts Price Matrix Wizard window opens when you click Configuration menu > Parts > Default Outside Purchase Pricing.
Setting up a matrix for the Matrix Pricing by Associated Labor method includes the following steps:
- Step 1 - Name the Matrix for Matrix Pricing by Associated Labor
- Step 2 - Set the Cost Ranges for Matrix Pricing by Associated Labor
- Step 3 - Select the Labor Categories for Matrix Pricing by Associated Labor
- Step 4 - Select the Labor Operations for Matrix Pricing by Associated Labor
- Step 5 - Set the Margins for Matrix Pricing by Associated Labor
- Step 6 - Enter the Global Settings for All Matrices
- Step 7 - Set the Supplier Adjustment for Matrix Pricing by Associated Labor
- Step 8 - Save the Matrix for Matrix Pricing by Associated Labor
Step 1 - Name the Matrix for Matrix Pricing by Associated Labor
To create a new matrix, click the New button and enter a name in the Matrix Name field.
Use a descriptive enough name so you can identify the correct matrix easily when editing.
For example, “Transmission Labor Outside Purchases”.
TIP: You may want to click the Save Changes button to save the new name to the Matrix Name dropdown list.
Step 2 - Set the Cost Ranges for Matrix Pricing by Associated Labor
Click the Price Ranges tab to set the cost ranges. Enter the dollar values in each box to set the cost ranges. The cost ranges are the pricing levels for the margins you set on the Margins tab.
When all the ranges have been entered, click the Next button to move to the next tab in the process or just click the tab you want to complete next.
If there are certain types of labor that need to have different pricing, decide which categories and/or operations are priced differently and create separate matrices for those labor categories and/or operations.
Step 3 - Select the Labor Categories for Matrix Pricing by Associated Labor
On the Labor Categories tab, use the arrow buttons to select the categories for the pricing matrix.
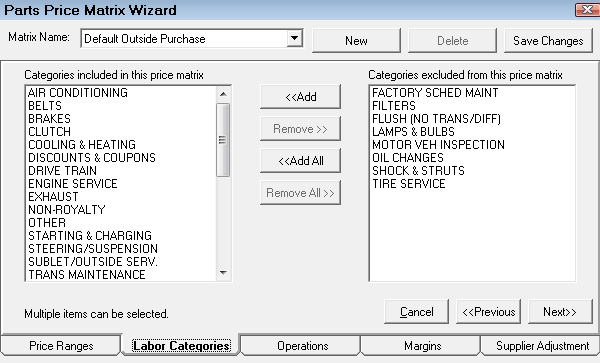
You can create an entire matrix for just one labor category.
Selecting categories does not limit the labor operations that appear on the Operations tab. By default, all operations appear on the Operations tab regardless of the categories selected on the Labor Categories tab.
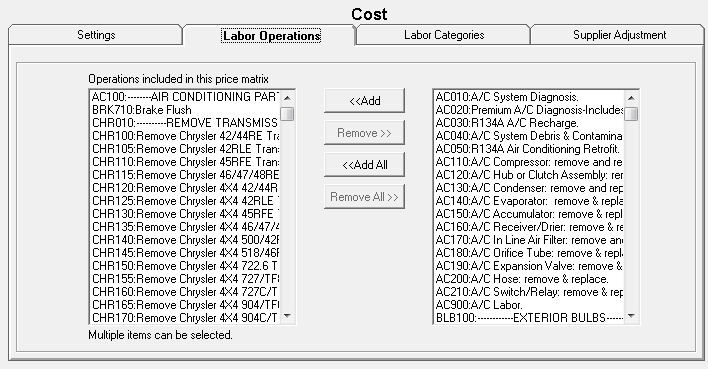
Step 4 - Select the Labor Operations for Matrix Pricing by Associated Labor
On the Labor Operations tab, use the arrow buttons to select the suppliers for the pricing matrix.
Selecting categories does not limit the labor operations that appear on the Operations tab. By default, all operations appear on the Operations tab regardless of the categories selected on the Labor Categories tab.
You can select labor operations from multiple categories or just one labor operation for the entire matrix.
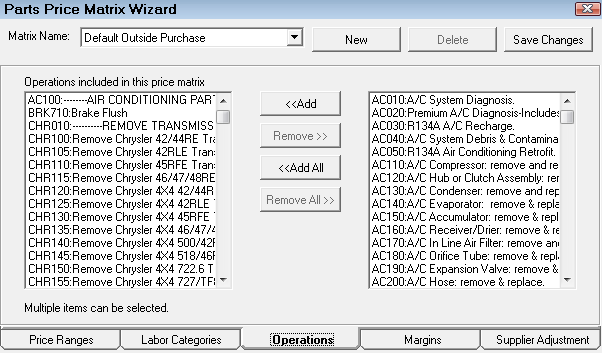
- Labor Operations on the Included list are assigned to this matrix.
- Labor Operations on the Excluded list are removed from this matrix.
Step 5 - Set the Margins for Matrix Pricing by Associated Labor
On the Margins tab, you set the margins for the cost ranges entered on the Price Ranges tab.
|
Value |
Description |
|---|---|
|
The Cost Range set on the Price Ranges tab appear as columns on the Margins tab. |
|
|
This row displays the values from the Sales History if it was run. The percent of total parts sales for each price range appears. If the Sales History was not run, this area says “No Calc”. |
|
|
There are three categories for each cost range: CPM, Margin, and Markup. When you change one of these categories, R.O. Writer calculates the other two values. For instance, if you type in the CPM number, the Margin and Markup values change to match that number. As a result, |
|
|
Min Price |
This is the minimum price for parts in this cost range. If the calculated price is less than the minimum price, then that price is used. |
|
Aggregate Profit Margin |
This number is a result of the Sales Analysis run in the previous step. Pay careful attention to this percentage because it provides powerful information regarding total parts sales profitability. |
Step 6 - Enter the Global Settings for All Matrices
The global settings appear below the table.
Global Parts Rounding Options
The Global Parts Rounding option selected applies to all matrices.
- No Rounding - Does not round the values up or down.
- Round Up To - Select the number you wish to round prices up to.
Minimum Profit Margin
The minimum margin is the percentage of profit that no sale should fall below. A minimum margin must be set for Smart Matrix Pricing methods.
The minimum margin is a percentage even though a percent symbol (%) does not appear in the box or the field label.
To set the minimum profit margin, type the percentage into the box.
As a starting guideline, set the minimum about 1.5 to 2.0 percentage points lower than the aggregate profit margin. To see the aggregate profit margin percentage, run an analysis on the Sales Analysis tab.
NOTE: The minimum profit margin is a global setting and applies to all matrices.
R.O. Writer calculates the margin for
- Each part posted to a ticket.
If the margin for the part falls below the minimum margin, you are prompted to change the price on the part.The Margin entry in the Pricing Section of the Editing Parts window displays the margin percentage.
- Each ticket overall.
If the price for the entire ticket falls below the minimum margin:- A red down arrow appears in the Information Section of the Parts/Labor Tab of the ticket.
- You are prompted to change the price.
Default CPM for Manual Price Calc
In the Default CPM for Manual Price Calc field, enter the multiplier used when the Price Calc button is clicked in the Pricing Section of the Editing Part Window.
To Save the Values on the Margins Tab
To save the margin values, you can do one of the following:
- Click Save Changes in the upper right corner to save the changes and remain on the Margins tab.
- Click Save in the lower right corner to save the entire matrix and close the window.
NOTE: Click Cancel to cancel your changes and also to close the entire window.
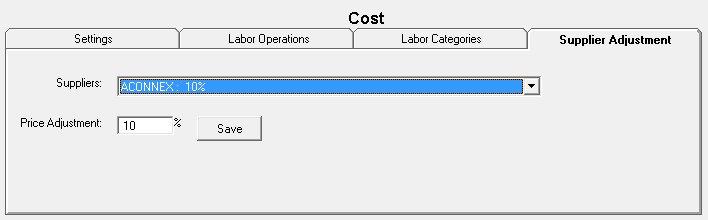
Step 7 - Set the Supplier Adjustment for Matrix Pricing by Associated Labor
On the Supplier Adjustment tab, you can adjust the final calculated price per supplier.
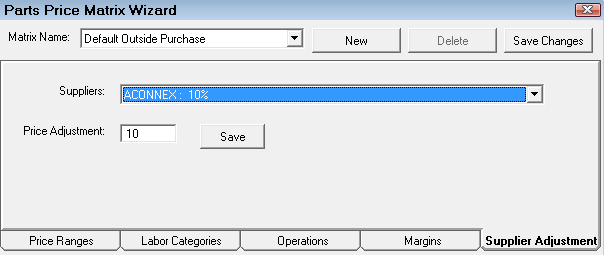
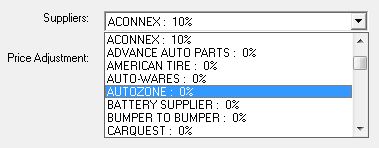
- Supplier - Select the supplier to adjust from the dropdown list.
The dropdown list shows the adjustment percentages set up for each supplier already.
- Price Adjustment - Type in the percentage of the adjustment.
- Click Save. The adjustment appears by the suppliers name in the Suppliers dropdown list.
Step 8 - Save the Matrix for Matrix Pricing by Associated Labor
Click the Save Changes button in upper right corner.
All changes are saved and the matrix remains on the Parts Price Matrix Wizard.
You can click the Save Changes button
- From any tab on the Parts Price Matrix Wizard to save changes.
- At any time to save the changes you just made.
NOTE: You can also save the matrix by clicking the Save button on the Margins tab. However, this saves the matrix and closes the Parts Price Matrix Wizard.
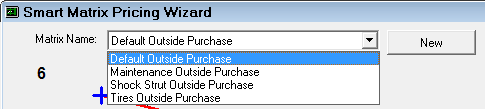
Smart Matrix Pricing by Supplier for Outside Purchases
If the Smart Matrix Pricing by Supplier pricing method is selected in the Outside Purchases section of the Set Pricing Method setting, the Smart Matrix Pricing Wizard opens when you click Configuration menu > Parts > Default Outside Purchase Pricing. The settings for Smart Matrix Pricing by Supplier appear on the pricing wizard window automatically.
Setting up a matrix for the Smart Matrix Pricing by Supplier method includes the following steps:
- Step 1 - Name the New Matrix for Smart Matrix Pricing by Supplier
- Step 2 - Establish the Pricing Matrix for Smart Matrix Pricing by Supplier
- Step 3 - Enter the Global Settings for All Matrices
- Step 4 - Calculate the Price from a Sample Cost (Recommended)
- Step 5 - Run a Sales Analysis for Smart Matrix Pricing by Supplier (Recommended)
- Step 6 - Select the Suppliers for Smart Matrix Pricing by Supplier
- Step 7 - Save the Smart Matrix for Smart Matrix Pricing by Supplier
Step 1 - Name the New Matrix for Smart Matrix Pricing by Supplier
To create a new matrix, click the New button and enter a name in the Matrix Name field.
Use a descriptive enough name so you can identify the correct matrix easily when editing.
For example, “Oil Supplier Outside Purchases”.
TIP: You may want to click the Save Changes button to save the new name to the Matrix Name dropdown list.
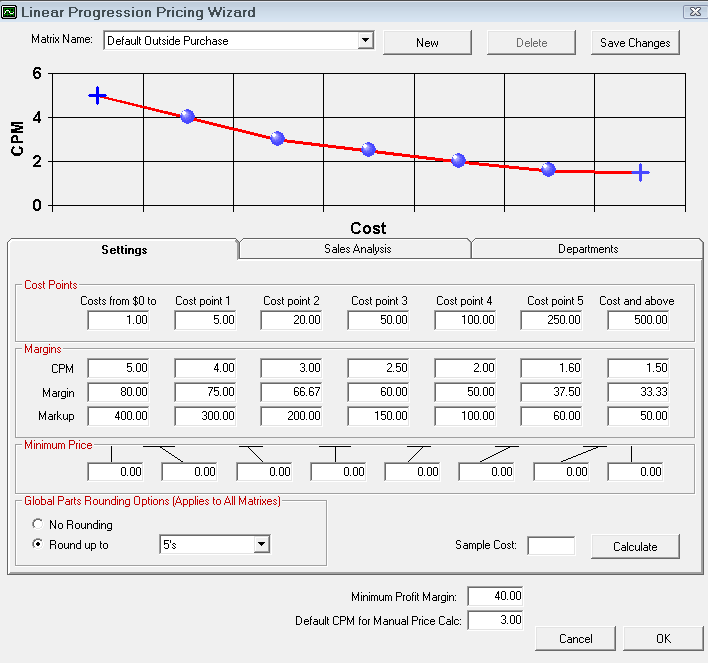
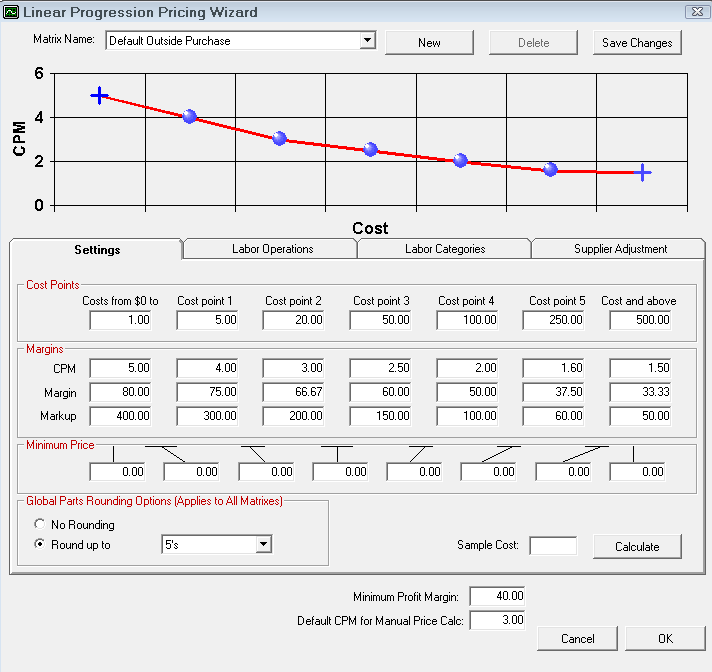
Step 2 - Establish the Pricing Matrix for Smart Matrix Pricing by Supplier
The pricing matrix is established on the Settings tab. There are a few sub-steps.
Step 2a - Set the Cost Points
The cost points are the cost levels you will set the margins for in the next step. There are six cost points available to set.
Enter the dollar values in each box to set that cost point.
In Smart Matrix Pricing, the levels are infinite. It is a gradual stair step where halfway is 50%. This is usually a progression downwards, but it doesn't have to be.
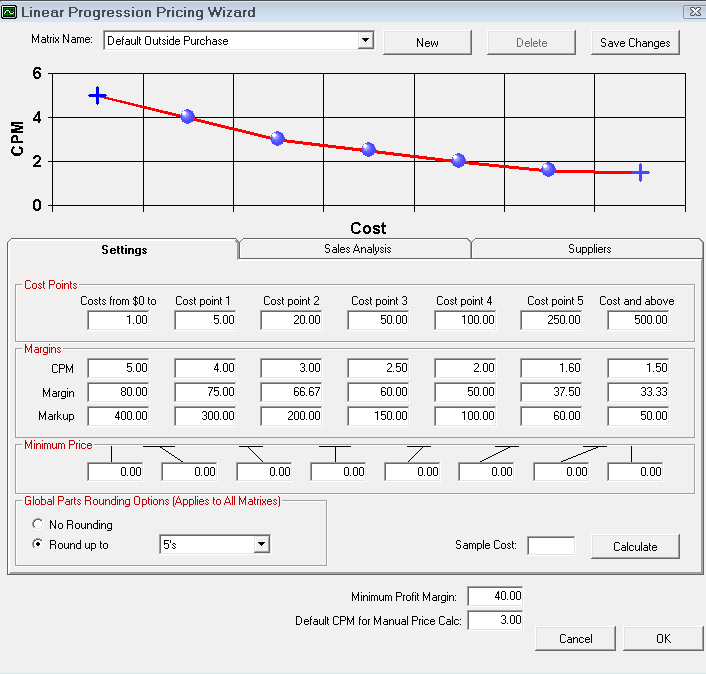
Step 2b - Set the Margins for Each Cost Point
There are three categories for each cost range: CPM, Margin, and Markup. You only need to enter one of these values.
- CPM - The CPM is the cost plus multiplier for this cost point.
- Margin - The Margin is the percentage of profit required for this cost point.
- Markup - The Markup is the percentage of markup calculated for this cost point.
When you change one of these categories, R.O. Writer calculates the other two values. For instance, if you type in the CPM number, the Margin and Markup values change to match that number.
As a result,
- You can better see the relationship between profit margin and markup.
- You can enter the margin or markup and have R.O. Writer calculate the CPM.
In addition, when you enter a CPM, Margin, or Markup value, a preview of the linear progression appears in the CPM chart at the top of the window. The moving image below shows a sample of
Step 2c - Set the Minimum Price for Each Cost Point
Set a minimum price for each cost point. If the calculated price is less than the minimum price, then that price is used.
Step 3 - Enter the Global Settings for All Matrices
The global settings for all matrices appear below the Settings table.
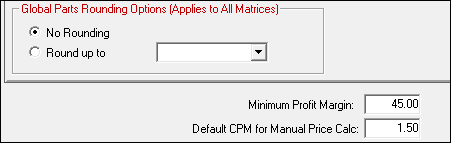
Global Parts Rounding Options
The Global Parts Rounding option selected applies to all matrices.
- No Rounding - Does not round the values up or down.
- Round Up To - Select the number you wish to round prices up to.
Minimum Profit Margin
The minimum margin is the percentage of profit that no sale should fall below. A minimum margin must be set for Smart Matrix Pricing methods.
The minimum margin is a percentage even though a percent symbol (%) does not appear in the box or the field label.
To set the minimum profit margin, type the percentage into the box.
As a starting guideline, set the minimum about 1.5 to 2.0 percentage points lower than the aggregate profit margin. To see the aggregate profit margin percentage, run an analysis on the Sales Analysis tab.
NOTE: The minimum profit margin is a global setting and applies to all matrices.
R.O. Writer calculates the margin for
- Each part posted to a ticket.
If the margin for the part falls below the minimum margin, you are prompted to change the price on the part.The Margin entry in the Pricing Section of the Editing Parts window displays the margin percentage.
- Each ticket overall.
If the price for the entire ticket falls below the minimum margin:- A red down arrow appears in the Information Section of the Parts/Labor Tab of the ticket.
- You are prompted to change the price.
Default CPM for Manual Price Calc
In the Default CPM for Manual Price Calc field, enter the multiplier used when the Price Calc button is clicked in the Pricing Section of the Editing Part Window.
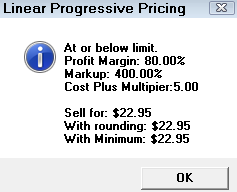
Step 4 - Calculate the Price from a Sample Cost (Recommended)
After the matrix is set and saved, you can check to see if your settings for the matrix are what you want.
Type in the cost of a part into the Sample Cost box. Then, click the Calculate button to see what the price would be for that cost using the currently saved matrix.
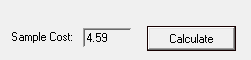
A popup window appears showing you the Sell For price (with and without rounding) and exactly how that price was calculated.
Step 5 - Run a Sales Analysis for Smart Matrix Pricing by Supplier (Recommended)
If you have been using R.O. Writer for a while or you have sales history information in your database, historical sales information should be available. You can run a sales history analysis on the Sales History tab to see what the margins have been in the recent past. This will help you set the new pricing matrix margins on the Margins tab in the next step.
The Sales History tab is always blank when you first open it. The data appears only after the analysis has been run.
Complete these steps:
- By default, R.O. Writer selects the last 12 rolling months as the date range. You can select your own beginning and end date.
- Click the Run Analysis button and R.O. Writer runs an analysis of your actual purchases for the date range.
- The progress bar shows the progress of the analysis while it is running.
- The results appear in the table when the analysis is complete.
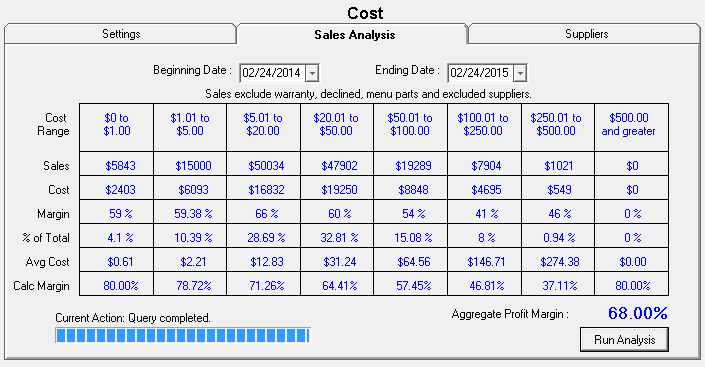
The Cost Ranges in the table are the Cost Points entered on the Settings tab.
Pay attention to the Aggregate Profit Margin; it provides powerful information about the profitability to total parts sales.
NOTE: If historical data is not available, you can skip running the analysis and go right to the next step.
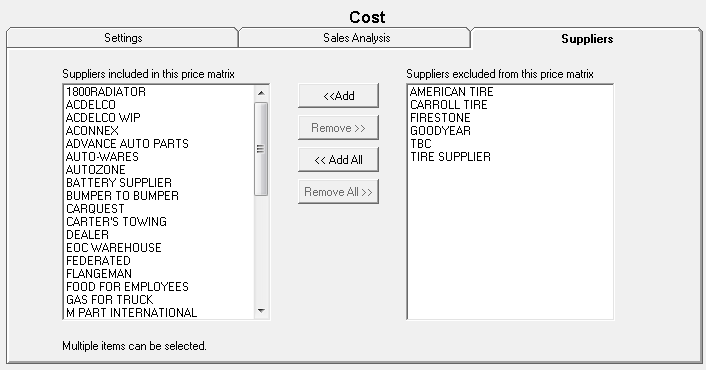
Step 6 - Select the Suppliers for Smart Matrix Pricing by Supplier
On the Suppliers tab, use the arrow buttons to select the suppliers for the pricing matrix.
Step 7 - Save the Smart Matrix for Smart Matrix Pricing by Supplier
Click the Save Changes button in the upper right corner of the Smart Matrix Pricing Wizard window at any time to save the matrix. The settings are saved and the matrix remains on the window.
Smart Matrix by Department for Outside Purchases
If the Smart Matrix by Department pricing method is selected in the Outside Purchases section of the Set Pricing Method Configuration setting, the Linear Pricing Progression Wizard opens when you click Configuration menu > Parts > Default Outside Purchase Pricing. The settings for Smart Matrix Pricing by Department appear on the pricing wizard window automatically.
Setting up a matrix for the Smart Matrix Pricing by Department method includes the following steps:
- Step 1 - Name the New Matrix for Smart Matrix Pricing by Department
- Step 2 - Establish the Pricing Matrix for Smart Matrix Pricing by Department
- Step 3 - Enter the Global Settings for All Matrices
- Step 4 - Calculate the Price from a Sample Cost (Recommended)
- Step 5 - Run a Sales Analysis for Smart Matrix Pricing by Department (Recommended)
- Step 6 - Select the Departments for Smart Matrix Pricing by Department
- Step 6 - Save the Smart Matrix for Smart Matrix Pricing by Department
Step 1 - Name the New Matrix for Smart Matrix Pricing by Department
To create a new matrix, click the New button and enter a name in the Matrix Name field.
Use a descriptive enough name so you can identify the correct matrix easily when editing.
For example, “Oil Department Outside Purchases”.
TIP: You may want to click the Save Changes button to save the new name to the Matrix Name dropdown list.
Step 2 - Establish the Pricing Matrix for Smart Matrix Pricing by Department
The pricing matrix is established on the Settings tab. There are a few sub-steps.
Step 2a - Set the Cost Points
The cost points are the cost levels you will set the margins for in the next step. There are six cost points available to set.
Enter the dollar values in each box to set that cost point.
In Smart Matrix Pricing, the levels are infinite. It is a gradual stair step where halfway is 50%. This is usually a progression downwards, but it doesn't have to be.
Step 2b - Set the Margins for Each Cost Point
There are three categories for each cost range: CPM, Margin, and Markup. You only need to enter one of these values.
- CPM - The CPM is the cost plus multiplier for this cost point.
- Margin - The Margin is the percentage of profit required for this cost point.
- Markup - The Markup is the percentage of markup calculated for this cost point.
When you change one of these categories, R.O. Writer calculates the other two values. For instance, if you type in the CPM number, the Margin and Markup values change to match that number.
As a result,
- You can better see the relationship between profit margin and markup.
- You can enter the margin or markup and have R.O. Writer calculate the CPM.
In addition, when you enter a CPM, Margin, or Markup value, a preview of the linear progression appears in the CPM chart at the top of the window. The moving image below shows a sample of
Step 2b - Set the Minimum Price for the Cost Point
Set a minimum price for each cost point. If the calculated price is less than the minimum price, then that price is used.
As part of the Smart Matrix pricing, there is a minimum price that can be set for each cost range. If the calculated price is less than the minimum price, then that price is used.
Step 3 - Enter the Global Settings for All Matrices
The global settings for all matrices appear below the Settings table.
Global Parts Rounding Options
The Global Parts Rounding option selected applies to all matrices.
- No Rounding - Does not round the values up or down.
- Round Up To - Select the number you wish to round prices up to.
Minimum Profit Margin
The minimum margin is the percentage of profit that no sale should fall below. A minimum margin must be set for Smart Matrix Pricing methods.
The minimum margin is a percentage even though a percent symbol (%) does not appear in the box or the field label.
To set the minimum profit margin, type the percentage into the box.
As a starting guideline, set the minimum about 1.5 to 2.0 percentage points lower than the aggregate profit margin. To see the aggregate profit margin percentage, run an analysis on the Sales Analysis tab.
NOTE: The minimum profit margin is a global setting and applies to all matrices.
R.O. Writer calculates the margin for
- Each part posted to a ticket.
If the margin for the part falls below the minimum margin, you are prompted to change the price on the part.The Margin entry in the Pricing Section of the Editing Parts window displays the margin percentage.
- Each ticket overall.
If the price for the entire ticket falls below the minimum margin:- A red down arrow appears in the Information Section of the Parts/Labor Tab of the ticket.
- You are prompted to change the price.
Default CPM for Manual Price Calc
In the Default CPM for Manual Price Calc field, enter the multiplier used when the Price Calc button is clicked in the Pricing Section of the Editing Part Window.
Step 4 - Calculate the Price from a Sample Cost (Recommended)
After the matrix is set and saved, you can check to see if your settings for the matrix are what you want.
Type in the cost of a part into the Sample Cost box. Then, click the Calculate button to see what the price would be for that cost using the currently saved matrix.
A popup window appears showing you the Sell For price (with and without rounding) and exactly how that price was calculated.
Step 5 - Run a Sales Analysis for Smart Matrix Pricing by Department (Recommended)
If you have been using R.O. Writer for a while or you have sales history information in your database, historical sales information should be available. You can run a sales history analysis on the Sales History tab to see what the margins have been in the recent past. This will help you set the new pricing matrix margins on the Margins tab in the next step.
The Sales History tab is always blank when you first open it. The data appears only after the analysis has been run.
Complete these steps:
- By default, R.O. Writer selects the last 12 rolling months as the date range. You can select your own beginning and end date.
- Click the Run Analysis button and R.O. Writer runs an analysis of your actual purchases for the date range.
- The progress bar shows the progress of the analysis while it is running.
- The results appear in the table when the analysis is complete.
The Cost Ranges in the table are the Cost Points entered on the Settings tab.
Pay attention to the Aggregate Profit Margin; it provides powerful information about the profitability to total parts sales.
NOTE: If historical data is not available, you can skip running the analysis and go right to the next step.
Step 6 - Select the Departments for Smart Matrix Pricing by Department
On the Departments tab, use the arrow buttons to select the parts departments for the pricing matrix.
If certain parts departments have different pricing, decide what those departments are and create separate matrices for those departments.
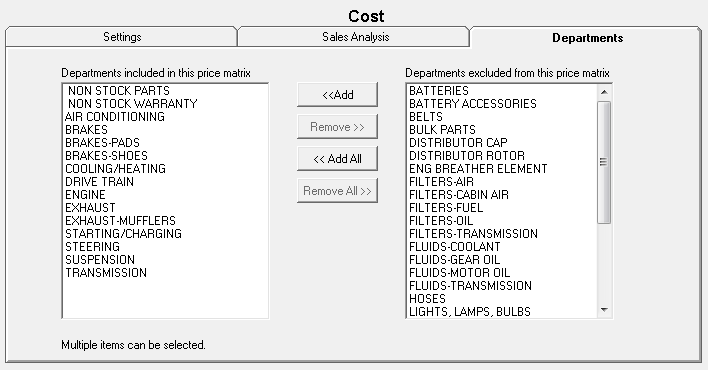
You can create an entire matrix for one department.
Step 6 - Save the Smart Matrix for Smart Matrix Pricing by Department
Click the Save Changes button in the upper right corner of the Smart Matrix Pricing Wizard window at any time to save the matrix. The settings are saved and the matrix remains on the window.
Smart Matrix Pricing by Associated Labor for Outside Purchases
If the Smart Matrix Pricing by Associated Labor pricing method is selected in the Outside Purchases section of the Set Pricing Method Configuration setting, the Smart Matrix Pricing Wizard opens when you click Configuration menu > Parts > Default Outside Purchase Pricing. The settings for Smart Matrix Pricing by Associated Labor appear on the pricing wizard window automatically.
Setting up a matrix for the Smart Matrix Pricing by Associated Labor method includes the following steps:
- Step 1 - Name the New Matrix for Smart Matrix Pricing by Associated Labor
- Step 2 - Establish the Pricing Matrix for Smart Matrix Pricing by Associated Labor
- Step 3 - Enter the Global Settings for All Matrices
- Step 4 - Calculate the Price Based on Sample Cost (Recommended)
- Step 5 - Select the Labor Categories for Smart Matrix Pricing by Associated Labor
- Step 6 - Select the Labor Operations for Smart Matrix Pricing by Associated Labor
- Step 7 - Set the Supplier Adjustment for Smart Matrix Pricing by Associated Labor (Optional)
- Step 8 - Save the Smart Matrix for Smart Matrix Pricing by Associated Labor
Step 1 - Name the New Matrix for Smart Matrix Pricing by Associated Labor
To create a new matrix, click the New button and enter a name in the Matrix Name field.
Use a descriptive enough name so you can identify the correct matrix easily when editing.
For example, “Oil Labor Outside Purchases”.
TIP: You may want to click the Save Changes button to save the new name to the Matrix Name dropdown list.
Step 2 - Establish the Pricing Matrix for Smart Matrix Pricing by Associated Labor
The pricing matrix is established on the Settings tab. There are a few sub-steps.
Step 2a - Set the Cost Points
The cost points are the cost levels you will set the margins for in the next step. There are six cost points available to set.
Enter the dollar values in each box to set that cost point.
In Smart Matrix Pricing, the levels are infinite. It is a gradual stair step where halfway is 50%. This is usually a progression downwards, but it doesn't have to be.
Step 2b - Set the Margins for Each Cost Point
There are three categories for each cost range: CPM, Margin, and Markup. You only need to enter one of these values.
- CPM - The CPM is the cost plus multiplier for this cost point.
- Margin - The Margin is the percentage of profit required for this cost point.
- Markup - The Markup is the percentage of markup calculated for this cost point.
When you change one of these categories, R.O. Writer calculates the other two values. For instance, if you type in the CPM number, the Margin and Markup values change to match that number.
As a result,
- You can better see the relationship between profit margin and markup.
- You can enter the margin or markup and have R.O. Writer calculate the CPM.
In addition, when you enter a CPM, Margin, or Markup value, a preview of the linear progression appears in the CPM chart at the top of the window. The moving image below shows a sample of
Step 2c - Set the Minimum Price for Each Cost Point
Set a minimum price for each cost point. If the calculated price is less than the minimum price, then that price is used.
Step 3 - Enter the Global Settings for All Matrices
The global settings for all matrices appear below the Settings table.
Global Parts Rounding Options
The Global Parts Rounding option selected applies to all matrices.
- No Rounding - Does not round the values up or down.
- Round Up To - Select the number you wish to round prices up to.
Minimum Profit Margin
The minimum margin is the percentage of profit that no sale should fall below. A minimum margin must be set for Smart Matrix Pricing methods.
The minimum margin is a percentage even though a percent symbol (%) does not appear in the box or the field label.
To set the minimum profit margin, type the percentage into the box.
As a starting guideline, set the minimum about 1.5 to 2.0 percentage points lower than the aggregate profit margin. To see the aggregate profit margin percentage, run an analysis on the Sales Analysis tab.
NOTE: The minimum profit margin is a global setting and applies to all matrices.
R.O. Writer calculates the margin for
- Each part posted to a ticket.
If the margin for the part falls below the minimum margin, you are prompted to change the price on the part.The Margin entry in the Pricing Section of the Editing Parts window displays the margin percentage.
- Each ticket overall.
If the price for the entire ticket falls below the minimum margin:- A red down arrow appears in the Information Section of the Parts/Labor Tab of the ticket.
- You are prompted to change the price.
Default CPM for Manual Price Calc
In the Default CPM for Manual Price Calc field, enter the multiplier used when the Price Calc button is clicked in the Pricing Section of the Editing Part Window.
Step 4 - Calculate the Price Based on Sample Cost (Recommended)
After the matrix is set and saved, you can check to see if your settings for the matrix are what you want.
Type in the cost of a part into the Sample Cost box. Then, click the Calculate button to see what the price would be for that cost using the currently saved matrix.
A popup window appears showing you the Sell For price (with and without rounding) and exactly how that price was calculated.
Step 5 - Select the Labor Categories for Smart Matrix Pricing by Associated Labor
On the Labor Categories tab, use the arrow buttons to select the categories for the smart matrix.
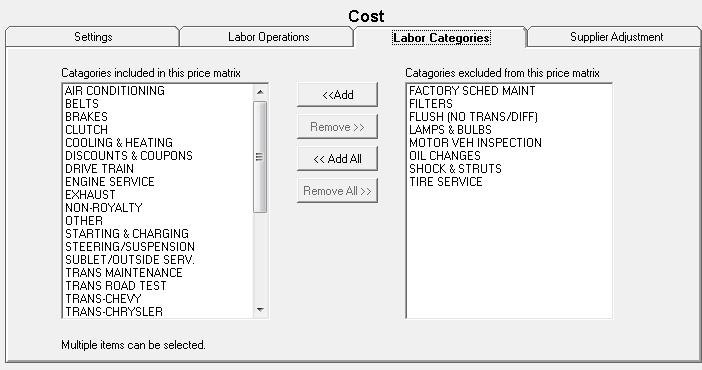
You can create an entire matrix for just one labor category.
Selecting categories does not limit the labor operations that appear on the Labor Operations tab. By default, all operations appear on the Labor Operations tab regardless of the categories selected on the Labor Categories tab.
Step 6 - Select the Labor Operations for Smart Matrix Pricing by Associated Labor
On the Labor Operations tab, use the arrow buttons to select the suppliers for the pricing matrix.
Selecting categories does not limit the labor operations that appear on the Operations tab. By default, all operations appear on the Operations tab regardless of the categories selected on the Labor Categories tab.
You can select labor operations from multiple categories or just one labor operation for the entire matrix.
- Labor Operations in the Included list are assigned to this matrix.
- Labor Operations in the Excluded list are removed from this matrix.
Step 7 - Set the Supplier Adjustment for Smart Matrix Pricing by Associated Labor (Optional)
On the Supplier Adjustment tab, you can adjust the final calculated price per supplier.
- Supplier - Select the supplier to adjust from the dropdown list.
The dropdown list shows the adjustment percentages set up for each supplier already.
- Price Adjustment - Type in the percentage of the adjustment.
- Click Save. The adjustment appears by the suppliers name in the Suppliers dropdown list.
Step 8 - Save the Smart Matrix for Smart Matrix Pricing by Associated Labor
Click the Save Changes button in the upper right corner of the Smart Matrix Pricing Wizard window at any time to save the matrix. The settings are saved and the matrix remains on the window.