Adding Parts to Tickets
There are several ways to add parts to tickets.
- To add standalone parts, click the Part button in the ticket toolbar and search.
- If you add a part that is linked to another part, both parts are added automatically.
- To add parts from an integrated supplier catalog, open that catalog, search, and post parts from the search results.
- To add a parts kit, click the Kits toolbar button > Parts Kits.
Parts are also added by adding labor that is configured to include parts. When the labor is added, the parts are added automatically. For more information, click one of the following links:
Searching for Parts
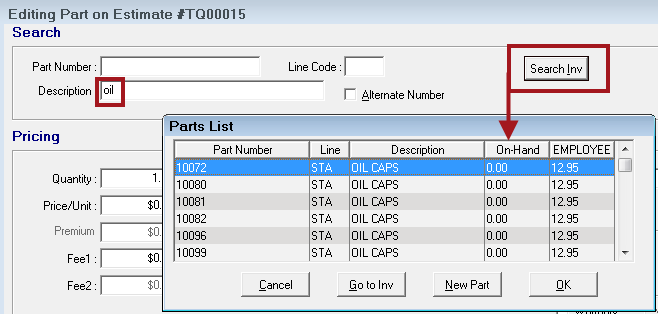
When you click the Parts button in the ticket toolbar  , the Edit Parts window opens in search mode.
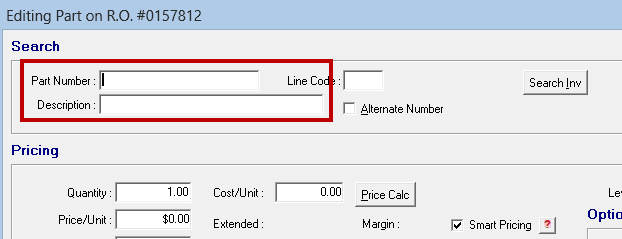
To Search for Parts
You can search by Part Number and Description.
Complete these steps:
- On the Edit Parts window, type part information in the following fields:
- Part Number - Check Alternate Number to include the alternate part number in the search.
- Description - The Part Number field must be blank to search by description.
- If both the Part Number and Description fields contain text, the Part Number field is searched.
- Press the ENTER key. R.O. Writer searches for matching parts.
- The Parts List opens displaying a list of matching part records in Inventory.
If the Wildcard Search box is checked on the Quick Parts window, R.O. Writer performs a wildcard search. If not, R.O. Writer searches only for parts that begin with what you type in.
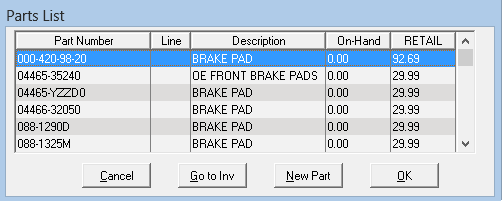
- To add a part from the list, either double-click on it or select it and click OK.
- To view or edit the part record in Inventory first, click the Go to Inv button.
- If the part you entered is not in the list, click the New Part button to add an inventory record.
- To exit the list without selecting a part, click the Cancel button.
- The information in the part record is entered into the Edit Parts window.
Searching in Quick Parts First
If you are having trouble finding the part on the Edit Parts window, you can open Quick Parts from the main toolbar  and search for parts there. Search results in Quick Parts display more data about each part than the Parts List, which can help you find the exact part you need faster.
When you find the part there,
- Write down the Part Number and/or Description.
- Return to the Edit Parts window and search on that criteria.
To Enter and Add a New Part on the Fly
If you need to add a part on the fly, you can add the part just to the current ticket by entering its information on the Edit Parts window. Only use this option if do not need to track the part's usage.
Complete these steps:
-
If the part you need does not exist in Inventory, the Parts List says, "No Matches Found!"
- Click the New Part button to create the part for the ticket. The Edit Parts window opens in entry mode.
- Enter the part details in the fields.
- Click OK. The part appears on the ticket.
If you want to enter the part into Inventory, click the Search Inv button.
- R.O. Writer searches for the part. If any matching parts are found, R.O. Writer enters the information on the Inventory Window.
- Click the New Part button to add this part record.
Modifying Pricing Information
If you need to modify pricing information, please note that numeric values begin at the right end of the field (for example, entering "1" displays "0.01"). To save all modifications, click OK. Changes apply only to the part on the current ticket.
NOTE: Pricing information for parts can be locked, which means that the pricing information cannot be modified. If so, an Override Button appears at the bottom of the window. See Price Locking Parts for more information.
To Update the Part Record from an Open Ticket
By default, part modifications apply only to the part on the ticket and do not affect the part record in Inventory.
If the Allow on-the-fly changes box is checked in Configuration (Configuration menu > Repair Order > R.O. Options > Miscellaneous), a prompt appears asking if you want to update the part record when you save changes to the part.
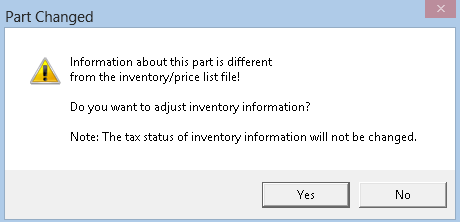
- Click Yes to update the part record in Inventory. (The tax status cannot be changed.)
- Click No to isolate your changes to the part posted to the current ticket.
Editing Part Window
- Opens when you double-click on a part.
- It does not matter how the part was added; the Editing Parts window always opens when you double-click on a part.
- Displays the ticket number in the title bar.
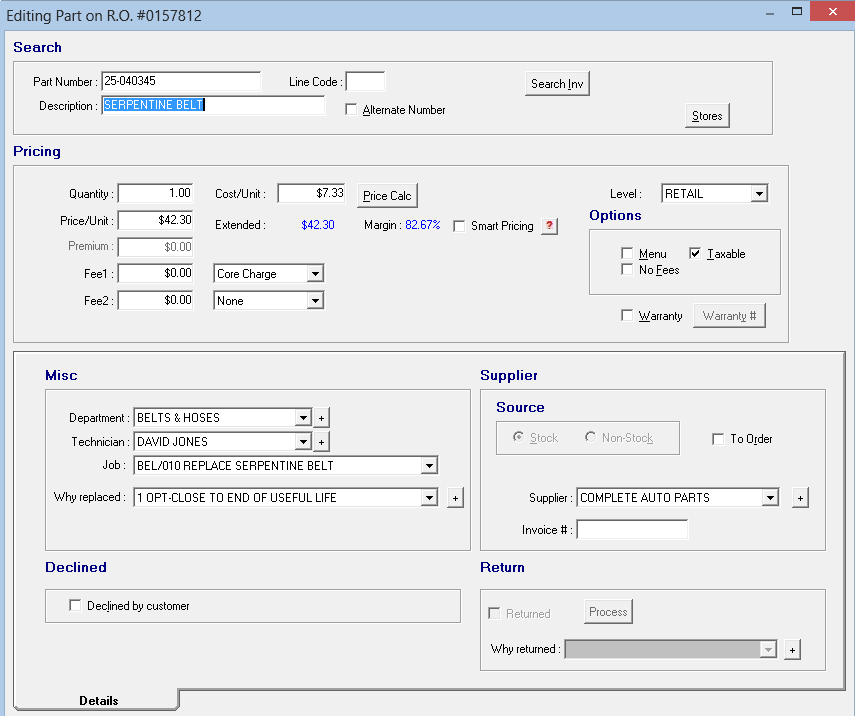
NOTE: The fields and options that appear on this window depend on multiple settings in Configuration for parts, labor, payment, and repair orders.
Search Section
The Search section at the top of the window allows you to search for parts (on a blank Editing Parts window) and displays the most basic information when the part is selected already.

- If the part has a record in Inventory, the information displayed comes from that record.
- If the part was posted to the ticket from an integrated catalog and has no record in Inventory, the information displayed comes from the supplier.
Part Number
The Part Number field is the part identification number selected by the shop to identify a specific part.
To search, type in part number information and press the ENTER key. For more information, click the following link: Searching for Parts.
NOTE: You can enter the vendor part number, however, every part number must be unique.
Description
The Description field is the description of the part. To search, type in description information and press the ENTER key. For more information, click the following link: Searching for Parts.
Alternate Number
Check the Alternate Number box to identify the part number in the Part Number field as an alternate part number.
Enter a portion of the alternate number in the part number field and press the ENTER key.
NOTE: Alternate number is useful to identify like parts that have different parts numbers or track old part numbers.
Line Code
This is the part manufacturer's line code; it can be used to group and sort Inventory Reports. You cannot search by line code.
- When duplicate part numbers are entered in Inventory, the line codes should be different so that they are treated as separate parts.
- When posting parts from parts catalogs such as Epicor, line codes are posted to the ticket.
- If you are using online catalogs, you should turn on the prompt to update line codes in Inventory and History in Configuration (Configuration menu > Parts > PO Transfer and Other Parts Options > When Changing Existing Part's Line Codes).
Search Inv Button
Click the Search Inv button to search by Part Number or Description. The Part List window opens showing matching parts.
-
Click the Go to Inv button to open the full part record.
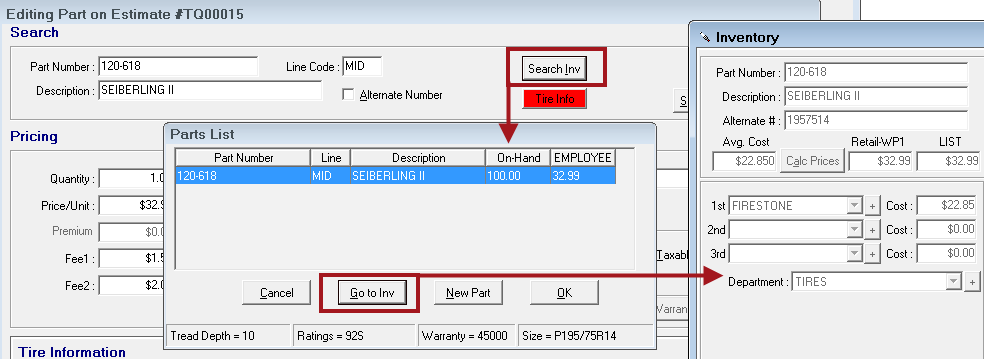
- Click New Part to create a part record for the part in Inventory.
- Click OK to select the part for the ticket.
Tire Info Button
The Tire Info button appears after you add a tire part in the tire group to a ticket.
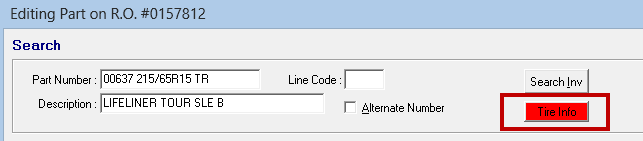
The button is red when DOT information is required for each tire. You cannot finalize the repair order until the DOT numbers are entered.
Click the Tire Info button to access the Tire Tab at the bottom of the window. After you enter all required DOT information, the Tire Info button is gray.
Stores Button
The Stores button appears if Central Office is installed and configured.
Click the Stores button to check inventory for the part number in other shops (databases). If the part is available by the same part number at another shop, the store number and the quantity available display on the Store Inventory popup window.

- Part information is correct as of the last "round trip" Central Office Transmission (i.e., stores transmit, central office transmits, and the stores transmit again, etc.).
- You cannot add parts from the Store Inventory window.
Pricing Section
This section contains the pricing and quantity information for the part.
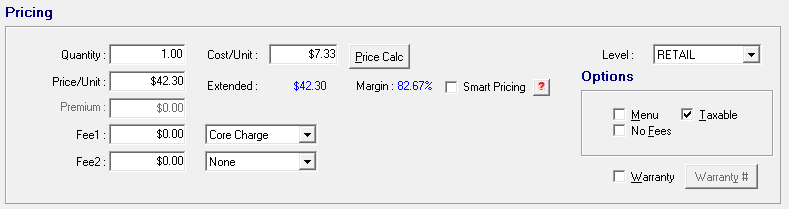
Quantity
This is the quantity of the part on the current ticket.
Type in the desired quantity. Type a period to adjust the quantity by increments of one.
Price/Unit
This is the charge to the customer per unit for this part. This charge may be entered manually or calculated.
To calculate the price, click the Price Calc Button. If the part has a part record in Inventory, the Price/Unit is automatically entered.
Premium (Custom Name)
This field is
- Named “Premium” unless a unique name is entered in the Description for Package Add field in the Package Options setting in Configuration.
- Active only when a part is included in a labor operation where the Package Price option is checked.
This dollar amount is multiplied by the quantity and that total is added to the total package price. The values in the package discount line are not adjusted. (The package discount line is determined by the Package Options setting in Configuration.)
- If this field is active, you can type in or adjust an amount.
- If a Package Add amount is stored in the part record in Inventory, that amount displays automatically.
- If there is an amount but the field is grayed out, the amount is not applied to the ticket.
See Package Adds on Parts for more information.
Fee 1 & Fee 2
If there is an additional fee charged in conjunction with this part, select the appropriate fee type from the dropdown list, and enter the amount of the fee.
NOTE: The dollar amount fields remain inactive until a fee is selected in the dropdown list.
Part fees
- Are created in Configuration in Configuration menu > Parts > Other Taxes and Fees.
- Added to individual parts on the Other Information Tab.
Core Received with Sale
The core options appear if Core Charge is selected for one of the fees AND a dollar amount is entered into that field.

Check the Core Received With Sale box to receive the core in core returns in Inventory and not charge the customer for it.
See Core Sales Tax Options for information on how to handle sales tax when receiving cores.
Core Credit
When a customer brings a core back, complete these steps to issue a core credit:
- Add the part to a new repair order, and
- Check the Core Credit box. This changes the part to a non-stock part with a 0.00 price and creates a credit repair order for the core return.
- Click the Process button.
- The part does not reduce the quantity on hand and the core is received in core returns.
- If you do not click the Process button, this will happen when you finalize the repair order.
- The part does not reduce the quantity on hand and the core is received in core returns.
Cost/Unit
This is the average cost of the part being installed.
Price Calc Button
The Price Calc button recalculates the unit price. When you click the Price Calc button, the Price Calculator tab appears at the bottom of the window.
Extended
R.O. Writer calculates the extended margin automatically.
- The calculation is the Quantity X the Price/Unit.
- This value is recalculated automatically whenever there is a change in the Quantity or Price/Unit fields.
Margin
R.O. Writer calculates this gross profit margin automatically. The calculation is the profit margin (which is the selling price minus the cost) divided by the selling price.
NOTE: The margin percentage must be above the minimum profit margin. If it is not, you are warned and asked if you want to adjust the price on the Price Calculator Tab.
Smart Pricing
The Smart Pricing box is checked when the price was calculated using a smart pricing matrix.
- For details about setting up matrix pricing, click the following link: Set Pricing Method.
- For details about how to post parts using smart pricing matrices, click the following link: Smart Pricing.
The Smart Pricing box is checked automatically when new non-stock parts are added.
- For details, click the following link: Non-Stock Parts Pricing.
If the box is not checked, you can check it to apply the default pricing matrix.
You can click the  button to see matrix pricing details for the part.

Level
Select the appropriate pricing level for this customer. Retail is the default, but you can click Edit Customer to change it. The pricing multiplier for the selected level is used to calculate the price the customer is charged.
- If a parts department is selected for this part, the pricing multipliers for that department are used to calculate the price of the part.
- If a parts department is not selected for this part, Default Inventory Pricing - Cost Plus Multiplier is used.
Click the Price Calc button at the bottom of the screen to calculate the price the customer is charged.
Warranty
Select this option to indicate that you are using the warranty for this part.
- The Menu option is selected automatically.
- The dollar amounts are zeroed out. (Customers are not charged for warrantied parts and services.)
- The word Free appears as the price of the part in the Jobs section of the Parts/Labor Tab.
After the repair order is finalized, this part is included in the Warranty Parts Report.
NOTE: You can use this option even if the part does not have a warranty set up for it in the Inventory module.
Options Section
The Options section displays additional pricing options.
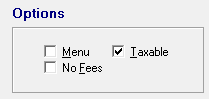
Menu
Check the Menu box to turn the part into a Menu Job, which means the total price to the customer is in the labor operation.
- The price for the part changes to "0.00" and
-
"Menu" appears in the Parts column in the Jobs section of the Parts/Labor tab instead of the price.

The part prints on the customer invoice only if the Print Menu Parts option is selected in Configuration.
No Fees
Check the No Fees box to not calculate supply fees on the price of the part.
Taxable
Check the Taxable box to add the sales tax to the Extended Price of this part. Sales tax is applied at the configured rate.
PST Tax and GST Tax
The PST Tax and GST Tax options appear only if the GST/PST Taxes option is selected in the International Options Configuration setting. GST and PST are Canadian taxes. For details, see GST/PST on the Editing Parts Window.
Misc Section
The miscellaneous section contains several dropdown lists that connect the part to the labor it may be a part of or related to.

Click the  button after the department, technician, or replacement reason to add a new one if the dropdown list does not contain the item you need.
Department
This is the parts department the part is in. The Department is selected automatically based on the part's settings.
You can change the parts department by selecting a different parts department in the dropdown list.
NOTE: If the part has a core charge and you change to a parts department group that had a different core amount or no core set up, a prompt appears to warn you that the core charge will be changed or removed.
Technician
Select the technician who installed the part. Each part must have a technician assigned.
Job
This dropdown list is available only Job-Based View.
If the part was added with a labor operation, Smart Job, or Smart eJob, the job is selected automatically.
The Jobs list includes only the jobs posted to the ticket already. You can change the job by selecting another job.
Why Replaced
If this is a replacement part and you want to track why the part was replaced, select the reason from the dropdown list.
The reasons are created in Configuration (Configuration menu > Parts > Reasons for Replacement).
Supplier Section
The Supplier section of the Editing Parts window shows you the supplier information.
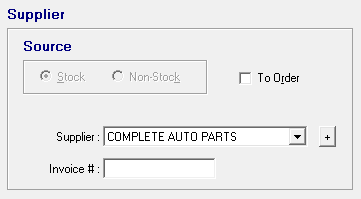
Source
If the Stock and Non-Stock options are active, you can select whether the part is a Stock or Non-Stock part.
- Stock - The part record is marked as a Stock part.
- Stock parts do not usually need to be ordered unless the quantity on hand is below the required amount.
- Non-Stock - The part record is marked as a Non-Stock part.
- Non-stock parts usually have to be purchased.
When there are no parts on hand, R.O. Writer selects the source according to the Make Status Adjustments for Negative on Hands setting in R.O. Options in Configuration:
- If set to Always , R.O. Writer selects Non-Stock automatically and the Source area is disabled and cannot be changed.
- If set to Prompt, R.O. Writer prompt you to choose Stock or Non-Stock.
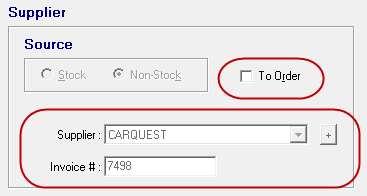
To Order
The To Order box indicates that the part needs to be ordered. As a result, the To Order box is checked automatically when a part from a supplier is posted without being ordered first.
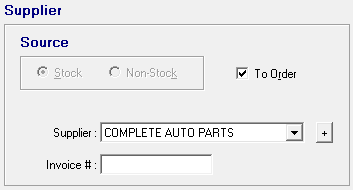
When the To Order box is checked, the part is included when you
- Open Smart eOrder for the ticket or for all tickets.
- Auto-build purchase orders in Purchase Order Management (stock and non-stock parts).
You can check the To Order box to tell R.O. Writer that the part needs to be ordered.
Supplier
Select the appropriate supplier from the dropdown list. If the appropriate supplier is not in the list, click the "+" and add the correct supplier.
When the part was added from an online catalog, the supplier is selected automatically. When you post the part to Accounts Payable, the supplier selected here is selected for Accounts Payable.
If the supplier is not selected when you post the part to Accounts Payable, the supplier you select when posting is selected on the Editing Parts window automatically.
OEC Order # (OEC Only)
The OEC Order # field appears only if the OEConnect RepairLink is licensed and configured.
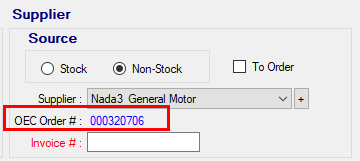
The OEC Order # field:
- Displays the order number after the part is ordered through OE Connect RepairLink.
- Cannot be edited.
The OEC Order # is the number assigned by OE Connect RepairLink to track the order to the OEC dealer. Because OEC dealers can assign their own invoice numbers, the Invoice # field remains blank. The OEC Order # allows you to track the order through OE Connect RepairLink independently from the invoice from the OEC dealer that fulfills the order.
You can enter the invoice number from the OEC dealer in the Invoice # field on the Edit Parts window or in the Invoice Number fields when you post to Accounts Payable. Posted transactions should always use the invoice number from the OEC dealer.
Invoice #
The Invoice # field is for the invoice number from the supplier. The Invoice # field is blank until the part is ordered. After the part is ordered, the invoice number is entered here automatically.
If the Invoice # field is blank when you post the part to Accounts Payable, the Invoice Number you enter when posting is entered in this field automatically.
After the invoice has been posted, the Invoice # field is grayed out and displays the invoice number.
The following fields are also disabled:
- Cost/Unit field
- Quantity field
- Part Number field
- Supplier field and button
- Declined option
- Search Inv button
- Delete button
These fields remain disabled even if a part's price lock has been overridden.
Post to AP Button
The Post to AP button appears instead of the Invoice # field if the Edit Inv # on Add Parts option is NOT selected in Configuration.
When the Post to AP button appears, you cannot edit a non-stock part with an invoice number and R.O. Writer requires you to post a detailed accounts payable invoice.
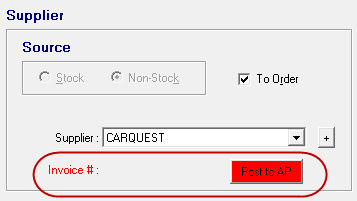
The Post to AP button appears and remains red until you post an Accounts Payable invoice for the part. You cannot finalize the repair order until the part has been posted.
Make a note of the supplier and part before clicking the Post to AP button (because you will have no access to the Editing Part window after clicking).
Click the Post to AP button to open the Post Accounts Payable Invoice window. Follow the instructions for posting invoices in detail.
Declined Section
The Declined section allows you to decline the job when the customer declines the service.

Select the Declined by Customer option to signify that the part was recommended for replacement, but the customer chose not to have it replaced. The part appears on the ticket as “Declined”.
This is useful to document unsafe parts that need replacement when the customer chooses not to replace them. This could limit liability in case of some accident involving this customer and vehicle.
Return Section
This section is for returned parts only.
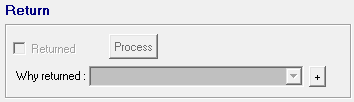
When a part is purchased from outside for this specific vehicle and posted through Accounts Payable and the part needs to be returned to the supplier, you must be able to track
- When it was returned to the supplier.
- When the credit was received so it can be posted in Accounts Payable.
The Return section activates
- After the part is posted directly to the repair order using the Accounts Payable detail post.
- The part is a non-stock part and includes an invoice number.
To return the part to the supplier, check the Returned box. The part remains on the repair order with a price of 0.00 but does not print on the customer invoice.
When the repair order is finalized or the Process button is selected,
- The part is received in part returns in inventory where it can be marked as sent.
- An Accounts Payable credit invoice can be posted if desired.
- Appears on the Part Returns report.
Why Returned
When an outside purchase part is marked as returned, select a return reason.
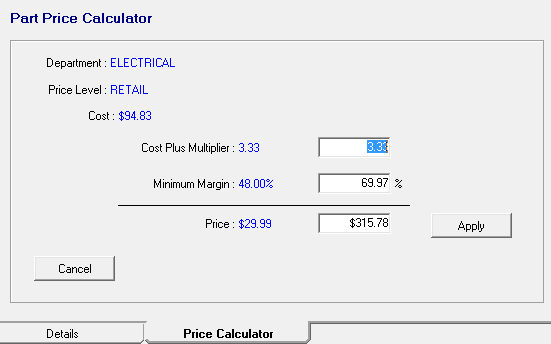
Price Calculator Tab
This tab appears when you click the Price Calc Button.
To recalculate pricing, complete these steps:
- Type in a new value in the Cost Plus Multiplier, Minimum Margin, or Price fields.
- Click Apply to saves the changes to the pricing.
Price Calculator Options
| Item | Description |
|---|---|
|
Department |
If the part is in a parts department, the name of the parts department displays here. |
|
Price Level |
This field displays the Level selected for the part.
|
|
Cost |
This is the Cost/Unit. |
|
Cost Plus Multiplier |
Displays the current cost plus multiplier. Type in a new Cost Plus Multiplier value in the field and click Apply to see the adjusted price.
|
|
Displays the current minimum profit margin set in Configuration. Type in a new Minimum Margin just for this part on this ticket in the field and click Apply to see the adjusted price. If the price is adjusted below the minimum margin, a warning message is displayed. If the cost or the shop's cost for a part is entered, the price is calculated to make the minimum profit margin. The profit margin, the multiplier, or the price per unit may be changed, and the other two fields are adjusted accordingly. |
|
|
Price |
Displays the current Price/Unit. Type in a new price in the field and click Apply to see the adjusted price. |
Oil Tab
When you add an oil part in the oil group to a ticket, the Oil tab appears at the bottom of the window, behind the Details tab. Click the Oil tab to view or edit oil information.
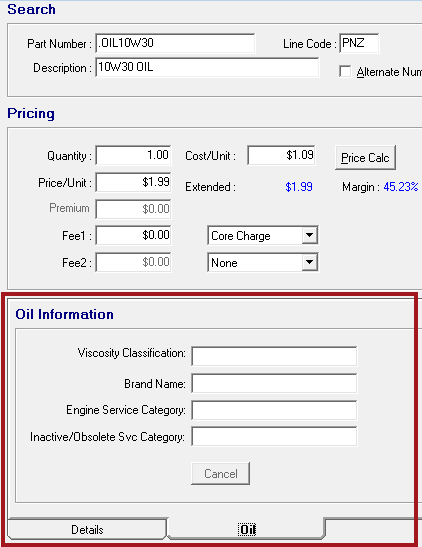
Oil information prints on estimates, work orders, and repair orders. For full details about how oil information prints, click the following link: Printing Oil Information.
Tire Tab
When you add a tire part in the tire group to a ticket, the Tire tab appears at the bottom of the window, behind the Details tab. Click the Tire tab to view or edit tire information. You can also click the Tire Info button in the Search section to open the Tire tab.
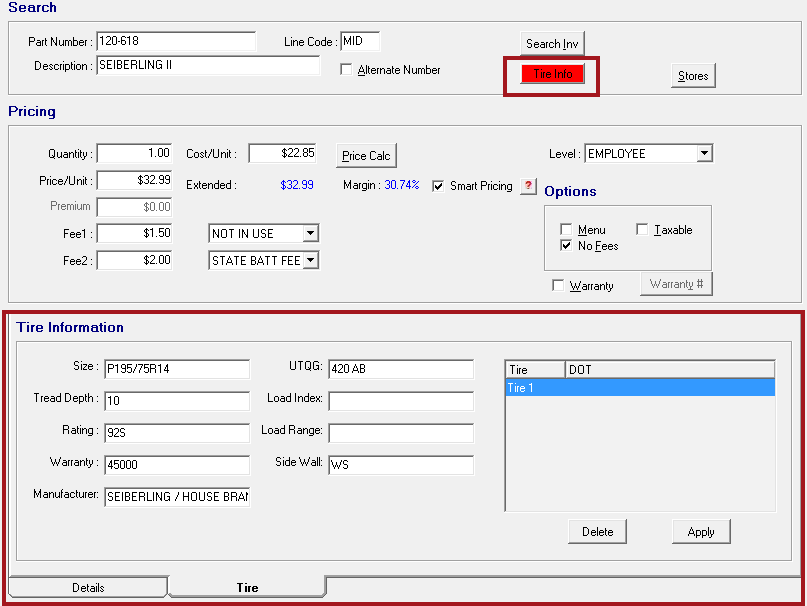
For more information, see Tire Parts on Tickets.
Buttons at the Bottom
The buttons appear at the bottom of the window, just below the tabs.

- Click the Cancel button to close the part without saving any changes.
- Click the Delete button to delete the part from the ticket.
- Click the Override button to unlock the pricing for the part. This re-activates locked fields and is usually password-protected.
- This button appears only if the part is price-locked; see Price Locking Parts.
- Click the Labor Guide button to access the Epicor labor categories.
- This button appears only if the Labor Lookup is selected for the labor in Configuration.
- Click the Next button to add the next part or move to the next labor item in the list.
- Click the OK button to save any changes and close the part.