Printing Repair Orders, Estimates, and Work Orders
Repair orders, estimates, and work orders each have their own format. Those formats are set in the Form Types Configuration setting. The form type determines how the estimate, repair order, and work orders look.
| To print | From | Click |
|---|---|---|
|
Estimates |
An open estimate |
|
|
Work Orders |
An open work order |
|
|
Repair Orders |
An open repair order |
|
|
Yes on the prompt to print the final repair order after the final payment is made. |
The Printing window opens displaying the available options.
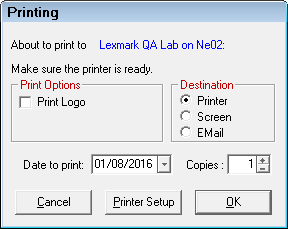
Destination Options
In the Destination section, you can choose to print
- To a physical printer
- To the screen (print preview)
- To an email (attaches a PDF to an email)
Printing Options for All Destinations
You must choose these options for printing to a printer, the screen, or email.
Print Date
The Date to Print field determines the date that appears in the "Date" field at the top of the document. Today's date is the default. Pick a new date if necessary.
NOTE: The print date is not necessarily the date of service.
Shop Header
The shop header from the software license prints at the top of each document automatically. (If you need to change the shop header, call your distributor to request a license change.)
Printing to a Printer
Complete these steps:
- Select Printer as the Destination.
- The About to Print to field displays the name of the default printer
- The default printer is selected in the Printer Locations setting.
- If this is the wrong printer, click the Printer Setup button and select the correct printer.
- Enter the number of Copies to be printed; 1 is the default.
- Click OK to print.
- The document prints to the printer.
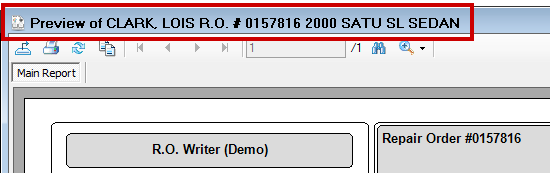
Printing to the Screen (Print Preview)
You would print to the screen to
- See the data on the screen.
- Preview the output so you can make corrections and run the report again.
Complete these steps:
- Select Screen as the Destination.
- Click OK to print.
- The Print Preview window opens displaying the ticket information in the title bar and toolbar.
Print Preview Toolbar
The toolbar at the top contains many options you can use to work with the document on the screen.
![]()
| Button | Name | Click to… |
|---|---|---|
|
|
Export |
Export the document to Excel, PDF, .CSV, or .XML. Anything in the print preview window can be exported to these formats. |
|
|
|
Print the document to a physical printer. You select the printer manually. |
|
|
Refresh |
Refresh the data on the screen. The ticket re-compiles and appears on the print preview window. |
|
|
Copy |
Copy one line of text you have selected. Click on a line in the document to select it and then click this button to copy the text. You can select only one line of text at a time. If you want to copy multiple lines of text, press and hold the CTRL button while you click on lines of text. |
|
|
Navigate |
Navigate through long documents.
|
|
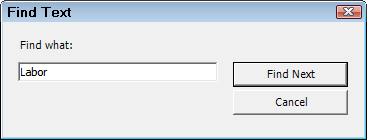
|
Find |
Search the document for specific words, numbers, or characters.
Click Find Next and the screen jumps to and highlights the found text. |
|
|
Zoom |
NOTE: This has no effect on the appearance of documents printed from this window. |
Printing to Email
Email appears in the Destination section only if email if properly configured in R.O. Writer.
Complete these steps:
- Select Email as the Destination.
- Click OK to print.
- Your default email program opens with the
- Document attached as a PDF.
- The customer's email address in the To line.
Printed Work Orders
Work orders include all parts, labor, and service checklist items included in the estimate or repair order. It is intended to be a working copy for the technician.
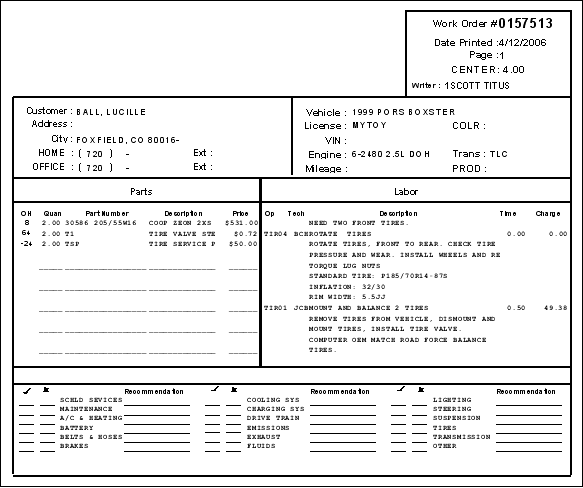
Work orders print in the non-job-based view:
- All parts are listed in the Parts section
- All labor is listed in the Labor section.
If the technician has to add any parts or labor during service, he or she can write them on the work order. The additional items may then be added to the estimate or repair order.
All Service Checklist items are printed across the bottom of the work order so that the technician can perform the inspections and list the results, including any recommendations.