Configuring R.O. Writer for Smart eCat
There are several steps to Smart eCat configuration.
In R.O. Writer Configuration:
- Step 1 - Put the Smart eCat Button in the Quick Launch
- Step 2 - Configure Smart eJobs
- Step 3 - Configure Supplier Interfaces
In Smart eCat Configuration:
This topic includes the basics of setting up access to and suppliers in Smart eCat. There are also Smart eCat Configuration Settings that enable you to customize more Smart eCat functionality.
Step 1 - Put the Smart eCat Button in the Quick Launch
You need to
- Activate Smart eCat and Smart eJob so these tools are available in the main R.O. Writer
- Smart eCat appears in the Catalogs section in the Quick Launch
 .
. - Smart eJobs appears as a button in the ticket toolbar
 .
.
- Smart eCat appears in the Catalogs section in the Quick Launch
- Configure how labor and Smart Jobs operate in Smart eCat.
Step 1a - Put Smart eCat in the Quick Launch
In the Configuration module, click File > General Options > Catalogs section > Smart eCat checkbox.
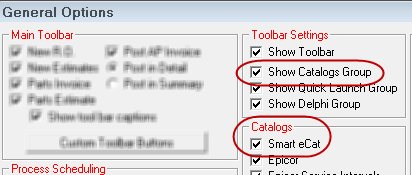
This makes the Smart eCat button appear in the Quick Launch in R.O. Writer.
Step 1b - Put Smart eJob in the Ticket Toolbar
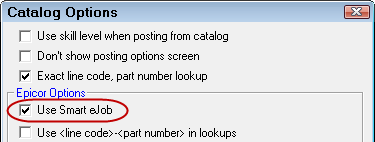
This makes the Smart eJobs button appear on the estimates and repair order toolbar . When clicked, Smart eCat opens to the Smart Jobs tab.
Step 2 - Configure Smart eJobs
R.O. Writer contains basic Smart Jobs for the services many shops provide. You can modify these jobs and create your own jobs in Configuration.
Smart eJobs appear in the Smart Jobs dropdown lists on the Smart Jobs tab in Smart eCat. For details, click the following link: Using Smart eJobs in Smart eCat.
Step 3 - Configure Supplier Interfaces
R.O. Writer has built custom electronic interfaces for the following suppliers in Smart eCat:
- Auto Value
- AutoZone
- Bumper to
Bumper - Federated Auto Parts
-
Web Warehouse - Motorcraft eCounter
- NAPA PROLink
- O’Reilly
- OEConnect RepairLink
- Transtar
- TurboParts
In the Configuration module, you need to
- Create the Suppliers.
- Add a supplier interface to the supplier with the credentials the supplier requires.
To watch a training video about how to create suppliers for Smart eCat, click the following link: Configuring Suppliers for Smart eCat.
Step 4 - Add Supplier Coverages to the Smart Buy List
To use integrated searches in Smart eCat, you need to do the following in Smart eCat Configuration:
- Create a coverage for the supplier in Smart eCat Configuration.
- Add the supplier coverage to the Smart Buy list.
To Add Supplier Coverages to the Smart Buy List
Complete these steps:
- In the R.O. Writer module, click the Smart eCat button in the Quick Launch .
- Click the Configure button
 . The Catalog tab opens displaying the Smart eCat configuration tab windows. The Smart Buy Tab appears first.
 - Click the Coverages Tab to configure a coverage for each supplier.
- On the Smart Buy Tab, select the coverage and click the left arrow
 to select it for the Smart Buy list.
 -
Make sure the box for the coverage is checked so that the coverage is searched when the Smart Buy coverage is searched.
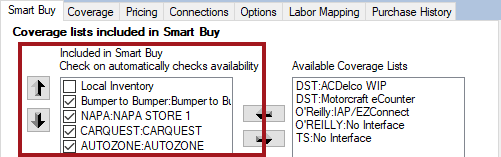
- Close Smart eCat.
Step 5 - Configure a Local Inventory Coverage
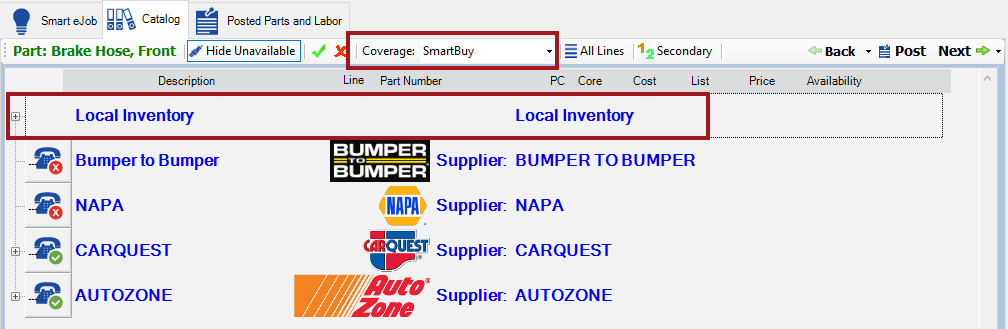
You want to make sure that you configure Smart eCat to search for parts in your local inventory first. After all, it's a waste of money to order parts that you already have in stock.
Smart eCat searches only the part lines in the local inventory coverage, not your entire local inventory. If parts are in your local inventory but not active in the local inventory coverage, that part is not included in integrated searches.
Step 5a - Create a Coverage for Local Inventory
Your local inventory coverage should include the part lines and manufacturers you stock (Step 9 below).
NOTE: You follow the same steps to edit an existing local inventory coverage. The only difference is that you would select an existing supplier and select Local Inventory as the supplier.
Complete these steps:
- In Smart eCat, click the Configure toolbar button > Coverages tab.
- Click the Add/Edit Coverages button. The Select Supplier window opens. This is a wizard that installs with Epicor. Click Next to move through the wizard.
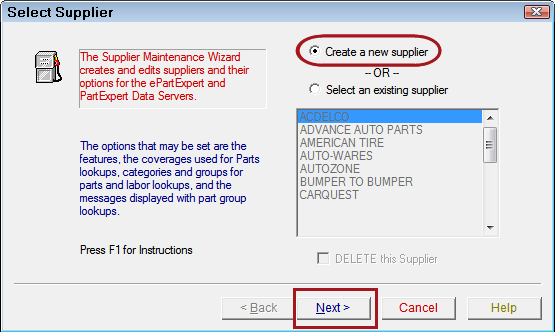
-
Select Create a New Supplier.
-
You need to create a supplier for your local inventory because it does not show up as an existing supplier.
-
If you need to edit the local inventory coverage, check Select an Existing Supplier and select the Local Inventory coverage in the supplier list.
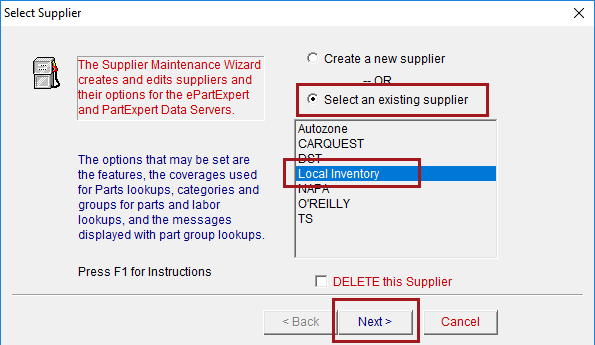
The rest of the steps are the same.
-
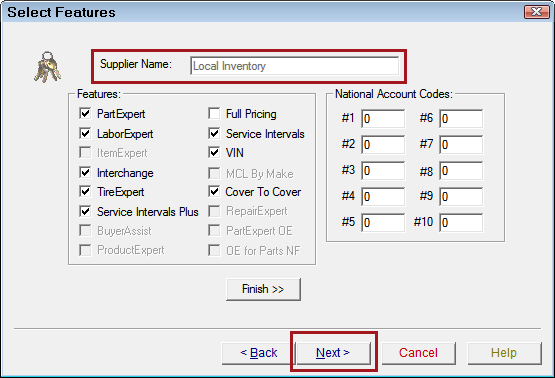
- Click Next. The Select Features window opens.
- Type "Local Inventory" in the Supplier Name field and select the Features.
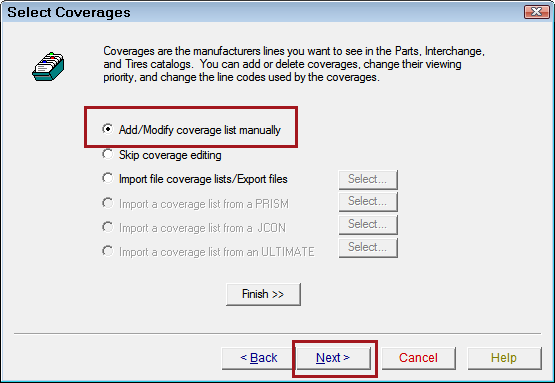
- Click Next. The Select Coverages window opens.
-
Select Add/Modify Coverage List Manually to select part lines that you stock on your shelf and click Next.
-
The Setup Coverages window opens displaying your inventory in the Manufacturers box.
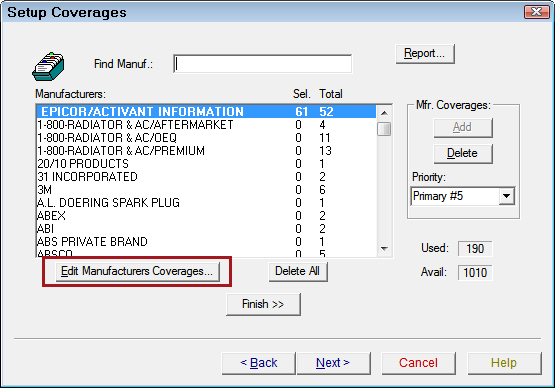
- Select EPICOR/ACTIVANT INFORMATION for the Local Inventory coverage.
- To add all items from a manufacturer, select the manufacturer in the list and click the Add button.
- To enable and disable lines for individual manufacturers,
- Select the manufacturer and click the Edit Manufacturers Coverages button. The Manufacturer Edit window opens over the Setup Coverages window.
Items in bold are enabled, which means Smart eCat can find them during integrated searches.
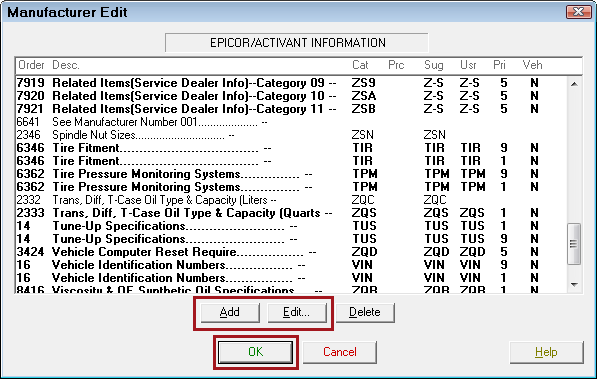
To enable items, select them and click the Add button. The items turn bold to indicate that they are enabled.
To disable items, select them and click the Delete button.
Click the OK button to save all changes.
The Manufacturer Edit window closes.
-
On the Setup Coverages window, click Next. The Category/Group Select window opens.
-
Select Add/Modify Categories and Groups Manually.
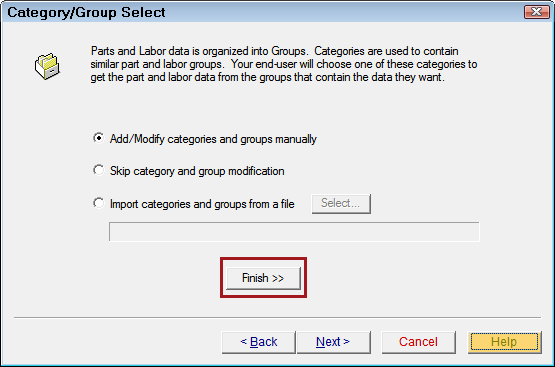
-
Click Finish. The Finish Supplier window opens.
-
Review the tasks in the top section of the screen.
-
If something doesn't look right, click the Back button to move back through the wizard screens and change your selections.
-
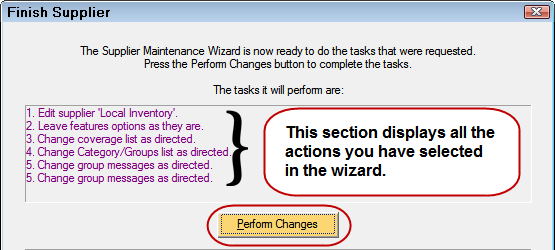
- Click the Perform Changes button. The tasks are processed.
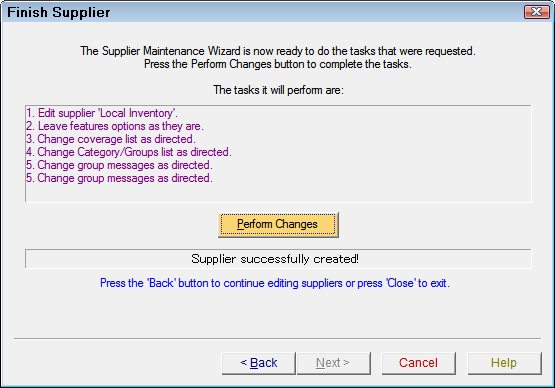
- When "Supplier successfully created!" appears, click the Close button to exit.
- Your Local Inventory coverage now appears in the Available Coverages List on the Smart Buy tab.
Step 5b - Add the Local Inventory Coverage to Smart Buy List
To include parts in your local inventory in integrated searches, you must add the local inventory coverage to the Smart Buy list. The local inventory coverage should be first in the list and be unchecked.
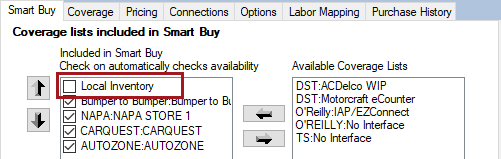
NOTE: Checked coverages search the supplier coverages over the Internet. Unchecked coverages search only your local data.
When Smart eCat is configured this way,
- Local inventory results always appear first in the list.
- Suppliers appear in the same order as they appear in the Smart Buy list.
Step 5c - Add the Local Inventory Coverage to the Smart Buy List
Complete these steps:
- In Smart eCat Configuration, on the Smart Buy tab, click the left arrow button to move the Local Inventory coverage to the top of the Included in Smart Buy column.
- Leave it unchecked so that Smart eCat checks your local inventory and does not search online. (Remember, this is your local inventory, so Smart eCat should not dial out to search it.)