Smart eCat Configuration Settings
When you click the Configure toolbar button ![]() , the Catalog tab shows the Configuration tabs for Smart eCat:
, the Catalog tab shows the Configuration tabs for Smart eCat:
- Smart Buy Tab
- Coverages Tab
- Pricing Tab
- Connections Tab
- Options Tab
- Labor Mapping Tab
- Purchase History Tab
Smart Buy Tab
The Smart Buy list allows Smart eCat to search multiple suppliers at the same time. The Smart Buy is the default coverage selected for integrated searches.
Smart Buy is a coverage that includes
- Your local inventory coverage.
- Other supplier coverages.
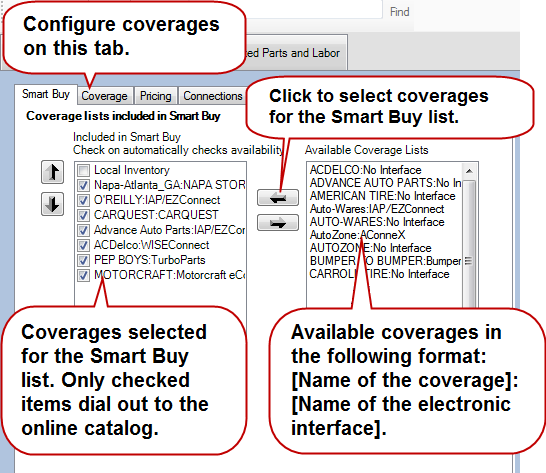
Use the left arrow  to add supplier coverages to the Smart Buy list.
Use the right arrow  to remove supplier coverages from the Smart Buy list.
Smart Buy List
The Includes in Smart Buy section displays the supplier coverages in the Smart Buy list.
- Only checked items in this list dial out to the supplier's online catalog.
- Unchecked coverages are not searched when the Smart Buy coverage is searched.
- The sequence of coverages in this section determines the sequence of supplier sections on the Catalog tab.
- Use the up
 and down
  arrows to determine the sequence.
- Use the up
Available Coverages Section
The Available Coverage section displays all the supplier coverages that are configured.
The name of coverage is in the following format: [Coverage name]: [Interface name].
- The coverage name is the name assigned when the coverage was created on the Coverages tab in Smart eCat Configuration.
- The interface name is the name assigned to the supplier interface in R.O. Writer Configuration.
- "No Interface" means there is no supplier interface configured. Do not select these for the Smart Buy coverage.
Coverages Tab
A coverage is a grouping of part lines from the suppliers and the manufacturers they work with.
On the Coverage tab, you
- Assign coverage lists to the suppliers configured with interfaces.
- Import coverages.
- Add new coverages.
- Edit existing coverages.
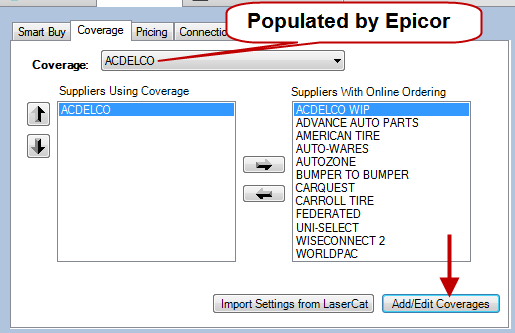
- Suppliers With Online Ordering — This section contains all suppliers that have an electronic interface configured in R.O. Writer Configuration.
- Add/Edit Coverages button — Click to open the Supplier Maintenance Wizard where you create, edit, and delete coverages for Smart eCat.
NOTE:
To Import a Coverage from a Supplier
In this scenario, either the supplier has sent you or you have obtained the supplier's MCL file and stored that MCL file on a hard drive the current computer can access.
Complete these steps:
- On the Coverages tab, click the Add/Edit Coverages button to open the Supplier Maintenance Wizard.
- On the Select Coverages screen, select the Import a Coverage List/Export Files option.
- Click the Select button.
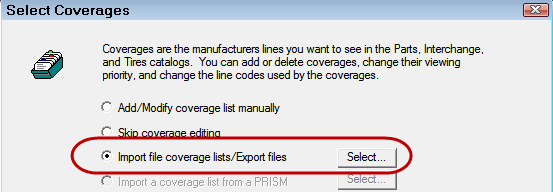
- On the Import/Export Coverages popup window, navigate to the MCL file and select it.
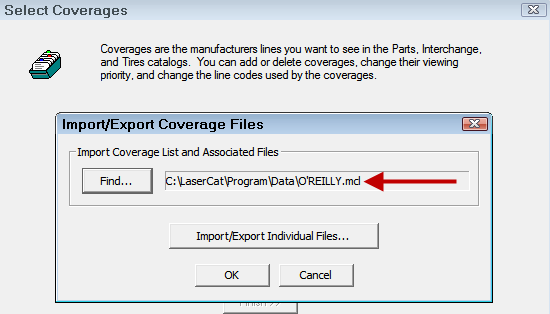
- Click OK to import the file.
To Create a Coverage for a Supplier
You need to configure a coverage for a supplier when you do not have the supplier's MCL file.
Complete these steps:
- On the Coverages tab, click the Add/Edit Coverages button to open the Supplier Maintenance Wizard.
- On the Select Coverages screen, select the Add/Modify Coverage List Manually option and click Next.
- On the Select Supplier, select the Existing Supplier option and the supplier in the list.
- Click Next and the coverage wizard takes you through the steps of creating a coverage.
- You need to choose the features and, most importantly, the part lines for each supplier.
- On the Finish screen, click Perform Changes and the supplier is configured.
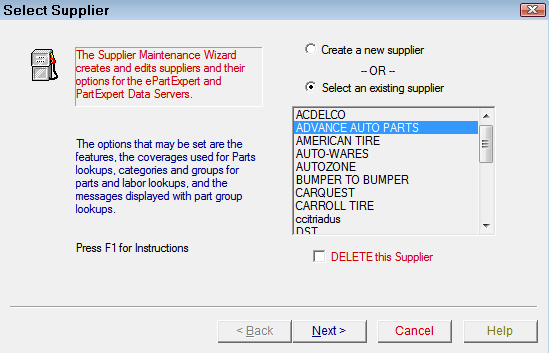
To Edit a Supplier Coverage
You can edit only one supplier at a time.
Complete these steps:
- On the Coverages tab, click the Add/Edit Coverages button to open the Supplier Maintenance Wizard.
- On the Select Coverages screen, select the Add/Modify Coverage List Manually option and click Next.
- On the Select Supplier, select the Existing Supplier option and the supplier in the list.
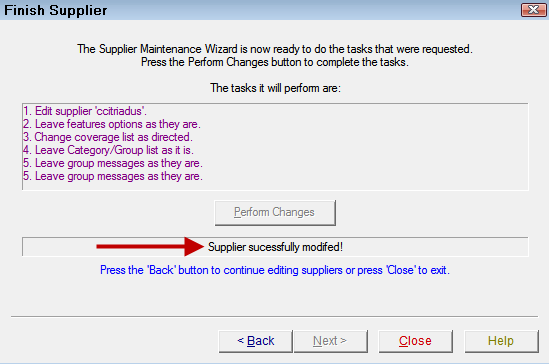
- The wizard moves you through the windows.
- Make changes where you need to.
- Click Finish on any window or after you complete each window, the Finish Supplier window opens listing your edits in the top half of the window.
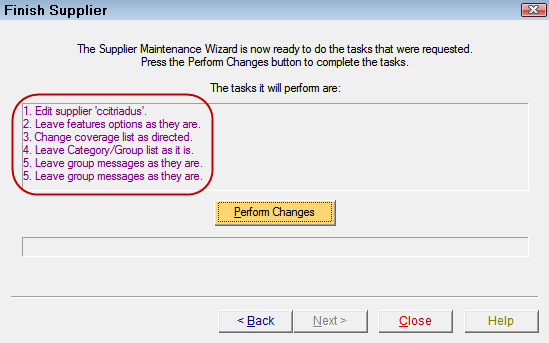
- Click Perform Changes and the supplier is edited.
- When the process is complete, the bottom section says, "Supplier successfully modified!"
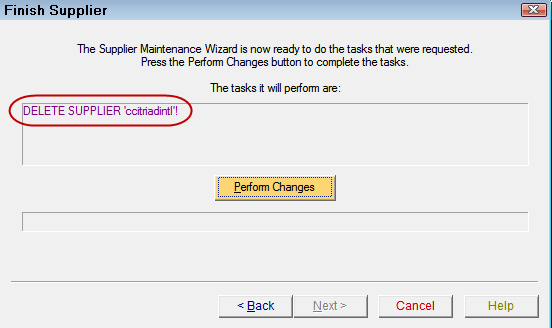
To Delete a Coverage
Complete these steps:
- On the Coverages tab, click the Add/Edit Coverages button to open the Supplier Maintenance Wizard.
- On the Select Coverages screen, select the Add/Modify Coverage List Manually option and click Next.
- On the Select Supplier, select the Existing Supplier option and the supplier in the list.
- Check DELETE This Supplier.
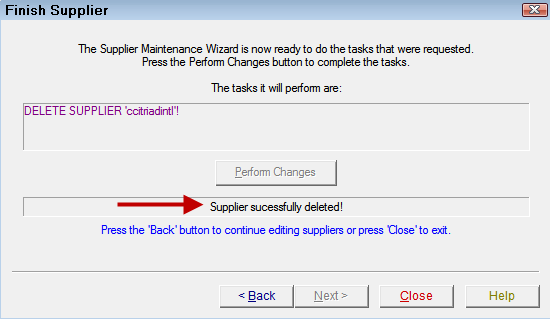
- Click Next. The Finish Supplier window opens displaying that the supplier is to be deleted in the top section of the screen.
- Click the Perform Changes button and R.O. Writer deletes the supplier. The bottom section of the window says, "Supplier successfully deleted!"
To Assign Suppliers to Your Coverage Lists
You need to assign suppliers that are configured for electronic ordering to a coverage list in Smart eCat.
Complete these steps:
- Select the Coverage in the dropdown list.
- In the Suppliers with Online Ordering section, select the supplier.
- Click the left arrow to associate it with the selected Coverage.
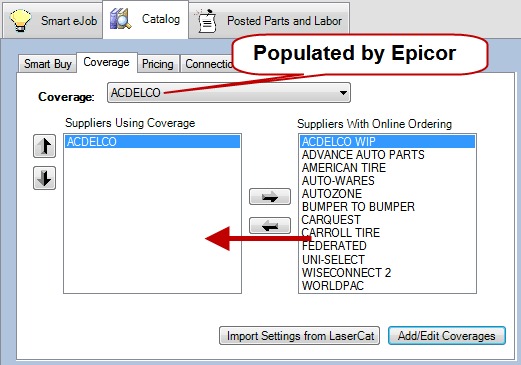
NOTE: Each supplier can be assigned to only one coverage. If you assign a supplier to a second coverage, the supplier is removed from the first coverage.
To Import Settings from LaserCat
Smart eCat does not use the coverages set up in LaserCat. You can import the LaserCat settings by clicking the Import Settings from LaserCat button on the Coverages tab.
You are notified that the coverages will be deleted and asked to confirm the deletion.
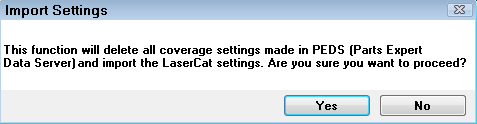
WARNING! Clicking Yes will delete all existing coverages already configured in PEDS. Only the Epicor coverages are affected. Coverage lists in Smart eCat but not in Epicor remain intact.
Changes made to coverages in Smart eCat cannot be exported back to Epicor.
If you plan to use the imported coverages from LaserCat, in Smart eCat, you need to reassign suppliers to the imported coverages.
Pricing Tab
On the Pricing tab, you
- Mark up the catalog list price for each coverage list.
- Determine how the retail price is calculated for each supplier.
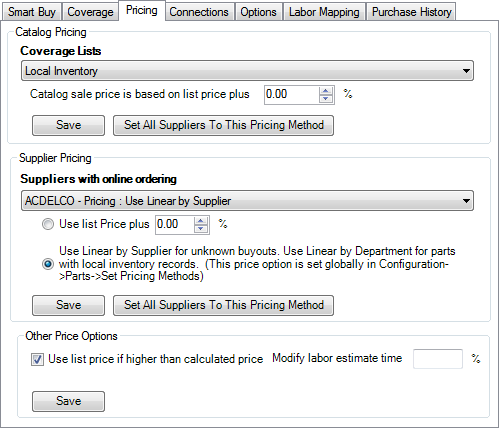
Catalog Pricing
Catalog pricing is applied to the suggested List price in Epicor when there is no electronic connection available or a part comes back from a vendor unavailable.
To mark up the list price for a selected coverage, select the coverage in the Coverage Lists dropdown list. Then, then enter the percentage to add.
Click Save to choose this method for the selected coverage.
Click Set All Suppliers to This Pricing Method to save this percentage for all coverage lists.
Supplier Pricing with Online Ordering
Supplier pricing is applied after a vendor has been queried and returned a cost and suggested List price.
Select the supplier using the dropdown, Then, select the option that determines the retail price posted to the ticket.
- Use List Price plus X% adds the percentage entered to the list price.
- Use the default matrix set as the pricing method for outside purchases.
Click Save to save the selected pricing option for the supplier selected in the dropdown list.
Click Set All Suppliers to This Pricing Method to save the selected pricing option for all suppliers with online ordering.
Other Price Options
Use List Price if Higher Than Calculated Price — Check to post the list price to the ticket if the list price is higher than the calculated price.
Modify Labor Estimate Time — Enter the percentage of time to add to labor times posted to the tickets. For example, "10" increases labor time by 10%.
- If you pay technicians on a flat rate, increasing labor time increases the technician's pay.
- Leave this field blank to use the labor at book time.
Connections Tab
This screen includes options when using Smart eOrder.
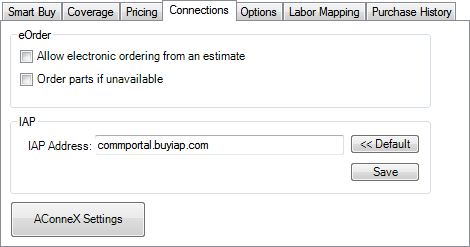
Allow Electronic Ordering from an Estimate
If this option is selected, you can use Smart eOrder to order parts for an estimate. If not selected, you can only order parts for a repair order.
Order Parts if Unavailable
This option determines how Smart eCat handles parts that are unavailable after you click the Check Price and Availability button on the Parts tab.
When selected, unavailable parts are highlighted in bold. The parts are ordered when the truck button is clicked.
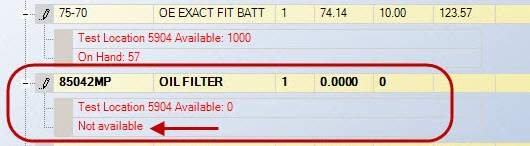
When not selected, unavailable parts are grayed out. Parts are not ordered when the truck button is selected.
IAP
Configure the Using IAP/EZConnect in eOrder COM portal address from either Smart eCat or eOrder. Click the Default button to change the URL back to the default and click the Save button to save changes.
AConneX Settings Button
AConneX setup is part of Smart eCat configuration.
Options Tab
The settings on the Options tab determine the default behavior in Smart eCat. You must click the Save button at the top of the window to save these settings whenever you make changes. When you click Save, the changes apply immediately.
The top half of the Options tab is as follows:

The sections in the top half of the Options tab are as follows:
- Limit Catalog Searches to Current Vehicle and Coverage
- Default Coverage
- Default Posting
- Parts Coverage Groups
- Standard Categories
- Cover to Cover
The bottom half of the Options tab is as follows:

The sections in the bottom half of the Options tab are as follows:
- Smart eCat Default Labor Options
- Smart eJobs Default Labor Options
- Service Intervals Labor Options
- Smart Oil Default Labor Options
- Automatically Post Specifications
Limit Catalog Searches to Current Vehicle and Coverage
Select this checkbox to limit catalog searches to only parts and labor that match the selected vehicle and coverage list.
Default Coverage
The Default Coverage dropdown list allows you to select smart buy or a specific coverage as the default for catalog part searches. Use the dropdown list to select the default coverage.
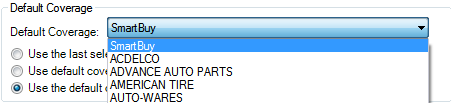
|
Setting |
Description |
|---|---|
|
Use the Last Selected Coverage When the Catalog Starts |
The last coverage used is automatically selected the next time you access the catalog. |
|
Use Default Coverage When the Catalog Starts |
The default coverage is selected every time you access the catalog. |
|
Use the Default Coverage for Every Query |
The default coverage is used every time a query is made, even if a different coverage was selected originally. |
Default Posting
These options determine which posting option is selected by default on the Posted Parts and Labor tab.
Check Do Not Update Prices if the prices have changed since the parts were posted to the repair order; existing prices are not updated.
Parts Coverage Groups
Add the Coverage Description to the Part Group — Display the description for each group as in the example below.

Display the Coverage Description When Hovering on Part Group — Does not display the description unless you hover your cursor over the group name as in the example below.
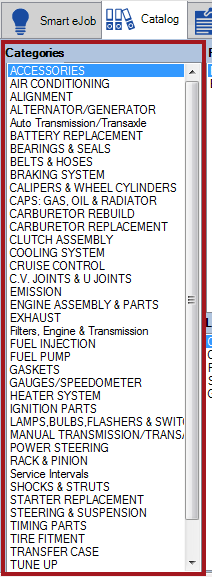
Standard Categories
This setting determines if the standard Categories column shows the Jobber categories or the Dealer categories. You must select either Jobber or Dealer; you cannot select both.

Checking Jobber shows the 12 jobber categories:

Checking Dealer shows the 42 dealer categories (selected by default):
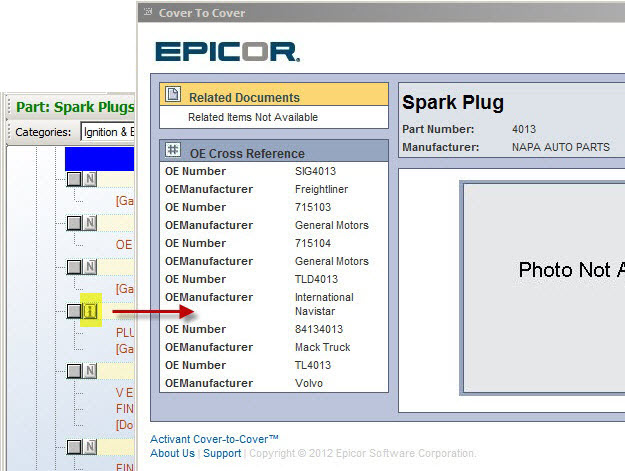
Cover to Cover
Check Use Supplier Information in Favor of Cover to Cover to display the part information from the supplier (when available) instead of Cover to Cover information from Epicor.
When there is part information from the supplier, and N button appears on the part line in the integrated search results.
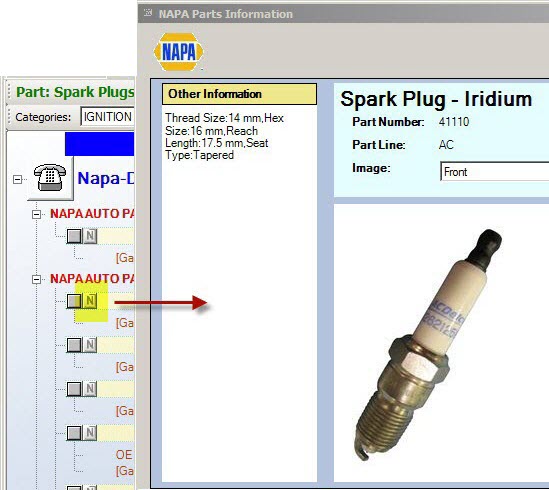
When this checkbox is not selected, the Cover to Cover information displays:
Smart eCat Default Labor Options
Select the default labor option selected on the Posted Parts and Labor tab when posting labor to open tickets.
The labor option determines
- The name of the labor line in the Jobs section on the Parts/Labor tab.
- The information that posts to the labor description, which prints on the final invoice to the customer.
The Smart eCat Default Labor Option selected determines which labor option is selected by default for regular labor.
You can select from the following options:
- Use Predefined Description
- Posts and prints only the labor description.
- Append to Predefined Description
- Replace Predefined Description
Smart eJobs Default Labor Options
Select the default labor option selected on the Posted Parts and Labor tab when posting labor to open tickets.
The labor option determines
- The name of the labor line in the Jobs section on the Parts/Labor tab.
- The information that posts to the labor description, which prints on the final invoice to the customer.
The Smart eJob Default Labor Option selected determines which labor option is selected by default for Smart eJobs.
You can select from the following options:
- Use Predefined Description
- Posts and prints only the labor description.
- Append to Predefined Description
- Replace Predefined Description
Service Intervals Labor Options
Select the default labor option selected on the Posted Parts and Labor tab when posting labor to open tickets.
The labor option determines
- The name of the labor line in the Jobs section on the Parts/Labor tab.
- The information that posts to the labor description, which prints on the final invoice to the customer.

You can select from the following options:
- Use Predefined Description
- Append to Predefined Description
- Replace Predefined Description
- Recommended as the default for service intervals.
For more details and examples, click the following link: Step 4 - Select the Labor Options.
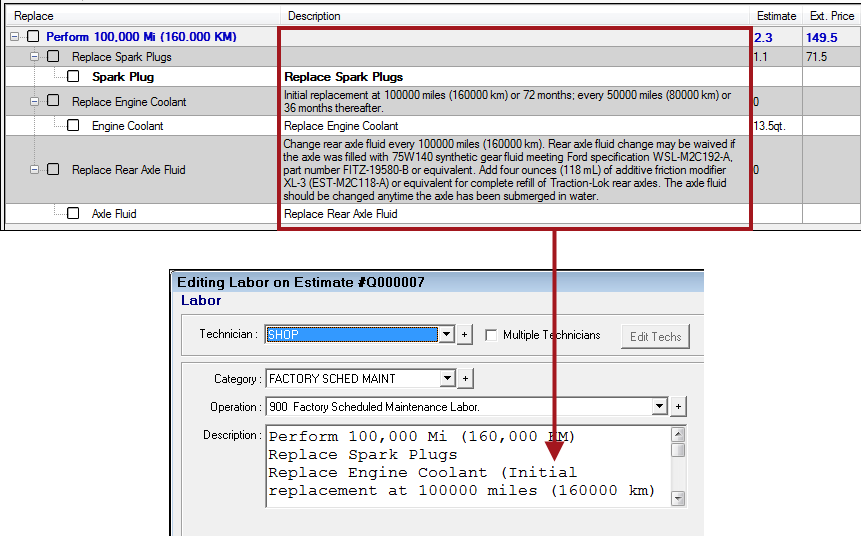
Post All Service Interval Details
The Post All Service Intervals Details box determines if the content in the Description columns on the Service Details Window post to the open ticket along with the contents of Replace and Inspect columns.
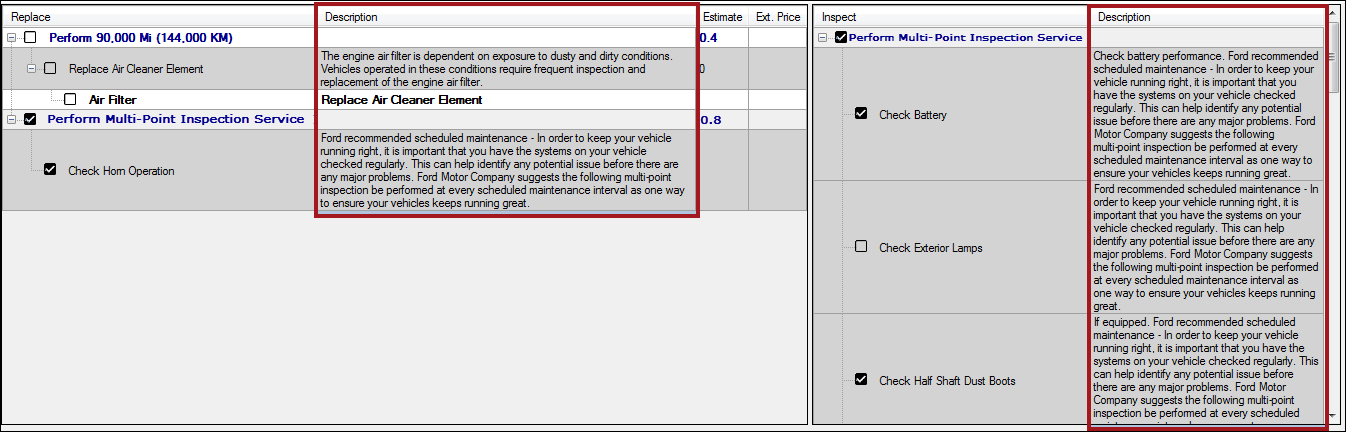
The Description columns for services and inspections contain details of the labor and can be quite long as a result. For this reason, the Post All Service Intervals Details box is unchecked by default.
NOTE: The content of the Replace and Inspect column post to the Description box only if you append or replace the predefined labor description when posting the service.
-
When the Post All Service Intervals Details box is unchecked, only the content of the Replace and Inspect columns post to the Description box of the labor operation.
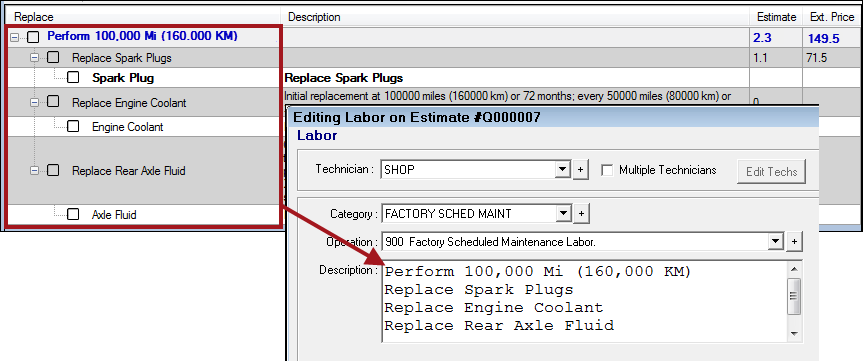
- When the Post All Service Intervals Details box is checked, the content of the Description columns is posted to the Description box of the labor operation.
Smart Oil Default Labor Options
Select the default labor option selected on the Posted Parts and Labor tab when posting labor to open tickets.
The labor option determines
- The name of the labor line in the Jobs section on the Parts/Labor tab.
- The information that posts to the labor description, which prints on the final invoice to the customer.
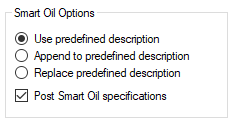
R.O. Writer recommends selecting Use Predefined Description and Post Smart Oil Specifications.
Post Smart Oil Specifications
This setting determines if the Epicor specifications are posted to the labor description.
- Check Post Smart Oil Specifications to always post the Epicor specification information to the labor description regardless of the selected labor option.
For example, if you select Use Predefined Description as the labor option - which normally does not post Epicor specifications - the Epicor information still posts. The full labor description always prints on the customer invoice.
- Uncheck Post Smart Oil Specifications to not post the Epicor specification information when Use Predefined Description is selected as the labor option.
Labor Options
The labor option selected determines
- The name of the labor line in the Jobs section of the posted labor.
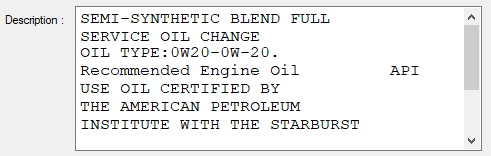
- If the Epicor specification information for oil type, capacity, viscosity, and drain plug torque posts to the Description box of the posted labor.
R.O. Writer recommends selecting Use Predefined Description and Post Smart Oil Specifications.
|
Labor Option |
Sets the name of the posted labor line as… |
Posts the following to the labor description… |
|---|---|---|
|
Use Predefined Description |
The name of the Smart Oil job.
|
The labor description content of the Smart Oil job only.
The Epicor specifications do not post to the labor description when Use Predefined Description is selected unless Post Smart Oil Specifications is checked in Smart eCat Configuration. |
|
Append to Predefined Description |
The name of the Smart Oil job. |
The labor description content of the Smart Oil job with the Epicor specification information added to the end of the description. |
|
Replace Predefined Description |
The Epicor description. |
The Epicor specification information only. The Smart Oil job description does not post at all. |
NOTE: If Post Smart Oil Specification is checked, the Epicor specifications always post with the labor, regardless of the labor option selected.
Automatically Post Specifications
When Automatically Post Specifications is checked, the Epicor specifications for catalog parts and labor are selected automatically when they appear in Smart eCat.
If you leave the specifications checked:
- The specifications post to the Notes Tab of the Posted Parts and Labor tab automatically.
- When the labor is posted to a ticket, the specifications are added to the description of the labor, which also prints on the customer invoice.
You can uncheck the specifications before clicking the Next  toolbar button.
Labor Mapping Tab
You can map Epicor descriptions to R.O. Writer categories and/or operations. When you post a mapped Epicor description to a ticket, the R.O. Writer category and/or operation posts. Mapping can help you track sales by labor category better, which helps you design better marketing campaigns.
In most cases, you should map only to a category and a labor operation only in certain cases.
For each Epicor Labor Guide Group, select the R.O. Writer Labor Category and/or Operation using the dropdown lists.

Click Save to save your changes.
NOTE: Keep in mind that when you have configured external labor to be price-locked, the price lock status of the mapped R.O. Writer labor will be used when the Epicor labor is posted to the ticket.
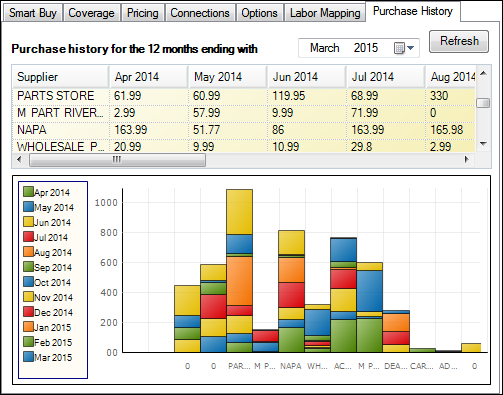
Purchase History Tab
The Purchase History tab displays the dollar amount purchased online through Smart eCat from each supplier for 12 months. Select the ending month and year and click the Refresh button. The dollar amount per month displays as well as a graph.