Create New Smart Oil Jobs
You need to create new Smart eJobs configured to use Smart Oil. First, decide how many jobs you will need for your business. Please review the following topic before proceeding: Where to Begin.
The process consists of the following steps:
Step 1 - Create New Smart Oil Jobs
Step 2 - Add Engine Oil as the Smart Fluid (This step involves linking parts to Epicor viscosities.)
Optional Step - Add Oil Filter to the Labor Guide Section
Prerequisite for Smart Fluids
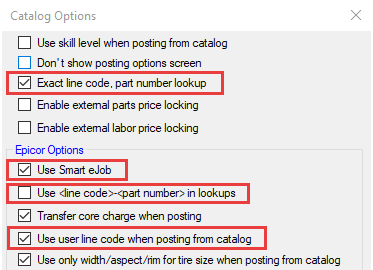
Smart Fluids requires that Catalog Options (Configuration > Configuration menu > Repair Order > Catalog Options) must be set as described below.
The following boxes must be checked:
The following box must be unchecked:
Step 1 - Create New Smart Oil Jobs
You create new Smart Oil jobs the same way you create any Smart eJob on the Edit Smart Job window. There are some extra options on the window specific to Smart Oil functionality.
You may want to create new labor operations first and map your Smart Oil jobs to those new operations if you use the following:
To Create New Smart Oil Jobs
Complete these steps:
- In Configuration, click Configuration menu > Labor > Smart Jobs. The Edit Smart Jobs window opens.
- Select the Job Category in the dropdown list.
- To create a new category for Smart Oil, click the plus button and create it.
- To use an existing category, select it from the Job Category dropdown list.
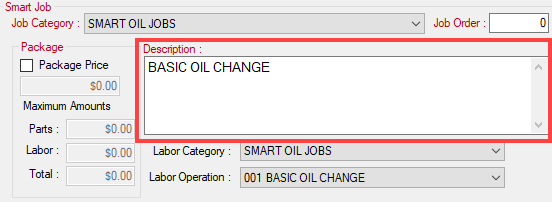
- Click the Add button. The Edit Smart Jobs window opens with the Job Category already selected.
- Type in a Description for the new job. You do not need to specify the viscosity in the Description field.
- The viscosity is posted to the Description with the Epicor specifications automatically when the job is posted to a ticket.
- The part number may also contain the viscosity.
- Type in a Job Order.
- If you leave the Job Order blank, R.O. Writer assigns the job order when you save the job.
- If you to use a package price for this job, check the Package Price box and enter the values.
- You can also set a Minimum Price for the job.
- Associate the new Smart Oil job with a Labor Category and/or a Labor Operation.
- The Labor Operation label is a hyperlink that gives you direct access to the labor operation.
- The associated labor impacts your labor reporting but is not required to save the job as a Smart Oil job.
-
You can
-
Continue to add Engine Oil as the Smart Fluid in Step 2.
-
Click OK to save your changes so far. This closes the Smart Job. You will need to re-open it to proceed to Step 2.
-
Job Category
Smart Job Categories appear in the dropdown list on the Smart eJob tab in Smart eCat. However, Smart Oil jobs do not appear in the Smart Job list within that category.
If the new Smart Job Category contains only Smart Oil jobs, the Smart Job dropdown list is empty when the new Smart Job Category is selected.
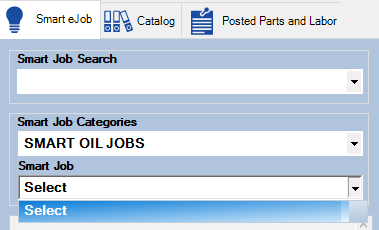
Smart Oil jobs appear only in the Smart eJob dropdown list on the Smart Oil tab.
TIP: If you would like to create a new Smart Jobs Category for Smart Oil jobs, you might want to consider making the category inactive so that it doesn't appear in the Smart Job Categories dropdown list on the Smart eJob tab. However, you should also consider how you report on your Smart Job Categories before inactivating the Smart Job Category.
Step 2 - Add Engine Oil as the Smart Fluid
You configure the job for Smart Oil in the Smart Fluids section.

To Add and Map Oil Viscosities to the Smart Oil Job
Complete these steps:
- Open the Smart Oil Job.
- In the Smart Fluids dropdown list, select Engine Oil. This activates the rest of the settings in the Smart Fluids section.
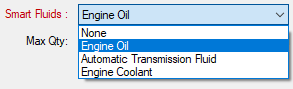
- Click the Configure button. The Smart Fluids Setup window opens for Engine Oil.
- Link oil parts to Epicor viscosities for this job.
- For full instructions on this step, click the following link: Link Epicor Viscosities to Inventory Parts.
- After you have linked all parts for the job, click the Close button on the Smart Fluids Setup window.
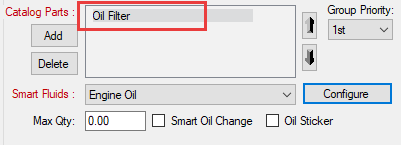
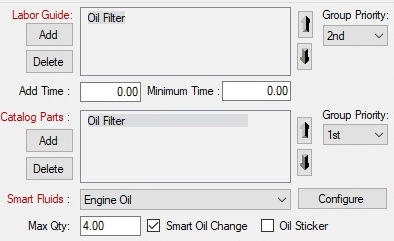
- You are returned to the Edit Smart Jobs window where you will see the following:
- Engine Oil is selected as the Smart Fluid.
- The Group Priority of Catalog Parts section is set to 1st.
Oil Filter appears in the Catalog Parts section.
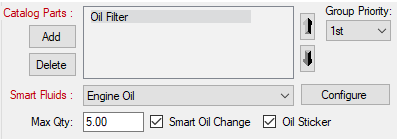
- In the Max Qty field, type in the maximum quantity for the job.
- Check the Smart Oil Change box. (Required)
-
The Smart Oil Change box must be checked to mark the job as a Smart Oil job. This puts the job in the Smart eJob dropdown list on the Smart Oil tab.
-
Check the Oil Sticker box if you want to print an oil sticker for this job.
- Click OK to save the Smart eJob as a Smart Oil job.
NOTE: You can add other items to the job as you would for any other job; however, the settings in the Smart Fluids section are the settings you need specifically for Smart Oil jobs.
Maximum Quantity
The Max Qty field is where you enter what you want the maximum quantity to be for this job.
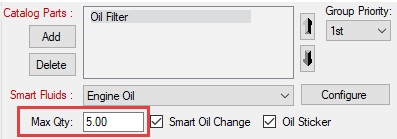
The number you enter applies to both liters and quarts on the Smart Oil tab.
The vehicle may require more than the maximum quantity number you enter for the job. That additional fluid will be added to the job depending on the package price setting.
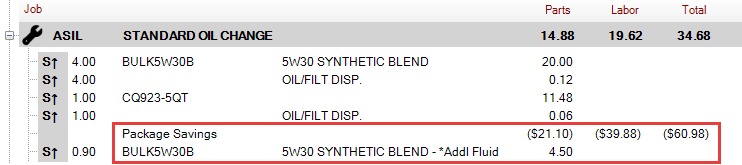
When the job has a package price, the additional fluid is added as a separate part line. " - *Addl Fluid" is added to the end of the part description. The price of the additional fluid is added to the part total, in addition to the package price.
When the job does not have a package price, the additional fluid is added as a separate part line. "- *Addl Fluid" is the part description. The price of the additional fluid is added to the part total.

NOTE: The *Addl Fluid part is always the final part of the job line in the Jobs section and on the printed customer invoice.
If you set the Max Qty to zero ("0.00"), the quantity is considered unlimited. Additional fluid is then added to the overall quantity of the part, even if package pricing is turned on.

If the job has a Minimum Price, the Max Qty is set to zero and disabled.
Smart Oil Change Box
The Smart Oil Change box must be checked to mark the job as a Smart Oil job. This puts the job in the Smart eJob dropdown list on the Smart Oil tab.
Oil Sticker Box
The Oil Sticker box functions the same way for Smart Oil jobs as it does for any other oil change job. If you want to print an oil sticker when you finalize the repair order, check the Oil Sticker box.
Oil Filter as a Catalog Part
After you link the parts and return to the Edit Smart Jobs window, the Oil Filter part has been added to the Catalog Parts section automatically.
Smart eCat will launch an integrated catalog search for the matching oil filter after the parts are selected on the Smart Oil tab. If the matching oil filter happens to be in your local inventory, the oil filter part appears in the Local Inventory section of the integrated search results.
Most oil changes require an oil filter; however, there are so many different oil filters for vehicles that many shops do not stock the required oil filters for every vehicle. As a result, Smart Oil jobs are designed to search for oil filters as an outside purchase.
Optional Step - Add Oil Filter to the Labor Guide Section
Adding Oil Filter to the Catalog Parts section adds only the part but not the time. If want to add the Epicor time for changing the oil filter to the job, add Oil Filter to the Labor Guide section.
When the Labor Guide includes an oil filter, Smart eCat asks you to select the oil filter labor while processing the Smart Oil job.

NOTE: The Group Priority on the Labor Guide and Catalog Parts sections determines when Smart eCat asks you to select the oil filter labor. For Smart Oil jobs, the Catalog Parts section should be first.
Optional Step - Deactivate Your Original Oil Changes
After you have tested all your new Smart Oil jobs to ensure they are working properly, you may want to deactivate your original oil change Smart eJobs. This way, only Smart Oil jobs are used when building tickets.
Complete these steps:
- Launch R.O. Writer Configuration.
- Click Configuration menu > Labor > Smart Jobs.
- Select an old oil change job and click the Edit button.
- Double-click the Smart Job to edit it.
-
Select the Inactive radio button and click OK.

- The Smart Job still exists in your database but no longer displays on the Smart eJobs tab in Smart eCat.
The topics in this section include: