Adding Labor Operations
To add labor to an estimate or repair order, click the Labor button ![]() in the ticket toolbar.
in the ticket toolbar.
Select the Category and the Operation in the dropdown lists.
Click OK to accept and close.
NOTE: R.O. Writer already contains the most common labor categories and labor operations already loaded in the system. You can modify or create labor operations in Configuration.
Navigating the Editing Labor Window
Use the tab keys to move between fields.
When entering prices or labor times, the numbers are entered starting with the right hand side of the field. For example, entering "1" results in ".01" in the field.
- To enter one dollar ($1), you can either type "100" or "1."
- To enter one (1) hour, you can either type 100 or "1."
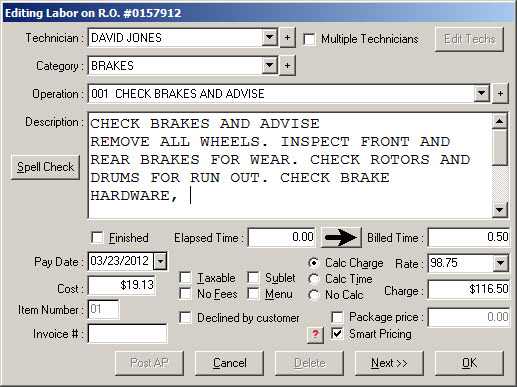
Editing Labor Window
This section describes the fields and options on the Edit Labor window.
Technician
Select the technician doing the job from the dropdown list. You can assign multiple technicians to one labor operation.
If the desired technician does not appear in the list, modify the list by clicking the ![]() button and adding a technician.
button and adding a technician.
It is not absolutely necessary to select a technician but desirable from a labor accountability standpoint.
Category
Select the appropriate labor category from the dropdown list. If the desired category does not appear in the list, modify the list by clicking the "+", and adding a labor category (see Labor Categories). While it is not absolutely necessary to have a labor category, it is highly desirable from a reporting perspective. This makes the sales reports more meaningful and easier to understand what type of work is being performed.
Operation
Select the labor operation from this dropdown list.
If the desired operation does not appear in the list, modify the list by clicking the ![]() button and adding a labor operation.
button and adding a labor operation.
It is not absolutely necessary to have a labor operation on a repair order but highly desirable from a reporting perspective. This makes the reports more meaningful and easier to track.
Description
This is the complete description of the labor operation.
The first line of this field is used to describe the operation in the dropdown list. The first five lines of the description are displayed.
To display the other lines, use the keyboard down arrow or the scroll buttons to the right. The complete description appears on the repair order.
Spell Check
This function is a built-in spell check for the description field.
Pay Date
This defaults to the current date and does not change unless manually edited. This is the date that the technician performing the work will receive credit for performing the work when using the Labor Summary and Labor Detail by Pay Date reports in the Reporting module.
Cost
The cost of the job is calculated based on the billed time and the hourly rate of the selected technician or the elapsed time (see below) and the hourly rate of the selected technician depending on the option selected in the Configuration module (see R.O. Options - Labor).
The cost may be overridden, and any figure entered for the cost; however, if the Calc Time function is selected, this figure may be recalculated if the Time is changed.
The cost is used to calculate the gross profit margin for the labor operation. The sales margin (the labor charge minus the cost) divided by the labor charge is the calculation for gross labor margin.
Item Number
As labor operations are added to the repair order, they are assigned a sequential number. This number may be changed in order to rearrange the order of appearance of labor operations on the repair order, both on the screen and on the printed repair order. Be careful not to duplicate item numbers.
Taxable
This item should be selected if this labor operation is to receive sales tax.
R.O. Writer calculates the sales tax based on the percentage entered for labor in the Configuration module and this operation appears under taxable labor on the sales reports.
Sublet
This box should be checked if the operation is a sublet job; i.e., labor performed outside your shop by third-party companies. Sublet labor appears as sublet charges on the sales and sublet reports.
If you are charging customers for the sublet labor, the Post AP button is available so that you can post it to Accounts Payable
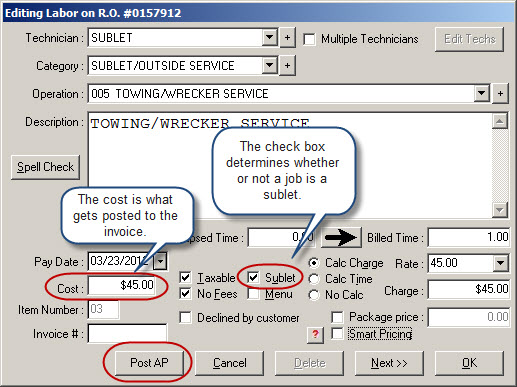
Post AP
Selecting the Post AP button allows you to enter a summary accounts payable invoice. The cost on the sublet labor is automatically entered for you and the estimate or repair order number is entered as the purchase order number.
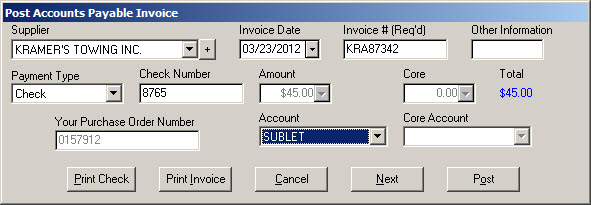
Select the supplier, date, invoice, payment type, account, etc. and click the Post button. After an invoice has been posted, you cannot delete the labor operation from the repair order or edit the fields that tie the job to the Accounts Payable invoice.
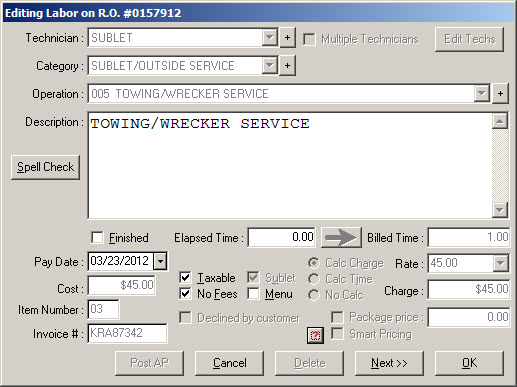
If you need to delete or edit the sublet labor, you must delete the accounts payable invoice in the Accounts Payable module under Edit Invoice first.
The Invoice # can only be edited if the Edit Inv# on Add Labor option is selected in Configuration.
No Fees
This item should be selected if it is desirable not to calculate supply charges on this labor operation (see Taxes and Fees).
Menu
This item should be selected if this operation is a menu job. Selecting menu will cause this labor operation to appear under menu sales on the Itemized Sales Report.
PST Tax and GST Tax
These options appear only if the GST/PST Taxes option is selected in the International Options Configuration setting. GST and PST are Canadian taxes .
See GST/PST on the Editing Labour Window.
Declined By Customer
This item should be selected if it is desirable to show a specific labor operation that was recommended, but declined by the customer. The complete operation description appears on the repair order, but no charges are included in the calculations (tab) or displayed on the repair order. To undecline the labor operation, uncheck the Declined By Customer checkbox.
When a labor operation is declined or undeclined, you are prompted to decline any parts associated with it.
Declined labor and parts are automatically entered into the list of Service Recommendations that open the next time you start a ticket for the customer.
Elapsed Time
This is the actual timed worked by the assigned technician. The time is recorded by using the Labor Time Clock. You can also type the time in this field.
To bill the customer for Elapsed Time, click the ![]() button to move this time to Billed Time before finishing the job.
button to move this time to Billed Time before finishing the job.
Elapsed time is used in the following sales reports:
Billed Time
This is the time used to
- Calculate the charge for the job.
- Credited to the technician for performing the operation.
This time appears as the billed time in the following reports:
Finished
Checking this box finishes the job on the ticket. If the Labor Time Clock has been activated, the time clock is stopped. The Elapsed Time field displays the time recorded since the labor time clock was started.
If the time clock is running, this option must be checked before you can finalize the repair order.
If multiple technicians are assigned to the same job, you must check this box on each sub labor row.
When checked, the number of hours for the job is no longer included in the Hours column for the ticket on the
Rate
This is the hourly rate used to calculate the cost of the job to the customer. Select one of the four predefined Labor Rates.
Charge
This is how much customer is charged for this labor operation. This value may be calculated from the billed time times the rate, if Calc Charge is selected. This value may be manually input, and the billable hours calculated if Calc Time is selected.
The charge can be marked up automatically based on different types of labor using Smart Labor Pricing.
Calc Charge
Selecting this option will calculate the charge based on the billed time and the selected labor rate. If the billed time or the labor rate changes, the charge is recalculated based on the updated information. This may be configured as the default setting (see R.O. Options - Labor).
Calc Time
Selecting this option will calculate the billed time based on the charge and the selected labor rate. If the charge or the labor rate changes, the billed time is recalculated based on the updated information. This may be configured as the default setting (see R.O. Options - Labor).
No Calc
This feature prevents the charge or the time from automatically being recalculated when using Multiple Technicians. See the section on using Multiple Technicians for more information.
Package Price
This feature only appears when using the Job-Based View.
Package price is another method of having a fixed price for all parts and labor associated with a particular job. It ensures that sales tax is properly calculated for parts sold on a job.
To use package price, select the option, and enter the price to be charged for all parts associated with this labor operation.
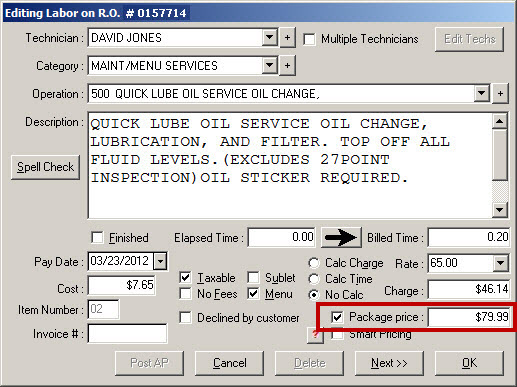
The price charged for the labor operation is now based on the package price minus the total cost of all associated parts. The billed time is not affected by this calculation.

If the total labor and parts add up to more than the package price, the labor is discounted first. Parts are only discounted if the parts total is more than the package price.
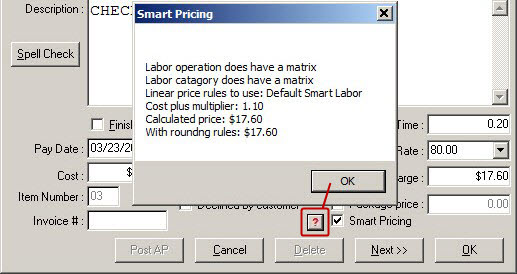
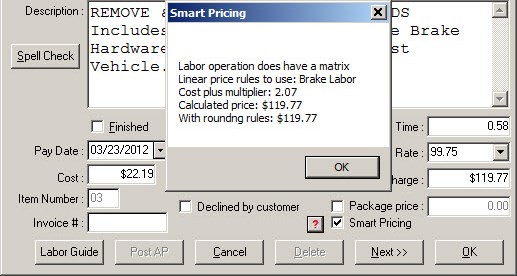
Smart Pricing
If Smart Labor Pricing is turned off in Configuration, the Smart Pricing checkbox is grayed out.
If Smart Labor Pricing is turned on and the Smart Pricing box is checked, the charge is calculated (and often marked-up) based on the smart labor matrix.
If no category or operation is selected or if the category and/or operation selected does not have its own matrix and the Smart Pricing box is checked, the charge is calculated using the default smart labor matrix.
If the category and/or labor operation has its own smart labor matrix, the charge is calculation using that matrix. The Smart Pricing box is checked.
If the Smart Pricing checkbox is checked, you can click the ![]() button to see how the price was calculated.
button to see how the price was calculated.
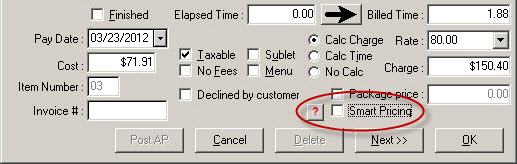
If you choose not to use smart pricing, uncheck the Smart Pricing box and the calculated charge is recalculated without the additional mark-up.
To recalculate using the smart labor pricing, select the Smart Pricing box and click the ![]() button. If the category and/or operation selected have its own matrix, that matrix is used.
button. If the category and/or operation selected have its own matrix, that matrix is used.
Override Button
Labor operations can be price-locked in Configuration. If you choose a labor operation that is locked or locked with minimum price,
- Certain fields are grayed-out and disabled
- An Override button appears at the bottom that allows you to override the price lock if you have permission
Saving Changes to the Master Record
By default, R.O. Writer saves any changes you make on the Edit Labor window to the labor operation on the estimate or repair order when you click OK. Those changes do not affect the labor operation on other tickets or the labor operation record in Configuration.
If the Allow On-the-Fly Changes to Parts and Labor Files option is selected in Configuration, you can save changes to the labor operation record.
When you click OK after making a change, the following prompt appears.
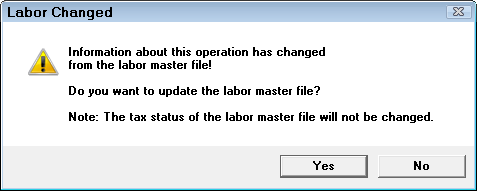
- Click Yes to permanently change the labor operation in Configuration.
- Click No to save the change to the current labor operation only.