Ticket Toolbar
When a ticket is created, a toolbar appears across the top of the ticket window.
![]()
The following table describes the buttons in the ticket toolbar.
| Button | Name | Description | ||||
|---|---|---|---|---|---|---|
|
|
Smart eJobs |
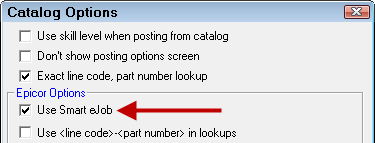
This button appears if Smart eJobs is enabled. Configuration module > Configuration menu > Repair Order > Catalog Options > Use Smart eJob option checked:
Click this button to add a Smart eJob to the ticket. Smart eCat opens to the Smart eJob tab. (Smart eCat must be enabled.) |
||||
|
|
Smart Jobs |
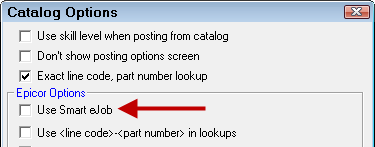
This button appears if Smart eJobs is not enabled. Configuration module > Configuration menu > Repair Order > Catalog Options > Use Smart eJob option unchecked:
Click this button to add a Smart Job directly to the open ticket. Smart eCat does not open; instead, the Smart Jobs window opens. |
||||
|
|
Labor |
Click to add a labor operation (jobs). Jobs often include parts but not always. |
||||
|
|
Part |
Click to add a part to the open estimate or repair order. The Edit Parts window opens where you can search for the part in the part number and description fields. |
||||
|
|
Kits |
Click to add a part kit to the open estimate or repair order. There is also a dropdown menu of other options.
|
||||
|
|
History |
Click to open the Local History for the customer and vehicle. |
||||
|
|
Services |
Click to see recommended Services for this vehicle. |
||||
|
|
Checklist |
Click to see the Service Checklist for this vehicle. |
||||
|
|
Fleet |
Click to open the Fleet Wizard to assign the vehicle to a fleet. This is how you create a fleet invoice. |
||||
|
|
Print RO |
Click to print a repair order. |
||||
|
|
Print Est |
Click to print an estimate. |
||||
|
|
Print WO |
Click to print a work order for the ticket. |
||||
|
|
Send Email |
This button is active only if email is set up properly in Configuration > File Menu > Email Setup. Click to send an email to this customer. You must have a valid email entered for this customer. |
||||
|
|
Est Auth |
Click to authorize the estimate or repair order. See Authorizing Estimates and Repair Orders. This button indicates if the ticket needs to be authorized (with red) or is authorized (with green). |
||||
|
|
Scheduler |
This button appears on the toolbar ONLY if Scheduler is enabled in Configuration. Click this toolbar button and Scheduler opens displaying the details of the open ticket. |
||||
|
|
Calendar |
This button does appears when Scheduler is NOT enabled in Configuration. This is the default button. Click it to open the Calendar application. |
||||
|
|
Convert |
Click to convert
|
||||
|
|
Finalize |
This button appears only on repair orders because only repair orders can be finalized. |