Entering and Editing Parts
![]()
View/Add/Edit
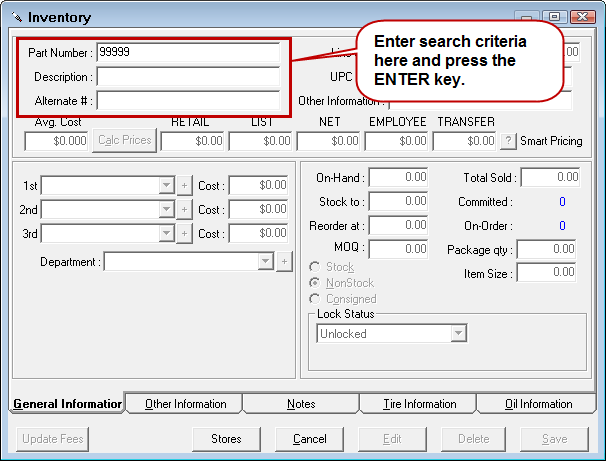
This is the recommended method for adding or editing existing parts in inventory because it allows you to search for parts in inventory before adding them. This helps you avoid entering the same part multiple times. When you click View/Add/Edit, the Inventory window opens in search mode.
For a video overview of View/Add/Edit, watch the video below. (This video was recorded using R.O. Writer 1.31.)
Inventory Entry
This is similar to View/Add/Edit but designed for those times when you need to enter multiple parts that have the same information but different part numbers. When you click Save, the part is saved but the General Information tab displays all the information from the part just entered except the part number. This way, you can type in a part number, click Save, type in another part number, click Save, and so on until all the parts are entered.
For example, when entering a list of oil filters, type the part number for the first one, enter the description, cost, supplier, parts department, etc. and click the Save button. All the information remains except the part number. You can then enter the next part number, edit any information that is different and click the Save button repeating this for every oil filter.
When you click Inventory Entry, the Inventory window opens in entry mode, which means that the Edit, Delete and Save buttons are enabled. The system does not search for parts first. When using this option, make sure that the parts you are adding have not been entered already.
NOTE: This option is often password-protected because it is designed for a special situation when you have to enter many similar parts at the same time.
Searching for Parts
When you click View/Add/Edit, the Inventory window opens in search mode, which means that
- The Edit, Delete, and Save buttons are disabled.
- You need to search for the part first.
| Search Field | Description |
|---|---|
|
Part Number |
Enter a portion of the part number. Only parts whose part number begins with the numbers entered are retrieved. |
|
Description |
Enter a portion of the description of the part. Only parts whose description begins with the numbers entered are retrieved. Make sure the Part Number field is blank when searching on description. If any characters are in the Part Number field, that information is used to search part numbers as well and may override the description search criteria. |
|
Enter a portion of the alternate number in the alternate number field. Only parts whose alternate number begins with the numbers entered are retrieved. |
The Parts List appears with the matching parts:
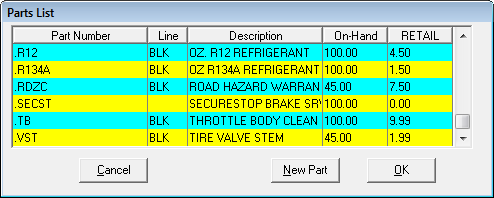
- Click on any column header to sort the list.
- Double-click on the part to open it. The Inventory window opens. Click the Edit button to edit the part.
- Click New Part to enter a new part.
Entering New Parts
You may need to enter new parts for a number of reasons and from a number of places. The basic process is as follows:
- On the Inventory window, search for the part. The Parts List opens displaying the parts in the system that have already been entered.
- If there are no matches, this window says, "No Matches Found!"
- If no matches are found or you do not see the part in the list, click the New Part button.
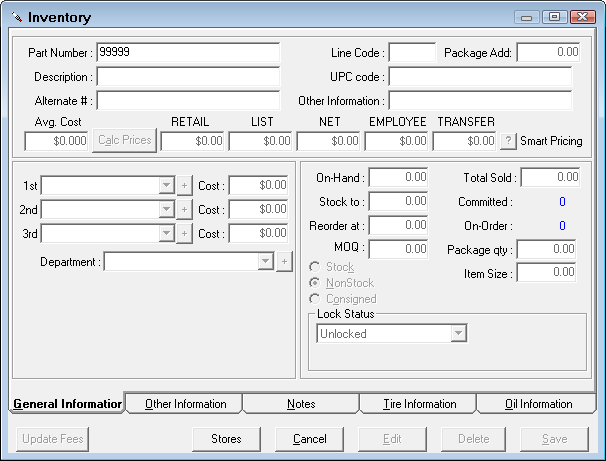
- The Inventory window opens in entry mode, which means that
- The Edit, Delete and Save buttons are enabled.
- The fields on all window are active and enabled.
- Enter the appropriate information on the Inventory Window.
- Click Save to save the inventory record in the system.
Inventory Window
The Inventory window has three main tab windows:
The following tabs are specific to parts in a tire group or oil group:
Buttons at the Bottom of the Window
These buttons appear at the bottom of the Inventory window for all tabs.
| Item | Description |
|---|---|
|
Update Fees |
You can set fees on individual part records that are different from the parts department group on the Other Information tab. Clicking this button replaces those fees with the fee information from the parts department group the part belongs to. |
|
Stores |
If you are using Central Office is used, you can search for, reviewed, and edit inventory information from other store locations. |
|
Cancel |
Click to cancel a search or close the Inventory window. |
|
Edit |
When a part is opened, its information is disabled and cannot be edited. Click this button to enable the information for editing. This button is inactive until a part is open on the window. |
|
Delete |
Click to delete a part. This button is inactive until a part is open on the window. |
|
Save |
Click to save a new part or edits to an existing part. This button is inactive until a part is open on the window. |
General Information Tab
The General Information about a specific part is broken down into Part Information, Pricing, Suppliers and Department, and Quantities.
Parts Information Section
This section contains information that describes the part. This information is used in searches to locate the part in inventory, and will be used on the repair order to describe the part.
| Field | Description |
|---|---|
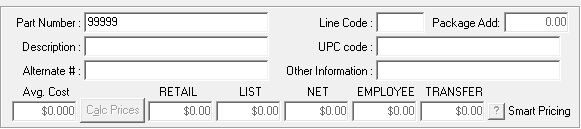
| Part Number | This is your shop’s internal number for the part. This could be the vendor’s number, or something unique to the shop. Part numbers should not be duplicated unless the line code is different. This is also the search field. |
| Description |
A verbal representation of the part. When choosing a description, keep in mind how the description appears in lists and is retrieved during searches. For instance, if you want to see all types of filters on a search, then describe all filters, oil, air, fuel, etc., beginning with "Filter", followed by the specific type such as "Filter-Oil 5W20". As a result,
For consistency and accuracy in searches, assign consistent descriptions. |
| Alternate # |
This is another means of grouping similar parts. For tires, enter the tire size here so that the part is included when searching by tire size. |
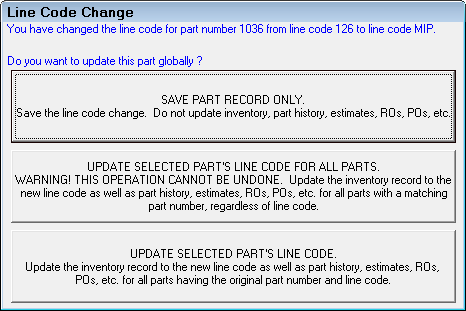
| Line Code |
This is the part manufacturer’s line code. You can use it to group parts on Inventory Reports. A line code is automatically added when posting parts from some of the online catalogs such as Epicor. You need to update these parts in History and Inventory when different line codes are added from parts catalogs. The When Changing Existing Part's Line Codes setting in PO Transfer Configuration determines how existing line codes are updated. Prompt For Action is the default, which means that when the new line codes come in, you are prompted as to what you want to do with the new line codes.
|
| Package Add | This is an amount you may want to charge per quantity for this part over the package price. This only works when the job has a package price. The package add amount will be added to the total package price. |
| UPC Code |
This is the UPC code for the part. This information is used with bar coding applications. See Adding UPC Codes to Parts and Scanning Parts Into Open Tickets . |
| Other Information | This is a 20-character field that may be used for any purpose. |
| This is the pricing information when the part is added to a repair order: | |
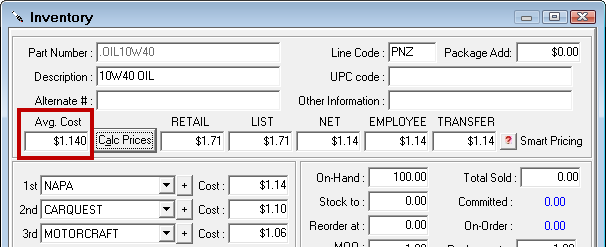
| Average Cost |
Average cost is the average cost of the part to your shop. This cost is used when the part is added to for estimates and repair orders. Average cost is based on the Item Size and the Cost from the 1st, 2nd, and 3rd suppliers.
When you first enter the part, the average cost is the cost from the 1st supplier. Over time, the average cost is updated as the part is used and ordered from the 2nd and 3rd suppliers. In addition, if the cost from the supplier is different when the part is received, the average cost is updated automatically. |
| Pricing Levels |
This is the price charged to the customer at each of the established pricing levels. Press the Calc Prices button, and the customer’s pricing at each level is calculated based on the average cost. Pricing levels may be manually adjusted, as appropriate.
|
See Non-Stock Parts Pricing for detailed information on pricing non-stock parts.
See Smart Pricing for more information on using smart pricing matrices.
Suppliers and Department Section
This section determines the pricing and ordering information for the part. Supplier information is particularly useful if you use Purchase Order Management to generate purchase orders.
| Field | Description |
|---|---|
|
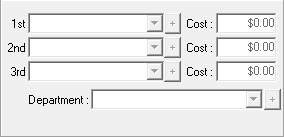
1st, 2nd, 3rd |
Select suppliers from the dropdown list. If the appropriate supplier is not in the list, press the "+" to add the supplier.
These can be updated when posting purchase orders in Purchase Order Management (in Inventory) and posting receipts in Inventory. |
|
Cost |
Enter the cost for the part for the supplier selected. The cost is updated whenever the part is received from the supplier. |
|
Department |
Assign the part to a parts department. Parts departments help you manage part pricing levels and reporting. Some sales reports show parts sales by parts department and most inventory reports can be grouped or filtered by department. |
Stock Information Section
This area displays quantity, ordering, and stock vs. non-stock information.
If the Apply Ordering Rules Based on Package Qty and Minimum Order Qty option is selected in the PO Transfer and Other Parts Options Configuration setting, then Purchase Order Management looks at these values when creating purchase order - either manually or automatically.
| Field | Description |
|---|---|
|
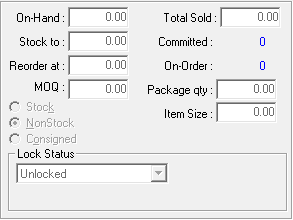
On-Hand |
The quantity currently in Inventory; it includes parts on the shelf and parts committed on open repair orders. |
|
Stock To |
The maximum quantity to stock to (keep on hand) at any time. When the on hand quantity |
|
Reorder At |
When the part hits this quantity, it triggers a replenishment order in Purchase Order Management - manually or automatically. |
|
MOQ |
The minimum order quantity that any replenishment order in Purchase Order Management has to have. |
|
Total Sold |
The quantity sold since the part was added to Inventory. The date the part was added is listed on the Other Information Tab. |
|
Committed |
The quantity committed on open repair orders. |
|
On-Order |
The quantity on purchase orders generated by Purchase Order Management. |
|
Package Quantity |
The quantity of the package if you order this item in a case or package. |
|
Item Size |
The number of units contained within the Package Quantity; what would be considered an "each". For example, if the part is a spark plug that you order in boxes of four, the Package Quantity is 1 (for one box) and the Item Size is 4 (for four spark plugs in that box).
|
|
Part Inventory Type |
|
|
Stock |
Select if this is a part that is generally kept in the shop |
|
Non-stock |
Select if this is a part that is generally ordered and used on a specific vehicle |
|
Consigned |
Select if this is a part that is in the shop that is purchased from the supplier as it is used |
Lock Status
Use this dropdown list to lock the current pricing for the part when it is added to estimates and repair orders.
| Price Lock Status | Description |
|---|---|
|
Keeps the part unlocked. There is no change to the pricing fields and all fields can be edited. This is the default status; parts remain unlocked until you lock them - either individually or globally. |
|
|
Locks the price and specific fields for the part. |
|
|
Locks the same fields as the Locked status except for the Price/Unit field, which can be edited but not to an amount lower than the minimum price. |
Other Information Tab
This tab contains various information about the part, including its sales history, and also provides the capability to associate the part with a specific labor operation.
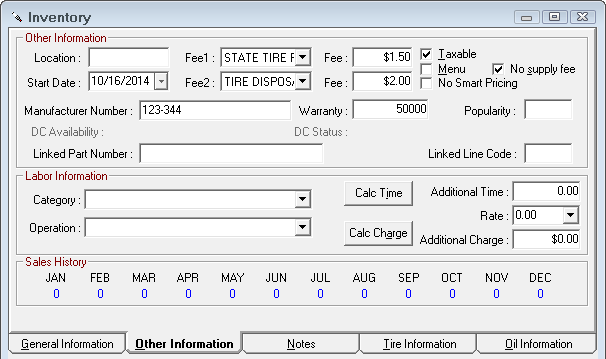
Other Information Section
| Field | Description |
|---|---|
|
Location |
This is the part’s location in the shop. If a warehousing system has been established for parts, this could be the bin location where the part is normally stored. Inventory reports can be grouped by the location. |
|
This is the date that the part was added to the inventory. |
|
|
Fee 2/Fee |
Two optional fees, such as a disposal fee, environmental fee or a core charge. Select the type of fee from the dropdown list and enter the appropriate amount in the Fee field.
If the fee selected is a percentage of the part price, the amount of the fee is automatically calculated from the retail price. The selected fees and amounts are included on the repair order whenever this part is added. |
|
Select this item if the part is to be included on estimates and repair orders as a Menu Jobs. Menu jobs have no price; instead, the price is charged from the labor alone. The part prints on the repair order only if the Print Menu Parts option is selected Configuration. |
|
|
When checked, the price can be updated only using the Calc prices button or manually entering a price. When this box is checked, the Smart Pricing option is grayed out. When the Calc Prices button is selected, the prices will be calculated using either the default CPM matrix or if a department is selected, the department CPM matrix. |
|
|
This item should be selected if sales tax is to be collected on the sale of this part. |
|
|
No Supply Fee |
Selecting this option stops Supply Charges (Shop Fees) from being calculated for the price of this part. |
|
The manufacturer's number. |
|
|
The manufacturer's or retailer's warranty number. For tires, the warranty number is considered part of the tire information. This is most often the number of miles in the warranty. |
|
|
Popularity |
The popularity of the part. |
|
Displays DC availability. |
|
|
DC Status |
Displays DC status. |
|
If another part is linked to this part, these fields display the part number and line code of the linked part. |

Labor Information Section
In this section, you can add a labor operation to a part. Each time the part is added to the repair order, the labor operation is added automatically as well.
You can mark up labor charges based on a labor category and/or operation by using smart labor pricing instead.
Time and charge is for one unit. If more than one unit of the part is added, the number of units added is multiplied by the time and the charge.
| Field | Description |
|---|---|
|
Category |
Select the labor category first; labor operations are inside categories. |
|
Operation |
This is the labor operation associated with the part. Each time this part is added to a repair order, the labor operation is added automatically. |
|
If more time is required than is already configured for the selected labor operation, additional time may be added. The amount of time entered will be added to the already configured time. To calculate the additional charge based on the additional time, enter the rate of 0.00 and press the Calc Charge button. |
|
|
Rate |
This is the labor rate that will be used to calculate the additional charge to be incurred, or to calculate the additional time to be billed. |
|
If the job is more costly than already configured for the selected labor operation, an additional charge may be added. The charge entered will be added to the charge already configured for the labor operation. To calculate the additional time based on the additional charge, enter the rate of 0.00 and press the Calc Time button. |
Sales History Section
The sales history displays the quantity sold for the current month and the previous 11 months. The sales quantities are revolving, with the current month’s figures cleared at the beginning of the month.
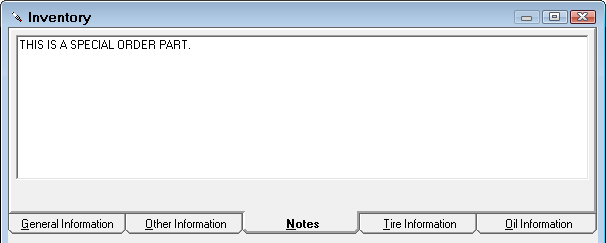
Notes Tab
This is a section that is provided to add additional notes regarding the part.
Tire Information Tab
This tab is blank unless the part is included in the tire group. If the part is in a tire group, this tab includes active fields where you can enter tire information.
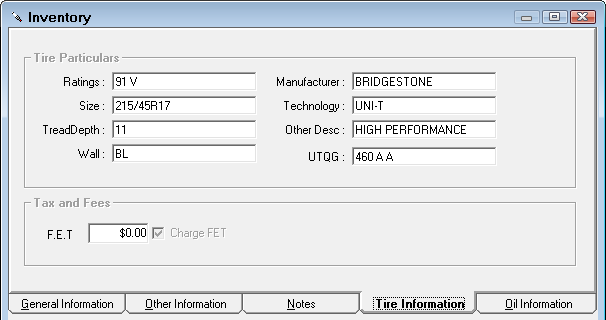
When this part is added to an estimate or repair order, a Tire Info Button appears on the Edit Parts window. Click it to see the information entered here.
For information about this window, see Entering Tire Information on Parts.
Oil Information Tab
This tab is blank unless the part is included in an oil group. If the part is in an oil group, this tab includes active fields where you can enter oil information.
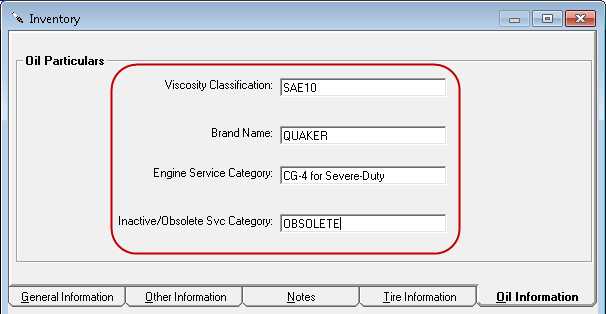
When this part is added to an estimate or repair order, a Oil Info button appears on the Edit Parts window. Click it to see the information entered here.
For information about this window, see Adding Oil Information to Oil Group Parts.